🧸 Crochet Sunflower Wall Pocket Organizer — Free Amigurumi-Style Pattern
Crochet Home Décor · Wall Organizer · Intermediate-Friendly
📖 Introduction
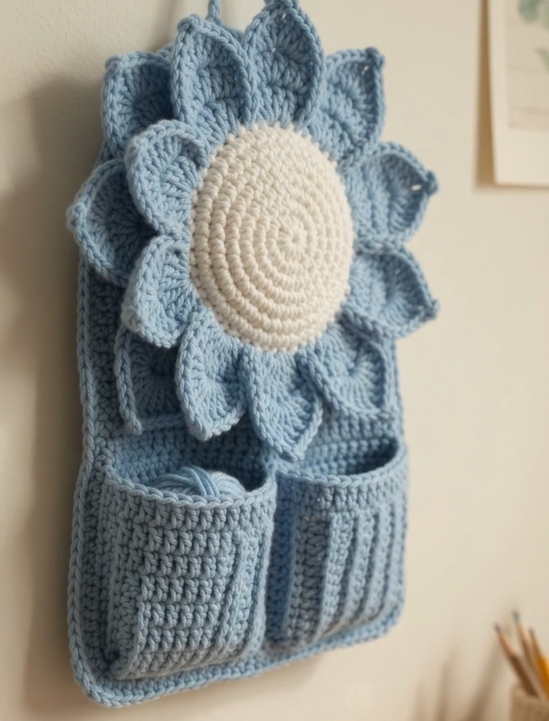
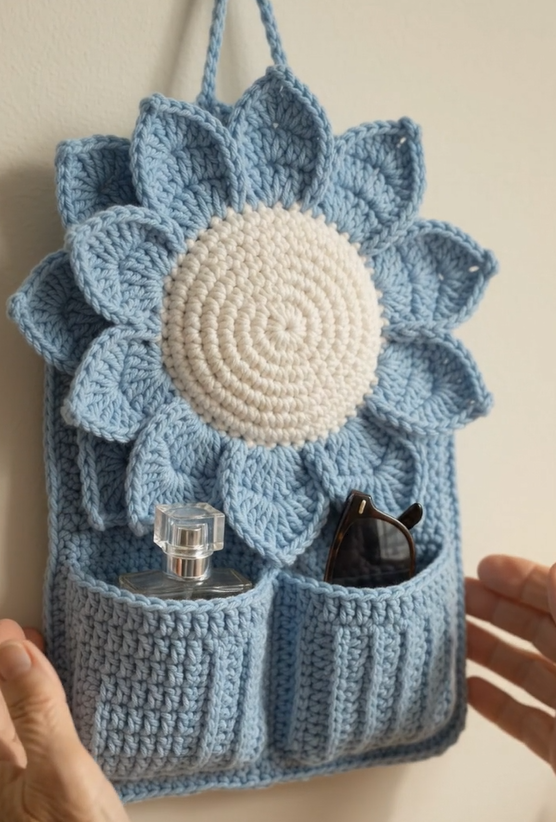
This crochet sunflower wall pocket organizer turns a single hanging piece into a real catch-all: a ring of layered petals frames a plush, spiral-textured sunflower center, and two ribbed pockets underneath hold everything from a phone and notebook to hair ties and mail. It reads as a statement piece the moment it’s hung — the kind of project that gets asked about the second a visitor walks past your entryway.
What makes this pattern worth making over a plain fabric pocket organizer is the sculptural petal layer. Rather than a flat appliqué, the petals are worked with enough body to stand slightly forward off the backing, so the sunflower has real dimension whether it’s viewed straight-on or from the side. The contrast between the dense, ribbed pocket bands and the soft, rounded petals gives the whole piece a tactile quality that a printed or sewn version can’t match.
Hang it by a bedroom door for scarves and gloves, mount it in a home office for pens and sticky notes, use it in a nursery for pacifiers and burp cloths, or make a smaller version as a fixed accessory for a craft fair table — a sunflower motif this size reads well as a seasonal spring or summer piece, but the muted colorway shown here keeps it wearing well as year-round décor rather than looking strictly seasonal.
The most distinctive details to nail are the two-tier petals — a full outer ring layered slightly behind a shorter inner ring so the flower has depth instead of looking like a single flat rosette — and the tightly spiraled, no-visible-seam center disc worked in single crochet so it lies perfectly flat against the petals. Below the flower, the two lower pockets are worked in back-loop-only rows for a visibly ribbed, structured texture that holds its shape even when loaded with a phone.
Personalize it freely: swap the dusty blue for mustard and brown for a classic sunflower palette, work the center in butter yellow instead of cream, size the whole piece up for a three-pocket mail sorter, or drop the pockets entirely and hang just the flower head as wall art. The core techniques — magic ring discs, layered petal rounds, and back-loop rib pockets — stay identical no matter which colorway or size you choose.
If you like this post, please share it . Thank you for supporting this site!
🔍 C. Main Pattern Overview
This organizer is built in four modular pieces that are then assembled: a rectangular backing panel, a two-tier sunflower (petal ring + center disc), a ribbed double pocket panel, and a hanging loop. The backing panel is worked first and left as the structural foundation; the sunflower is crocheted separately and sewn on top so its layered petals sit slightly proud of the surface; the pocket panel is worked as one continuous ribbed piece and stitched onto the lower two-thirds of the backing, then divided into two compartments with a single center seam.
Because every piece is worked flat or in the round separately and joined by sewing, this is a forgiving project to pick up and put down — you can crochet the sunflower one evening and the pockets the next without losing your place in a single long, uninterrupted piece.
🎯 D. Skill Level
Intermediate. Every individual stitch used is beginner-friendly, but the pattern assumes comfort with reading a multi-piece pattern, working consistent tension across separate components, and sewing pieces together neatly and invisibly.
Techniques used:
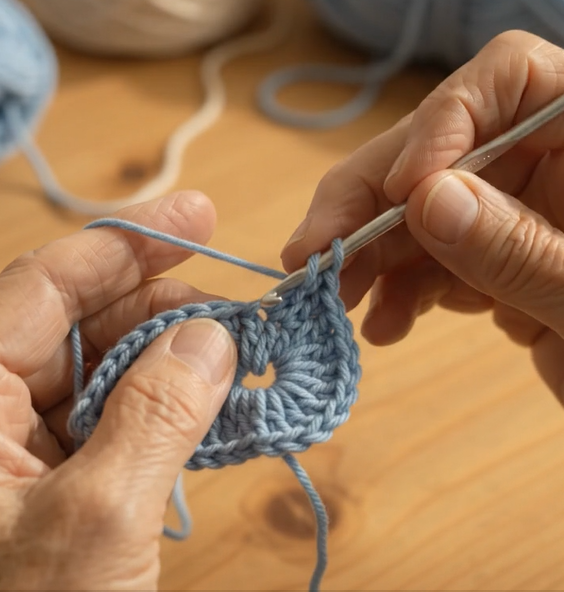
- Magic ring (adjustable ring) starts
- Working in continuous (unjoined) spiral rounds
- Working in joined, turned rounds for the petal layers
- Back-loop-only rows for ribbed pocket texture
- Front post/back post-style petal shaping (worked as elongated double crochet clusters)
- Invisible decrease
- Color changes with tail management
- Whip-stitch and ladder-stitch seaming for assembly
- Blocking a multi-layer piece so it lies flat against a wall
📏 E. Finished Size
- Height (including hanging loop): approximately 46 cm / 18 in
- Width: approximately 30 cm / 12 in
- Flower head diameter: approximately 20 cm / 8 in
- Pocket depth: approximately 10 cm / 4 in each
Size changes with yarn weight, hook size, and stitch tension: moving to a bulkier yarn and larger hook scales the whole piece up proportionally, while working with a thinner cotton and smaller hook produces a more delicate, tighter-stitched version suited to holding lighter items. Stuffing density in the center disc and petal tips also affects final dimension slightly — firmer stuffing rounds out the shapes and shortens them a touch, while lighter stuffing lets them relax and lie flatter.
🧮 F. Gauge
Exact gauge matching is less important here than consistent, even tension — the finished proportions of the flower and pockets matter far more than hitting a swatch measurement exactly, since this is a flat décor piece rather than a fitted item.
Approximate gauge: 14 sts x 16 rows = 10 cm / 4 in square in single crochet, using a 4.5 mm hook and worsted weight (US #4) yarn. Work a small swatch first and adjust your hook size up or down until your fabric feels dense enough to hold its shape without stiffening.
🧶 G. Required Yarn Amounts
| Color | Used For | Approximate Amount |
|---|---|---|
| Dusty Blue (Main Color, MC) | Backing panel, petals, pockets | ~180 g / 320 m |
| Cream/Ivory (Contrast Color, CC) | Sunflower center disc | ~25 g / 45 m |
| Coordinating embroidery thread | Optional center detailing | small amount, under 5 g |
| Polyester fiberfill | Petal tips and center disc stuffing | ~20 g total |
Total project estimate: approximately 210 g of worsted weight yarn across two colors. Buy slightly more than the estimate if you’re new to gauge-matching, since tension differences can shift usage by 10–15%.
🧰 H. Materials
- 4.5 mm (US G/7) crochet hook
- Worsted weight (US #4 / Aran) yarn in dusty blue and cream
- Polyester fiberfill stuffing
- Yarn needle for sewing seams and weaving in ends
- Stitch markers (at least 2, for tracking round starts and petal placement)
- Scissors
- Straight pins, for positioning the sunflower and pocket panel before sewing
- Optional: a wall hook, nail, or small dowel for hanging the finished piece
⚠️ This project uses small stuffing tufts inside the petals and center disc — keep away from young children and pets if any small pieces could be pulled loose, and check seams periodically for wear.
🔤 I. Abbreviations — US Terms
| Abbreviation | Meaning |
|---|---|
| MR | Magic ring |
| ch | Chain |
| sc | Single crochet |
| hdc | Half double crochet |
| dc | Double crochet |
| tr | Treble crochet |
| inc | Increase (2 sc in same stitch) |
| dec | Invisible decrease |
| BLO | Back loop only |
| sl st | Slip stitch |
| st(s) | Stitch(es) |
| rnd(s) | Round(s) |
| sp | Space |
| ( ) | Repeat instructions inside parentheses the stated number of times |
| [ ] | Total stitch count at end of round/row |
📝 J. Notes Before You Begin
- The backing panel and pocket panel are worked in turned rows, while the sunflower petal ring and center disc are worked in joined, turned rounds rather than a continuous spiral — this keeps the layered petal edges crisp instead of spiraling out of alignment.
- Use a stitch marker in the first stitch of each round on the sunflower pieces so you always know where a new round begins.
- Stuff the center disc lightly and evenly as you crochet the final 1–2 rounds, before closing — stuffing after closing is much harder with a flat disc shape.
- Fasten off and leave a long tail (at least 25 cm / 10 in) after every component that will be sewn to another piece; this saves you from joining in a fresh strand later.
- When changing from Main Color to Contrast Color, drop the working color, pick up the new color on the final yarn-over of the last stitch in the old color, and carry the dropped color loosely up the wrong side if you’ll need it again within a few rounds.
<!– AD SLOT: post-materials –>
📌 Want to save this pattern for your next crochet night? Pin it now or bookmark this page — you’ll want the full instructions on hand when you sit down with your hooks.
🪡 K. Complete Pattern
🧺 Backing Panel (Make 1)
This is the structural rectangle that the sunflower and pockets are sewn onto.
Materials: MC (dusty blue)
Ch 31.
Row 1: sc in 2nd ch from hook and in each ch across. (30)
Rows 2–34: ch 1, turn, sc in each st across. (30)
Fasten off, leaving a 30 cm / 12 in tail for seaming the sides later if desired, or weave in ends if the pocket panel will cover the seam allowance.
💐 Sunflower Center Disc (Make 1)
Materials: CC (cream/ivory)
Rnd 1: MR, ch 1 (does not count as st), 6 sc in ring. Join with sl st to first st. (6)
Rnd 2: ch 1, inc in each st around. Join. (12)
Rnd 3: ch 1, (sc, inc) x6. Join. (18)
Rnd 4: ch 1, (sc in next 2 sts, inc) x6. Join. (24)
Rnd 5: ch 1, (sc in next 3 sts, inc) x6. Join. (30)
Rnd 6: ch 1, (sc in next 4 sts, inc) x6. Join. (36)
Rnd 7: ch 1, sc in BLO of each st around. Join. (36)
Rnd 8: ch 1, sc in each st around. Join. (36)
Add a light, even layer of stuffing across the disc now, before closing.
Rnd 9: ch 1, (sc in next 4 sts, dec) x6. Join. (30)
Fasten off, leaving a 25 cm / 10 in tail for sewing to the petal ring.
💡 Working Rnd 7 in back loops only creates a subtle ridge that reads as a natural transition line between the flat face of the disc and its slightly domed edge — a small detail that makes the center look genuinely dimensional rather than like a flat circle glued on top.
🌼 Outer Petal Ring (Make 1)
Worked as one continuous ring of 12 individual petals, joined round.
Materials: MC (dusty blue)
Ch 4, join with sl st to form a ring.
Rnd 1 (base ring): ch 1, 24 sc into ring. Join with sl st to first st. (24)
Each petal is now worked individually across 2 base stitches, turning at the tip of every petal.
Petal (repeat 12 times around Rnd 1):
Petal Row 1: ch 2, work into next 2 sts of base ring: (hdc, dc, tr, tr, dc, hdc) all into the ch-2 space created — effectively building one elongated petal shape across the 2-stitch base. Sl st into the next base stitch to anchor and begin the following petal.
Design note: the exact stitch count inside each petal is an original design choice for this pattern rather than a visually verified detail from any reference image — if your petals feel too short or too narrow for your yarn weight, add one extra dc into the center of the petal for more length.
Continue around until all 12 petals are complete. Fasten off, leaving a 25 cm / 10 in tail.
🌻 Inner Petal Ring (Make 1)
A second, shorter ring of 10 petals that layers on top of the outer ring for visible depth.
Materials: MC (dusty blue)
Ch 4, join with sl st to form a ring.
Rnd 1 (base ring): ch 1, 20 sc into ring. Join. (20)
Petal (repeat 10 times around Rnd 1):
Petal Row 1: ch 2, work into next 2 sts of base ring: (hdc, dc, dc, hdc) all into the ch-2 space. Sl st into next base stitch to anchor.
Fasten off, leaving a 25 cm / 10 in tail.
🧵 Using one fewer petal and one fewer stitch per petal on the inner ring than the outer ring is what creates the staggered, layered look — the inner petals sit shorter and slightly offset from the outer ones once assembled, rather than lining up edge-to-edge.
🧵 Hanging Loop (Make 1)
Materials: MC (dusty blue)
Ch 40. Sl st into 2nd ch from hook and in each ch across to form a sturdy corded loop. Fasten off, leaving 15 cm / 6 in tails on each end for attaching to the top corners of the backing panel.
👝 Pocket Panel (Make 1)
Worked as one wide ribbed panel, then divided into two compartments during assembly.
Materials: MC (dusty blue)
Ch 31.
Row 1: sc in 2nd ch from hook and in each ch across. (30)
Rows 2–20: ch 1, turn, sc in BLO of each st across. (30)
Fasten off, leaving a 30 cm / 12 in tail for seaming.
⚠️ Working every row in back loops only (not just alternating rows) is what produces the deep horizontal ribbing seen on the finished pockets — don’t switch to full-stitch rows partway through, or the ribbing texture will look inconsistent between the top and bottom of the panel.
🎨 L. Styling / Assembly / Stability / Final Shaping
Recommended assembly order:
- Block the backing panel and pocket panel lightly so both lie flat and square before sewing — pin each to a blocking mat, spritz with water, and let dry fully.
- Position the pocket panel across the lower two-thirds of the backing panel, leaving roughly the top third of the backing exposed for the sunflower. Pin along the two side edges and the bottom edge, leaving the top edge of the pocket panel open.
- Whip-stitch the pocket panel to the backing along both sides and the bottom, working through both layers. Leave the top open so items can be slipped in.
- Divide the pocket panel into two compartments by sewing a single vertical seam down the center of the panel, from the top opening to the bottom seam, through both the pocket panel and backing panel.
- Assemble the sunflower: center the inner petal ring on top of the outer petal ring so the inner petals sit staggered between the outer petals, and tack them together at 4–5 points around the ring with a few small stitches. Center the stuffed cream disc on top of both petal rings and sew it down around its entire outer edge, catching a few strands of the petal ring beneath it as you go.
- Attach the completed sunflower to the top portion of the backing panel, positioning it so the lower edge of the petals just overlaps the top opening of the pockets. Sew around the back of the outer petal ring at 6–8 evenly spaced points, keeping stitches hidden on the reverse side.
- Attach the hanging loop to the two top corners of the backing panel, sewing each end securely through several layers for strength since the loop will bear the full weight of the loaded organizer.
- Weave in all remaining ends on the reverse side.
Stability notes: Because this piece hangs fully loaded with everyday items, reinforce the hanging loop attachment points with a few extra passes of yarn, and check that the pocket-panel seams are worked through both layers rather than just the front — a seam caught only on the front pocket layer will stretch and eventually separate under weight.
Symmetry check: Before sewing the sunflower down permanently, lay the whole piece flat and confirm the flower is centered left-to-right and that both pockets look even in width and depth. Small asymmetries are far easier to correct with pins removed and repositioned than after the final stitches are set.
✅ Final Shaping / Finishing Checklist
- ✅ Backing and pocket panels blocked flat and square
- ✅ Pocket panel seamed through both layers on both sides and the bottom
- ✅ Center divider seam creates two even, equally deep compartments
- ✅ Inner and outer petal rings staggered, not stacked edge-to-edge
- ✅ Center disc stuffed evenly with no lumps or flat spots
- ✅ Sunflower centered and overlapping the top edge of the pockets
- ✅ Hanging loop reinforced at both attachment points
- ✅ All yarn tails woven in and trimmed on the reverse side
- ✅ Piece hangs flat against the wall with no petal curling forward excessively
💡 Helpful Crochet Tips
- 💡 Work the center disc’s final decrease round a touch more snugly than the rest of the disc — a slightly tighter closing round keeps the stuffing from peeking through at the very center.
- 💡 Pin both petal rings to a foam blocking board and steam-block them lightly before assembly; this relaxes any curling at the petal tips so they sit flat once sewn down.
- 💡 Use a contrasting scrap-yarn stitch marker (not a metal ring marker) in the first stitch of every petal round — it’s easier to spot at a glance when you’re counting 10 or 12 petals around.
- 💡 Sew the sunflower on before the hanging loop, not after — it’s much easier to adjust the flower’s position while the top corners of the backing are still free of the loop’s stitching.
- 💡 If your pocket panel ribbing looks uneven, check that you’re consistently working into the back loop and not accidentally catching both loops on a few stitches — one missed BLO row is usually the culprit.
- 💡 Test the loaded weight before considering the piece finished: hang it temporarily with a phone and a small notebook in each pocket to confirm the seams and loop hold before you do the final end-weaving.
- 💡 For crisper petal tips, work the last stitch of each petal (the second hdc) slightly tighter than the rest of the petal — this closes the tip neatly instead of leaving a small gap.
- 💡 Keep your MC and CC balls on opposite sides of your lap or workspace while making the center disc — it prevents the two strands from tangling during the single color change.
🧼 Care Instructions
Hand-wash only, using cool water and a mild detergent — the multi-layer sunflower and stuffed center disc can lose their shape in a machine wash or dryer. Lay flat to dry on a towel, gently reshaping the petals and reforming the round center disc while damp. Avoid wringing or twisting the piece, which can distort the layered petals.
Because the dusty blue and cream yarns are both light-to-mid tone in this colorway, colorfastness is generally not a major concern, but if you substitute a much darker main color against the cream center, wash the piece separately the first time in case of any dye transfer. Store away from prolonged direct sunlight when not on display, since bright, sustained UV exposure can fade saturated yarn colors unevenly over time — the petals, being the most exposed part of the piece, will show fading first.
Closing
However you make it, this sunflower organizer earns its wall space by doing double duty — decorative on its own, genuinely useful once it’s holding your everyday odds and ends. Swap the palette for a true sunflower yellow-and-brown, size it up for a three-pocket version by the front door, or make a mini single-pocket variant as a gift tag alternative for a housewarming present. However you customize it, we’d love to see your finished piece — tag your version so we can share it with the rest of the community.
Share the Love
Made your own version of this sunflower organizer? Save this pattern for later, share it with a crochet friend who loves a good wall-hanging project, and tag us in your finished photos — we genuinely love seeing the colorway choices people land on.
Suggested categories: Amigurumi & 3D Crochet, Home Décor, Wall Hangings, Beginner-to-Intermediate Patterns
Suggested tags: crochet sunflower, wall pocket organizer, crochet home organizer, sunflower crochet pattern, crochet wall hanging, free crochet pattern, crochet pocket organizer, amigurumi sunflower, crochet flower décor, hanging organizer pattern, crochet for beginners intermediate, worsted weight crochet project, back loop crochet texture, crochet gift idea
Comment invitation: Which colorway are you picturing for your version — the true sunflower yellow-and-brown, or something that matches your own space more like this dusty blue? Drop it in the comments; it’s always fun to see how differently the same petal shape reads in a different palette.
You Might Also Like:
- Crochet Daisy Chain Wall Pocket Organizer
- Crochet Rose Bouquet Hanging Catch-All
- Mini Sunflower Coasters, Set of 4
- Crochet Sunflower Plant Pot Cozy
- Layered Flower Wreath Wall Hanging
📌 A print-friendly PDF version of this pattern can be made available through your site’s print plugin for readers who prefer an offline copy. <!– AD SLOT: pre-faq –>
❓ FAQ
Can I use a different yarn weight for this pattern? Yes — moving to a DK weight with a smaller hook (around 3.5 mm) produces a daintier, more delicate version, while a chunky yarn and larger hook (6 mm or up) makes a bold, oversized statement piece. Just expect the finished measurements and yarn amounts above to scale accordingly.
How much yarn do I actually need for the sunflower yellow-and-brown version? Follow the same amounts listed under Required Yarn Amounts, simply swapping dusty blue for your main color (brown or green, depending on whether you want a stem/leaf detail) and cream for a true butter or golden yellow for the center — the yardage needed doesn’t change with color, only with yarn weight.
Is this pattern safe for a nursery? The stuffed center disc and small stitch details make this best suited to a spot out of a young child’s direct reach rather than inside a crib or play area, given the small parts and stuffing involved.
My petals are curling forward instead of lying flat — what did I do wrong? This is almost always a tension or blocking issue rather than a stitch-count error. Try steam-blocking the petal rings pinned flat before assembly, and check that your petal stitches aren’t worked unusually tightly compared to the rest of the piece.
Can I make this without the pockets, just as a flower wall hanging? Yes — skip the Pocket Panel section entirely and attach the hanging loop directly to the top of a smaller square backing panel behind the sunflower.
What hook size should I use if I’m a tight crocheter? If your gauge swatch comes out noticeably smaller than 14 sts x 16 rows per 10 cm using a 4.5 mm hook, size up to a 5.0 mm hook rather than fighting your natural tension — a relaxed, even fabric matters more here than matching the hook size exactly.
How do I attach the pockets so they don’t sag over time? Seam through both the pocket panel and the backing panel together, not just the front layer of the pocket — this is covered in the Assembly section — and reinforce the top corners of the pocket opening with a few extra stitches, since that’s the point that takes the most stress when items are removed and replaced.