Crochet Santa Suit Star Lovey — A Cozy Holiday Security Blanket Pattern
Amigurumi-Adjacent Pattern · Holiday Décor · Baby Gift · Beginner-to-Easy
📖 Introduction
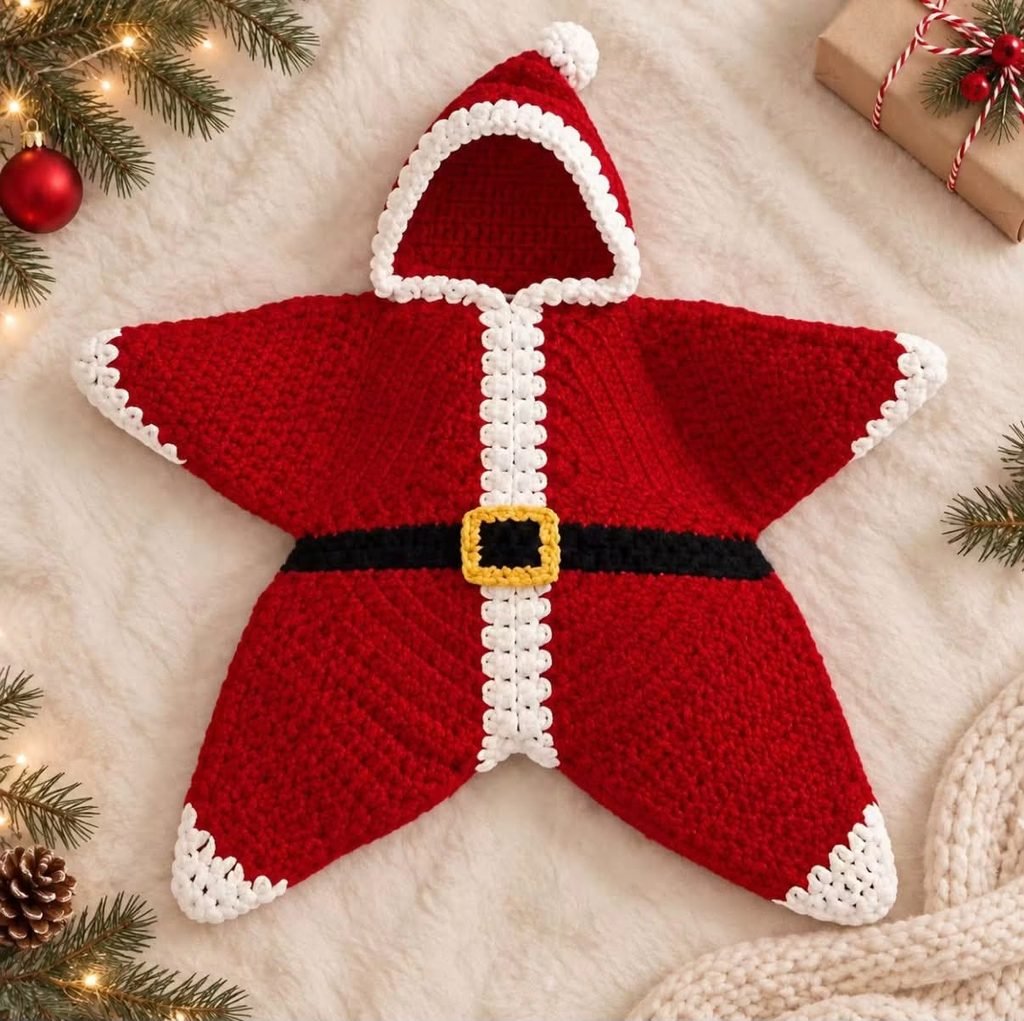
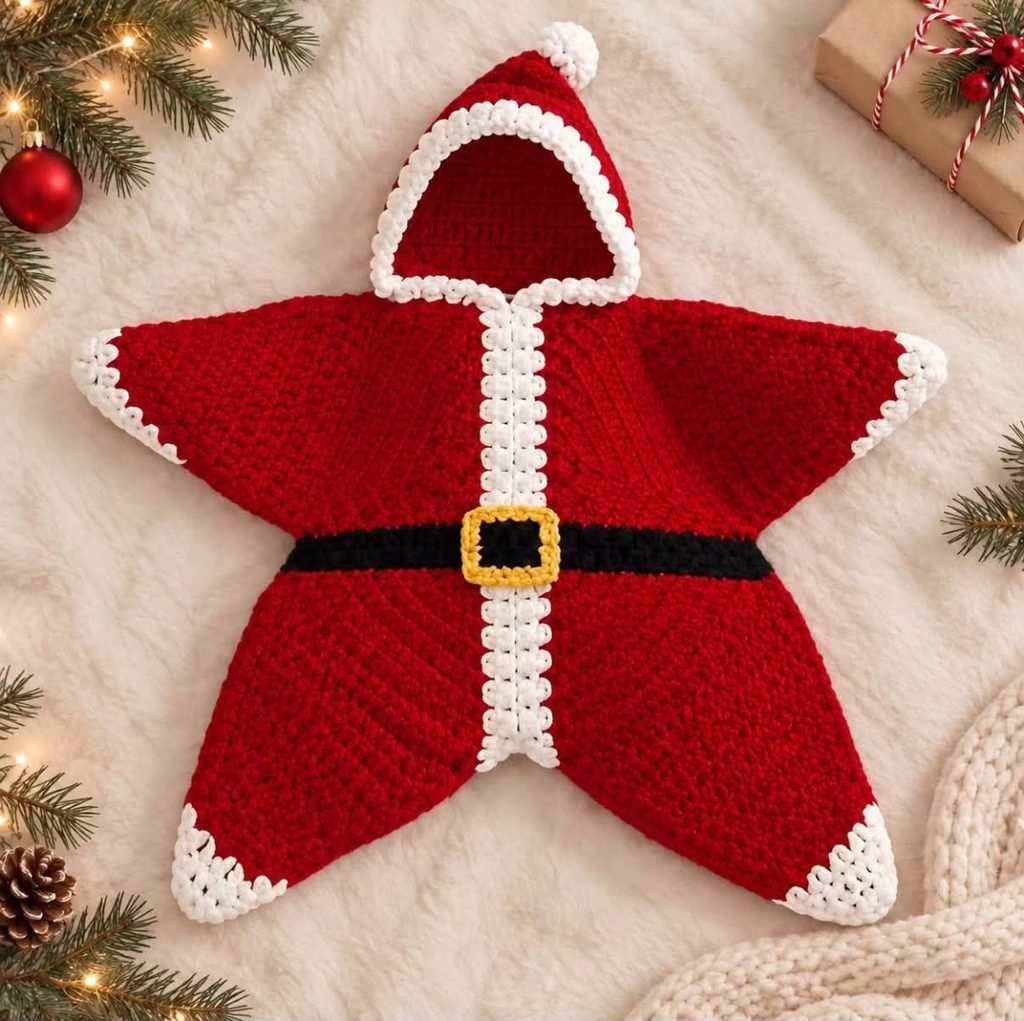
A crochet Santa suit star lovey turns the classic five-point star security blanket into a tiny, wearable-looking holiday keepsake — complete with a fur-trimmed hood, a stitched center “zipper,” and a buckled belt sitting right at the star’s middle. Instead of a plain star shape, this design borrows the silhouette of a child’s Santa costume: red as the main color, a soft white trim ringing the hood opening, a fluffy pom-pom at the tip, and a black-and-gold belt appliqué anchoring the whole piece visually and physically at the center.
Star loveys are popular for a reason — they lie flat, they’re satisfying to hold in one small fist, and the five points give a baby several soft “corners” to grip and mouth. Turning that familiar shape into a Santa suit makes it a natural pick for a first Christmas gift, a hospital-bag add-on for a December due date, a stocking stuffer for a newborn, or a keepsake piece for holiday photos. It also sells well as a seasonal item at craft fairs and in handmade shops, since it reads instantly as “Christmas” without needing an actual Santa figure attached.
What makes this particular design recognizable is the interplay of texture and detail rather than complexity: a densely stitched red star body, a contrasting white crochet trim that mimics faux-fur piping around the hood, a single snowy pom-pom at the peak, a narrow stitched line running down the front center that reads as a coat zipper, and a compact black belt with a golden buckle sitting just below the collar. None of these elements requires advanced technique — they’re achieved through color changes, surface slip stitches, and a couple of small appliqués — which keeps the project realistic for someone who has finished a handful of amigurumi or granny-square projects.
This pattern is easy to make your own. Swap the red for hunter green or plaid-inspired stripes for a non-Santa holiday lovey, size the star up for a throw-sized blanket, size it down for a stroller-clip toy, or leave off the belt and hood trim entirely for a simpler all-red star. The pom-pom can be swapped for a small crocheted bobble if you’d rather avoid loose fibers near a baby’s face.
Below you’ll find the complete crochet Santa suit pattern: gauge, materials, abbreviations, and full round-by-round instructions for the star body, the hood, the pom-pom, the zipper trim, and the belt-and-buckle appliqué, followed by assembly, finishing, and troubleshooting tips.
Affiliate Disclosure: This post may contain affiliate links. If you purchase through one of these links, I may earn a small commission at no extra cost to you. Thank you for supporting this site.
🔍 C. Main Pattern Overview
This lovey is built in five stages, worked in this order:
- Star Body — a flat, five-pointed star worked in joined rounds from the center outward, in red.
- Hood — a small folded triangle worked separately in red, trimmed in white, and sewn over one point of the star so it stands up off the surface.
- Pom-Pom — a classic wrapped pom-pom (or crocheted alternative) attached to the hood tip.
- Zipper Trim — a line of surface slip stitches in white or cream worked down the front center of the star, from the hood opening to the star’s bottom point.
- Belt & Buckle — a short flat strip in black with a small gold square appliqué, sewn across the star just below the hood.
Each stage is fully self-contained, so you can complete the star body, set it aside, and batch the smaller pieces (hood, pom-pom, belt, buckle) in a single sitting before final assembly.
📌 Want to save this for later? Pin this pattern or bookmark this page — the full round-by-round instructions are below.
🎯 D. Skill Level
Skill Level: Easy (Beginner-Friendly with One Intermediate Step)
The star body itself uses only stitches a beginner crocheter already knows. The hood and finishing touches introduce a few slightly more involved techniques, which is why this pattern sits at “easy” rather than “beginner”:
- Magic ring starts
- Single crochet (sc) and half double crochet (hdc)
- Corner increases worked at five marked points
- Color changes (red to white)
- Surface slip stitch (for the zipper line) — the one genuinely new skill for most beginners
- Simple appliqué shaping and sewing (belt and buckle)
- Basic pom-pom wrapping
If you’ve never worked a surface slip stitch before, practice it on a scrap swatch first — it’s simply slip-stitching into the front loops of an existing piece with a new strand, and it becomes intuitive within a few stitches.
📏 E. Finished Size
- Point to point (across the star, tip to tip through the center): approximately 30 cm / 12 in
- Center to single point (radius): approximately 15 cm / 6 in
- Hood height (folded, from base to tip): approximately 7 cm / 2.75 in
- Belt width: approximately 2.5 cm / 1 in
What changes the size:
- Yarn weight — moving from worsted (medium, #4) to bulky (#5) yarn with a larger hook increases the finished star by roughly 20–25%.
- Hook size — a larger hook with the same yarn loosens the fabric and enlarges the star; a smaller hook tightens and shrinks it.
- Number of rounds — adding 1–2 extra rounds to the star body before beginning the point extensions makes a noticeably larger lovey, useful if you want a blanket-style piece rather than a hand-sized toy.
- Tension — consistently tight tension produces a firmer, slightly smaller star with more defined points; looser tension produces a softer, larger, drapier star.
🧮 F. Gauge
Gauge is not critical for this project the way it is for garments, but consistent tension matters for keeping the five points symmetrical and the star lying flat.
Approximate gauge: 14 sc x 16 rows = 10 cm / 4 in square, using a 4.0 mm (US G/6) hook with worsted weight yarn.
Work a small gauge swatch in single crochet before starting if you want a predictable finished size, and check it periodically against your growing star — if one point is noticeably larger than the others, your tension likely loosened partway through and can be corrected by counting stitches at the end of each round (see stitch counts below).
🧶 G. Required Yarn Amounts
Estimates below assume worsted weight (medium, #4) acrylic or cotton-acrylic blend yarn.
| Color | Approximate Amount | Used For |
|---|---|---|
| Christmas Red (main color) | 150–170 g / approx. 300–340 m | Star body, hood exterior |
| Snow White | 30–35 g / approx. 60–70 m | Hood trim, zipper line, pom-pom |
| Black | 8–10 g / approx. 15–20 m | Belt strip |
| Gold or Mustard Yellow | 3–5 g / approx. 5–10 m | Buckle appliqué |
Total project estimate: approximately 190–220 g of yarn across all four colors.
Buy slightly more red than the estimate above if you plan to size the star up, since the body consumes the overwhelming majority of the yarn.
🧰 H. Materials
- 4.0 mm (US G/6) crochet hook (adjust for your gauge and yarn weight)
- Worsted weight (medium, #4) yarn in Christmas Red, Snow White, Black, and Gold/Mustard
- Polyester fiberfill stuffing (a small amount, only for lightly padding the hood so it holds its shape — the star body itself is not stuffed)
- Yarn needle for weaving in ends and sewing appliqués
- Stitch marker (a locking marker or contrast scrap of yarn)
- Scissors
- Straight pins (for positioning the hood, belt, and buckle before sewing)
- Cardboard circle or pom-pom maker (optional, for the pom-pom)
🧵 Safety note: This lovey includes a wrapped pom-pom and small appliqué pieces. If this project is intended for a child under 3, consider crocheting a small solid bobble instead of a wrapped pom-pom, and sew all appliqué pieces on securely with doubled thread, checking regularly for wear. Always supervise young children with any item containing small parts or loose fibers.
🛍️ Supplies We Recommend
- A size G/4.0mm hook with a comfortable ergonomic grip
- A worsted weight acrylic yarn in a true “Christmas red” and a bright “snow white” for maximum color contrast
- A bag of polyester fiberfill for the hood
- A basic pom-pom maker tool if you prefer a perfectly round, evenly trimmed pom-pom
📌 Save your progress: print this pattern or subscribe below to get new holiday patterns delivered as they’re published.
🔤 I. Abbreviations — US Terms
| Abbreviation | Meaning |
|---|---|
| MR | Magic ring |
| ch | Chain |
| sc | Single crochet |
| hdc | Half double crochet |
| inc | Increase (2 sc in same stitch) |
| dec | Decrease (invisible or standard sc2tog) |
| sl st | Slip stitch |
| st(s) | Stitch(es) |
| rnd(s) | Round(s) |
| BLO | Back loop only |
| FLO | Front loop only |
| ( ) | Stitch count at end of round |
| [ ] | Repeat instructions the stated number of times |
📝 J. Notes Before You Begin
- The star body is worked in joined, turned rounds (join with a slip stitch at the end of each round, then chain 1 and turn before starting the next), which keeps the star lying flat rather than spiraling into a cone the way amigurumi rounds do.
- Place a stitch marker in the first stitch of each round only if you find it easy to lose track of the join point — it is optional but recommended for beginners.
- Color changes are worked using the standard method: complete the last stitch of the old color up to the final yarn-over, then draw the new color through to finish the stitch, and drop (do not cut) the old color if it will be picked back up within the same section.
- The “zipper” line is not crocheted into the body as you go — it is added afterward as a surface slip stitch line, which keeps the front of the star clean and lets you position the line precisely once the star and hood are joined.
- Leave a long tail (at least 25 cm / 10 in) when fastening off the hood, belt, and buckle pieces — these tails are used directly for sewing and save you from adding and weaving in a separate strand.
- Because the star body is flat and unstuffed, weave in ends neatly on the wrong side and trim close, since the back of the lovey will be visible and handled as often as the front.
🪡 K. Complete Pattern
⭐ Star Body (Make 1, Christmas Red)
The star body starts as a small central decagon (10-sided shape) and grows outward, with five points marked for increases from Round 3 onward. Work in joined, turned rounds throughout.
Rnd 1: MR 10. Join with sl st to first st. (10)
Rnd 2: Ch 1, turn. 2 sc in each st around. Join. (20)
Rnd 3 (set up 5 points): Ch 1, turn. [2 sc in next st, sc 1, 2 sc in next st, sc 1] around — this places a paired increase at 5 evenly spaced points around the round. Join. (30)
Design choice: because the video reference doesn’t allow the exact interior stitch pattern to be verified, the point placement above (every 4th stitch pair) is my own original construction choice, chosen to produce five evenly spaced, symmetrical points.
Rnd 4: Ch 1, turn. [sc 1, inc, sc to next point marker, inc] around 5 times, sc to end. (40)
From this point forward, the five points you set up in Rnd 3 continue to receive one increase on either side of a marked center stitch each round, which is what causes the star shape to spread outward into five distinct triangular points rather than a plain circle.
Rnd 5: Ch 1, turn. [sc 2, inc, sc 1, inc, sc 2] around 5 points, adjusting stitch counts between points evenly. (50)
Rnd 6: Ch 1, turn. [sc 3, inc, sc 1, inc, sc 3] around 5 points. (60)
Rnd 7: Ch 1, turn. [sc 4, inc, sc 1, inc, sc 4] around 5 points. (70)
Rnd 8: Ch 1, turn. [sc 5, inc, sc 1, inc, sc 5] around 5 points. (80)
At Round 8, the star shape should already be clearly visible with five distinct triangular points and five inward “valleys” between them. Continue the same increase pattern — one more plain stitch added on each side of every point, per round — until the star reaches your desired size.
Rnd 9: Ch 1, turn. [sc 6, inc, sc 1, inc, sc 6] around 5 points. (90)
Rnd 10: Ch 1, turn. [sc 7, inc, sc 1, inc, sc 7] around 5 points. (100)
Rnd 11 (final round for the standard size): Ch 1, turn. [sc 8, inc, sc 1, inc, sc 8] around 5 points. Fasten off, leaving a long tail for seaming the hood later. (110)
💡 Verify your stitch count at the end of every round before moving on — a miscount in an early round compounds quickly across five points and will pull the star visibly out of symmetry.
⚠️ For a larger, blanket-style lovey, continue the pattern (adding one plain stitch per side, per round) for 2–4 additional rounds before fastening off.
🎓 Hood (Make 1, Christmas Red with White Trim)
The hood is worked flat as a small triangle, then folded and seamed into a cone shape before being sewn to one point of the star.
Row 1: Ch 16. Sc in 2nd ch from hook and each ch across. (15)
Row 2: Ch 1, turn. Sc 1, sc2tog, sc to last 3 sts, sc2tog, sc 1. (13)
Row 3: Ch 1, turn. Sc across. (13)
Row 4: Ch 1, turn. Sc 1, sc2tog, sc to last 3 sts, sc2tog, sc 1. (11)
Row 5: Ch 1, turn. Sc across. (11)
Row 6: Ch 1, turn. Sc 1, sc2tog, sc to last 3 sts, sc2tog, sc 1. (9)
Row 7: Ch 1, turn. Sc 1, sc2tog, sc to last 3 sts, sc2tog, sc 1. (7)
Row 8: Ch 1, turn. Sc 1, sc2tog twice, sc 1. (5)
Fasten off, leaving a long tail. This tapering triangle becomes the hood shape once its two long side edges are seamed together into a cone (see Assembly below).
Hood Trim (White): With the right side of the hood facing you and working around the open (wide) edge only, join white yarn with a sl st in the corner stitch.
Trim Rnd: Ch 1. Sc evenly around the entire open edge of the hood, working approximately 1 sc in each st/row-end for a smooth, non-puckered edge (roughly 18–20 sc total depending on your row-end count). Join with a sl st to first sc.
Trim Rnd 2 (fluffy edge): Ch 1. [Sc 1, ch 2, sk 1 st] around the entire trim to create a soft, bobbled look reminiscent of faux fur; alternatively, work this round in a fuzzy/boucle yarn if available for a more literal fur texture. Fasten off, leaving a tail for seaming.
🔔 Pom-Pom (Make 1, Snow White)
- Wrap white yarn around a 4 cm / 1.5 in diameter cardboard circle (or the small setting of a pom-pom maker) approximately 80–100 times for a dense, full pom-pom.
- Tie tightly through the center with a separate 20 cm / 8 in strand of the same white yarn, then cut the wrapped loops open around the edge.
- Trim into a neat, even sphere roughly 4 cm / 1.5 in in diameter, leaving the center tie strands long enough to sew through the hood tip.
💡 If you’d rather avoid a wrapped pom-pom near a baby’s face, substitute a small crocheted sphere: MR 6, inc around (12), sc around (12), sc around (12), [sc 1, dec] around (8), stuff lightly, dec around (4), fasten off and cinch closed.
🎀 Zipper Trim (Surface Slip Stitch, Snow White)
Worked after the star and hood are joined (see Assembly, Step 2), directly onto the front surface of the star body.
With white yarn and a slip knot on your hook, insert your hook from front to back through the first stitch at the base of the hood opening (the point where the hood meets the star body), yarn over, and pull up a loop to the front. *Insert your hook into the next stitch straight down the center line of the star’s top point, yarn over, pull up a loop, and draw it through the loop already on your hook (this is one surface slip stitch).* Repeat from * down the center line of the star’s front point, continuing for approximately 12–14 stitches, or until you reach roughly 2 cm / 0.75 in from the star’s bottom point tip. Fasten off and weave in both ends on the wrong side.
📝 This line is deliberately worked as a straight vertical run rather than a literal zipper shape — the visual effect of a fine contrast line down the center front is what reads as a “zipper” at typical lovey scale, and keeps the technique accessible.
🎀 Belt & Buckle Appliqué (Make 1 Belt in Black, Make 1 Buckle in Gold)
Belt (Black):
Row 1: Ch 22. Sc in 2nd ch from hook and each ch across. (21)
Row 2: Ch 1, turn. Sc across. (21)
Row 3: Ch 1, turn. Sc across. Fasten off, leaving long tails at both ends for sewing the belt across the star.
Buckle (Gold):
Rnd 1: Ch 6, join with sl st to form a ring (or work MR 6 for a rounder buckle shape). (6)
Rnd 2: Ch 1. 2 sc in each st around. Join. (12)
Rnd 3: Ch 1. Sc around, working into BLO only to create a raised outline effect. Join. Fasten off, leaving a tail for sewing.
💡 For a squared, more realistic buckle shape, work Rounds 1–2 as written, then flatten the small circle gently with your fingers into a soft square before sewing it down — the yarn will hold a light press once sewn in place.
🎨 L. Styling / Assembly / Stability / Final Shaping
Recommended assembly order:
- Block the star body lightly with a damp cloth and light steam or a spray of water, pinning each of the five points out to an even length. Let it dry fully before sewing anything to it — this step alone fixes most minor asymmetry between points.
- Seam the hood into a cone. Fold the hood triangle in half lengthwise, right sides together, and whipstitch or slip-stitch the two long straight edges together, leaving the wide trimmed edge open. Turn right side out.
- Position and sew the hood. Center the hood’s seam along the center line of one star point, with the hood’s open (trimmed) edge sitting roughly 3–4 cm / 1.25–1.5 in in from the point’s outer tip, angled so the hood tip points outward past the star’s tip. Pin in place, check that it sits symmetrically from both sides of that point, then whipstitch the hood’s base securely around its entire perimeter to the star body, using the hood’s own fastened-off tail plus a fresh strand as needed.
- Attach the pom-pom to the tip of the hood, sewing through the base of the pom-pom several times and knotting securely on the inside of the hood.
- Add lightweight stuffing to the hood only (not the star body) through the open base before it’s fully sewn down, so the hood keeps a soft three-dimensional shape rather than collapsing flat.
- Work the zipper trim down the front center point, from the base of the hood to just above the bottom tip, following the Zipper Trim instructions above.
- Position and sew the belt. Lay the belt strip horizontally across the star’s center, just below where the hood is attached, wrapping slightly around the sides of the center hub so it reads as a continuous band. Pin, check it sits straight and level, then whipstitch both short ends and the top/bottom long edges to the star body.
- Attach the buckle centered on the belt, over the point where the zipper trim would pass beneath it, sewing securely around its entire edge.
- Weave in all remaining ends, check the back of the piece for stray tails, and give the finished lovey a final light steam if the points have shifted during assembly.
Symmetry check: Lay the finished star flat on a table and fold it in half vertically through the hood point and the opposite bottom point — the two side points should land on top of each other. Adjust stuffing or gently re-block if one side sits noticeably longer or wider than the other.
Stability: Because this lovey lies flat and isn’t meant to stand, the main stability concern is the hood holding its shape and the belt/buckle staying flat rather than curling. Light stuffing in the hood and a firm, even sewing tension around the belt’s edges prevent both issues.
💡 M. Helpful Crochet Tips
💡 Count stitches at the end of every single round while working the star body — with five points increasing simultaneously, a single missed increase early on becomes an obviously lopsided point by Round 8 or 9.
💡 Block the star before attaching the hood, not after — trying to square up an unblocked star once the hood and belt are already sewn on is far harder and risks distorting your finishing work.
💡 Use a contrasting scrap of yarn as a removable stitch marker in the very first stitch of each round rather than relying on counting from the join, especially through Rounds 3–6 where the point pattern is still new.
💡 When seaming the hood into a cone, sew from the tip toward the open edge rather than the reverse — this keeps the point sharp and prevents a bunched, rounded tip.
💡 Work the fluffy trim round (Hood Trim Rnd 2) a little looser than your normal tension; a tight fluffy-stitch round will pull the hood opening smaller than intended and make it harder to seat properly on the star point.
💡 Test the belt’s finished width against your star before sewing — if your gauge runs looser than the sample, work the belt one row shorter to keep its proportions matching the body.
💡 Pin every appliqué (hood, belt, buckle) in place and step back to look at the whole piece before sewing anything permanently — small placement shifts are much easier to fix with a pin still in than with a needle and thread already through the fabric.
💡 If working this pattern in a fuzzy or boucle yarn for the trim, size your hook up slightly for that section only, since fuzzy yarns tend to look tighter and smaller at the same hook size as smooth yarn.
🧼 N. Care Instructions
Hand-wash in cool water with a mild detergent and lay flat to dry, reshaping the five points while damp. Because this lovey combines a smooth main-color yarn with a textured white trim, avoid high heat in a dryer, which can felt and shrink the fluffy trim round unevenly compared to the smooth body. If safety eyes or any rigid plastic elements are added as a variation, remove or avoid submerging those areas and spot-clean instead. Store away from direct sunlight when not in use, since saturated colors like this red and gold combination can fade unevenly with prolonged light exposure. Check the pom-pom and buckle stitching periodically for looseness with regular handling, and re-secure promptly if either begins to loosen.
Closing Section
This little star manages to feel both familiar and completely new — the same comforting five-point shape babies have reached for for generations, dressed up in just enough Santa detail to make it feel like it belongs under the tree. The belt and buckle give it a satisfying focal point, the hood adds real dimension instead of just a flat printed shape, and the whole thing is achievable in a weekend even if you’ve never worked a surface slip stitch before this project.
Try it in hunter green with a white trim for a “elf suit” variation, in cream and burgundy for a more neutral holiday palette that fits year-round nurseries, or scaled up two or three rounds larger as a lap-sized throw for a older sibling. However you make it, it’s the kind of small, detailed piece that tends to become a genuine keepsake rather than just another toy in the basket.
Post-Article Engagement & Distribution Block
📌 Share the Love: If you make this Santa suit star lovey, I’d love to see it — save this pattern, share a photo of your finished piece, and tag it so other crocheters can find your version too.
Suggested Categories: Amigurumi & Toys, Holiday & Christmas Crochet, Baby Gifts, Home Décor
Suggested Tags: crochet santa suit, star lovey pattern, christmas crochet baby gift, crochet security blanket, amigurumi santa, holiday crochet pattern, crochet hood tutorial, baby lovey free pattern, crochet star blanket, easy christmas crochet, handmade baby gift, crochet appliqué belt, beginner crochet holiday pattern, star shaped lovey
❓ Comment Invitation: Which holiday color combination would you try first for your own version — classic Santa red and white, or a green “elf suit” twist?
You Might Also Like:
- Crochet Reindeer Antler Star Lovey
- Crochet Gingerbread House Star Lovey
- Crochet Elf Suit Star Lovey
- Crochet Snowman Star Lovey
- Crochet Nutcracker Star Lovey
Printable Version: A print-friendly and PDF version of this pattern can be made available through your site’s print plugin for readers who prefer an offline copy.
❓ FAQ
What size hook and yarn work best for a Santa suit star lovey? A 4.0 mm (US G/6) hook with worsted weight (medium, #4) yarn produces the size described in this pattern — roughly 30 cm/12 in point to point. Any worsted-weight acrylic, cotton-acrylic blend, or cotton yarn will work as long as your tension stays consistent across all five points.
Can I substitute a different yarn than what’s listed? Yes. This pattern isn’t tied to a specific yarn brand — any worsted weight yarn in a true red, white, black, and gold/mustard will work. Just re-check your gauge swatch if you switch to a noticeably fuzzier or slicker yarn than a standard smooth acrylic.
How do I keep all five star points the same size? Count your stitches at the end of every round and compare the segment length between points rather than only the total stitch count — an uneven distribution of stitches between points is the most common cause of a lopsided star, even when the total count is technically correct.
Is this pattern safe for a newborn? The finished lovey includes a pom-pom and small sewn appliqué pieces, which are not appropriate for unsupervised use with infants. For a newborn-safe version, substitute a small crocheted sphere for the wrapped pom-pom, sew all appliqués on very securely with doubled thread, and always follow current safe-sleep and supervised-play guidance for any handmade item given to a baby.
How difficult is the hood, really, if I’ve never made one? The hood is a short, shaping triangle worked flat, then folded and seamed — no more complex than working a basic amigurumi ear or a granny-square corner. The surface slip stitch zipper line is the only genuinely new skill most beginners will encounter, and it’s worth practicing once on a scrap swatch before working it on the finished piece.
Can I make this bigger, like an actual baby blanket? Yes — continue the increase pattern on the star body for 2–4 additional rounds beyond Round 11 before fastening off, which will produce a noticeably larger star while keeping all five points proportional.
What if I don’t want the pom-pom or belt at all? Both are optional design elements. Leaving off the pom-pom gives you a plain fur-trimmed hood point, and leaving off the belt and buckle gives you a simpler two-tone red-and-white star that still reads clearly as a Santa-inspired piece.
Do I need to stuff the whole star? No. Only the hood receives a small amount of stuffing so it holds a soft three-dimensional shape; the star body itself stays flat and unstuffed, which is what makes it lie nicely for a baby to hold or lie on top of.