Crochet Poinsettia Table Runner: Free Christmas Pattern with Holly Leaves & Berries
Home Décor Crochet Pattern · Christmas Table Décor · Intermediate
📖 B. Introduction
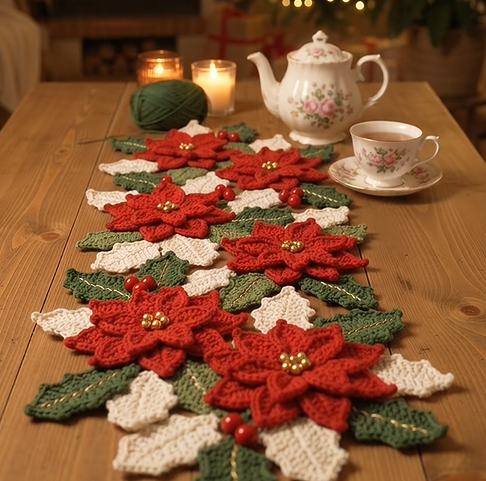
This crochet poinsettia table runner lays a staggered line of six layered, bead-centered poinsettias down your table. Between them sit dark green and cream holly leaves veined in gold, plus little clusters of red berries. It works up as individual motifs, which makes it good project-bag crochet. You join everything at the end into a long, festive centerpiece.
Most holiday runners repeat one motif in a grid. This one reads more like a garland, with loose petals, uneven leaf angles, and berries tucked into the gaps. Each poinsettia has a back layer of eight pointed petals and a smaller front layer of six. The overlap gives the depth you see in real bracts, and the gold beads add a small glint under candlelight.
It suits a Christmas dinner table, a mantel, a sideboard, or a handmade gift for a host. You can also make a few extra flowers and leaves to use as gift toppers or a wreath accent. Making a holiday crochet table runner in stages also spreads the work out, so starting in October leaves plenty of time.
Personalizing it is simple. Swap the reds for burgundy or white poinsettias, or use gold and cream leaves for a winter-wedding look. Work six flowers for this size, or make four for a shorter runner, or eight for a long dining table.
🔍 C. Main Pattern Overview
The runner has four motif types, all worked in the round or in a single flat pass and joined by sewing:
- 6 poinsettias, each with a large 8-petal back layer and a small 6-petal front layer
- 8 green holly leaves
- 8 cream holly leaves
- 12 crocheted berries, sewn in four clusters of three
Poinsettias are staggered left and right of a center line. Each has one green leaf on its outer side and one cream leaf on its inner side. One green and one cream leaf also sit at each end of the runner. The finished work is stitched together with an optional light backing for stability.
Estimated time: 12–16 hours.
📌 Email placeholder: Want a printable version of this pattern? Save it to your favorites or subscribe for new holiday patterns. [insert opt-in form]
🎯 D. Skill Level
Intermediate. The stitches are simple, but several techniques need care:
- Working tall stitches (tr, dtr) in fan clusters into a single stitch
- Working around both sides of a foundation chain
- Making picots
- Sewing beads and embroidering with metallic thread
- Assembling overlapping motifs
You will also use a magic ring, and invisible decreases for the berries.
📏 E. Finished Size
| Piece | Approx. size |
|---|---|
| Poinsettia back layer | 4.25 in (10.8 cm) across |
| Poinsettia front layer | 3.25 in (8.3 cm) across |
| Holly leaf | 3.25 in (8.3 cm) long, 1.75 in (4.5 cm) wide |
| Berry | 0.6 in (1.5 cm) |
| Assembled runner | ≈ 38 × 12 in (97 × 30 cm) |
Yarn weight, hook size, and your tension change these sizes the most. Blocking also opens the petals and adds a little length. Overlapping the motifs more tightly during assembly shortens the runner, so you can adjust the final length at that stage.
🧮 F. Gauge
Gauge is not critical for a decorative runner, but keep your tension firm enough that the tall petal stitches hold their shape rather than flopping. As a guide, on a 4.0 mm hook with worsted yarn, the first two rounds of the back layer (16 sc) should measure about 1.25–1.5 in (3.2–3.8 cm) across. If yours is much larger, drop a hook size. If your petals feel stiff or crowded, go up half a size.
🧶 G. Required Yarn Amounts
Estimates are approximate and use worsted-weight (#4) yarn.
| Color | Used for | Approx. amount |
|---|---|---|
| 🧵 Cranberry Red | 6 poinsettias (both layers), 12 berries | 350 yd (320 m) |
| 🧵 Holly Green | 8 leaves, sewing | 100 yd (91 m) |
| 🧵 Cream | 8 leaves, sewing | 90 yd (82 m) |
| 🧵 Gold metallic embroidery thread | Leaf veins, sewing beads | 12 yd (11 m) |
| Polyester fiberfill | Berries | small pinch |
Total yarn: approximately 540 yd (495 m). Buy an extra skein of red if you plan to make more than six flowers.
🧰 H. Materials
- 4.0 mm (US G-6) crochet hook
- Worsted-weight yarn in Cranberry Red, Holly Green, and Cream (cotton or cotton-blend gives crisper petals; acrylic gives a softer drape)
- Gold metallic embroidery thread
- About 45 gold seed beads (size 6/0), with a thin needle whose eye fits the beads
- Small amount of polyester fiberfill
- Yarn needle and sharp scissors
- Stitch marker
- Pins
- Optional: lightweight cotton or felt backing, about 14 × 40 in (36 × 100 cm), and matching thread
- Optional: fabric stiffener or spray starch for blocking
⚠️ Safety note: The beads and berries are small parts and are not suitable for young children or pets. For safer decoration, replace the beads with yellow French knots, and sew the berries on securely or omit them.
🛍️ Supplies We Recommend: a size G/4.0 mm hook, cotton-blend worsted yarn in red, green, and cream, gold seed beads and beading needles, a bag of polyester fiberfill, and blocking mats with pins. (Insert your affiliate links here.)
<!– AD SLOT: post-materials –>
🔤 I. Abbreviations — US Terms
| Abbreviation | Meaning |
|---|---|
| ch | chain |
| sl st | slip stitch |
| sc | single crochet |
| hdc | half double crochet |
| dc | double crochet |
| tr | treble crochet |
| dtr | double treble crochet (yarn over 3 times) |
| inc | 2 sc in the same stitch |
| dec | single crochet 2 together (invisible decrease if preferred) |
| MR | magic ring |
| st(s) | stitch(es) |
| R | round |
| picot | ch 3, sl st in 3rd ch from hook |
| x | times |
| ( ) at end of a round | stitch count |
📝 J. Notes Before You Begin
- Rounds of the poinsettia layers and berries are worked in a continuous or joined spiral as stated, and each round is worked with the right side facing you.
- Each petal is a fan of 7–9 stitches worked into a single stitch of the base round. Keep the fan loose: pull up the loops to the height of each stitch rather than cinching tight.
- On the poinsettia layers, the sl st between petals holds them apart so they don’t bunch up.
- Design choice: The petal counts (8 back, 6 front) and sizes are my own choices. They are not verified from the reference footage.
- For leaves, work around both sides of the foundation chain. The pointed tip forms at the beginning of the chain, and you finish at the base end.
- Leave a 6 in (15 cm) tail on every motif for sewing, and weave in the remaining ends before assembly.
- Use a stitch marker at the start of each berry round.
- Block the flowers and leaves before assembling. Steam them lightly or dampen them and pin them flat, since flattened petals make the runner lay better.
🪡 K. Complete Pattern
💐 Poinsettia Back Layer (Make 6)
The wide, 8-petal base of each flower. Color: Cranberry Red.
R1: MR 8. (8)
R2: inc around. (16) Sl st in the first st to join.
R3: (sc, hdc, dc, tr, dtr, tr, dc, hdc, sc) in the next st, sl st in the next st x8. (8 petals; 80 sts including the joining sl sts)
Fasten off, leaving a 6 in (15 cm) tail. Weave in the MR tail.
💐 Poinsettia Front Layer (Make 6)
The smaller top layer that sits between the back petals. Color: Cranberry Red.
R1: MR 6. (6)
R2: inc around. (12) Sl st in the first st to join.
R3: (sc, hdc, dc, tr, dc, hdc, sc) in the next st, sl st in the next st x6. (6 petals; 48 sts including the joining sl sts)
Fasten off, leaving a 6 in (15 cm) tail.
💐 Poinsettia Assembly
- Lay a front layer on a back layer so that the front petals sit in the gaps between the back petals as evenly as possible.
- Using the red tails, sew the two layers together at the center with a few small stitches. Bring the needle to the front.
- With gold thread and a beading needle, sew 7 seed beads at the center: one in the middle and six around it, passing through both layers so they stay attached. Knot on the back.
🌿 Holly Leaf (Make 8 in Holly Green and 8 in Cream)
Work a separate leaf in each color. Work the foundation chain first, then go around both sides.
Ch 13.
R1: Starting in the 2nd ch from the hook and working across the top of the chain:
- Side one, 11 sts in chains 2–12: sl st, sc, hdc, dc x5, hdc, sc, sl st. (11)
- Tip, 6 sts in the last ch (the first chain you made): hdc, dc, tr, tr, dc, hdc. (6)
- Side two, 11 sts along the bottom of the chain back toward the hook: sl st, sc, hdc, dc x5, hdc, sc, sl st. (11)
(28)
Sl st into the first st of R1 to join. Ch 1 (does not count as a st).
R2: Sc in the next 4 sts, picot x7, starting in the same st as the join. (28) Join with a sl st and fasten off.
Gold vein: With gold thread, embroider a straight line of split stitches or backstitch from the leaf’s base up the center to about 0.25 in (6 mm) from the tip.
🔔 Berry (Make 12)
Color: Cranberry Red.
R1: MR 6. (6)
R2: (1 sc, inc) x3. (9)
R3–R4: sc in each st around. (9)
R5: (1 sc, dec) x3. (6)
Stuff lightly.
R6: dec x3. (3)
Fasten off, leaving a 6 in (15 cm) tail. Thread the tail through the remaining stitches, pull tight, and close the berry.
🎨 L. Styling / Assembly / Stability / Final Shaping
Layout: Place the motifs on a flat surface before sewing:
- Arrange the six poinsettias in a staggered line, about 5.5 in (14 cm) between centers along the length, and alternating about 1.5 in (4 cm) left and right of the center line.
- Place one green leaf on the outer side of each flower, pointing outward.
- Place one cream leaf on the inner side of each flower, pointing toward the next flower.
- Add one green and one cream leaf at each end of the runner, pointing along the length.
- Place three berries in a cluster in four of the five gaps between flowers.
Recommended assembly order:
- Block all flowers and leaves flat and let them dry completely.
- Sew the poinsettia layers together and attach the beads.
- Pin each leaf to the back of its flower, overlapping about 0.5 in (1.3 cm).
- Whip-stitch each leaf to its flower from the back with matching yarn.
- Join adjacent flowers where their petals or leaves touch, using a few discreet stitches from the wrong side.
- Sew the end leaves in place.
- Sew the berry clusters into the gaps, attaching each berry through its base with a few stitches.
- If backing, cut it slightly smaller than the runner outline and hand-stitch it to the back through the crochet only, so no stitches show on the front.
Stability: Overlap more generously where the motifs are widest. Anchor the tips of the top petals with tiny stitches on the wrong side if they curl up. If the runner looks limp, a light spritz of fabric stiffener on the back can help.
✅ Final Shaping Checklist
- ✅ Front-layer petals sit between back-layer petals
- ✅ Beads are secure and centered
- ✅ Gold veins are straight and centered on each leaf
- ✅ Green and cream leaves alternate as planned
- ✅ Berry clusters are evenly spaced
- ✅ Flowers stagger evenly along the runner
- ✅ Every yarn tail is woven in
- ✅ Runner lies flat without curling
💡 M. Helpful Crochet Tips
- 💡 Keep the fan loose. Pull each loop of the petal fan up to full height so nine stitches fit into one, and use a hook one size up for petals only if they pinch.
- 💡 Do not skip the sl st between petals. It spaces the fans and prevents the petals from turning into one stiff clump.
- 💡 Use your stitch marker on the first tr of each petal at first, until you can see the fan’s center stitch at a glance.
- 💡 Work leaves loosely along the chain. A tight foundation chain pulls the leaf into a banana shape.
- 💡 Check the picots on your first leaf. If they curl inward, chain one stitch looser on the next leaf.
- 💡 Block flowers face-down on a soft surface so the petals dry with a little cup rather than pressed flat.
- 💡 Sew beads through both layers. It anchors the two layers and keeps the center from lifting.
- 💡 Make one test flower first. It confirms size, yarn choice, and hook before you commit to six.
- 💡 Lay everything out and photograph it before joining, so you can rearrange leaves without unpicking stitches.
- 💡 Join with a slightly darker thread on the back if your cream leaves show shadows through the seams.
🧼 N. Care Instructions
Spot-clean with a damp cloth and a drop of mild soap. If you must wash, hand-wash in cool water, press out the water in a towel without wringing, and lay flat to dry. Wash red and cream pieces separately from each other the first time, since red can bleed, and test one leaf if you’re using unknown yarn. Remove or avoid beads near heat and steam. Store flat or loosely rolled in a breathable bag away from direct sunlight, which can fade the reds.
Keep the runner away from open flames. Candles on or near acrylic or cotton yarn can be a fire risk.
Closing
However you set it out, this runner turns a plain table into something that looks made for the season. The reds, greens, and creams read as classic Christmas, and the gold detail gives it a hand-finished feel. It works as a gift for a host or family member, and it packs flat for next year. Try your own colorway or a different arrangement, and share your version with us.
Post-Article Engagement & Distribution
Share the Love: If you make this runner, save it to Pinterest, share a photo, and tag us so we can see your poinsettias.
Suggested categories: Home Décor Crochet · Christmas Crochet · Free Crochet Patterns
Suggested tags: crochet poinsettia, table runner, Christmas crochet, holly leaf crochet, crochet flowers, holiday table décor, free crochet pattern, crochet berries, beaded crochet, intermediate crochet pattern, crochet Christmas gift, poinsettia pattern
Comment invitation: Which colorway would you choose for your runner: classic red and green, or something less traditional like burgundy and gold?
You Might Also Like:
- Crochet Christmas Wreath with Poinsettias
- Holly Leaf Coasters (Free Pattern)
- Crochet Christmas Tree Skirt
- Crochet Poinsettia Gift Toppers
- Crochet Snowflake Table Mat
Printable/PDF note: a print-friendly version can be offered with a print plugin. <!– AD SLOT: pre-faq –>
❓ R. FAQ
How big is the finished runner?
About 38 × 12 in (97 × 30 cm). Blocking and how tightly you overlap the motifs will change it.
What yarn should I use?
Worsted-weight cotton or a cotton blend gives crisp petals and leaves. Acrylic works but is softer and may need more blocking.
Can I make it shorter or longer?
Yes. Make fewer flowers (four for a shorter runner) or more (eight for a long table) and adjust leaves and berries in proportion.
What hook size do I need?
A 4.0 mm (G-6) hook with worsted yarn. If your petals feel too tight, go up half a size.
How do I make crochet poinsettia petals stay pointed?
Use a taller center stitch (dtr on the back layer, tr on the front layer) and block with the petals gently pinned outward.
Is it safe for kids or pets?
The beads and berries are small parts. Replace the beads with French knots and secure the berries firmly, or leave them off.
Can I wash it?
Hand-wash gently in cool water and lay it flat to dry. Spot-clean if possible.
Can I use it as a wreath or garland instead?
Yes. Sew the same motifs onto a wreath form or a length of ribbon instead of joining them into a runner.