Crochet Lace Bell Ornament Pattern: Free Icy Blue & Silver Christmas Bell
Crochet Ornament Pattern · Christmas & Winter Décor · Intermediate Lace
📖 B. Introduction
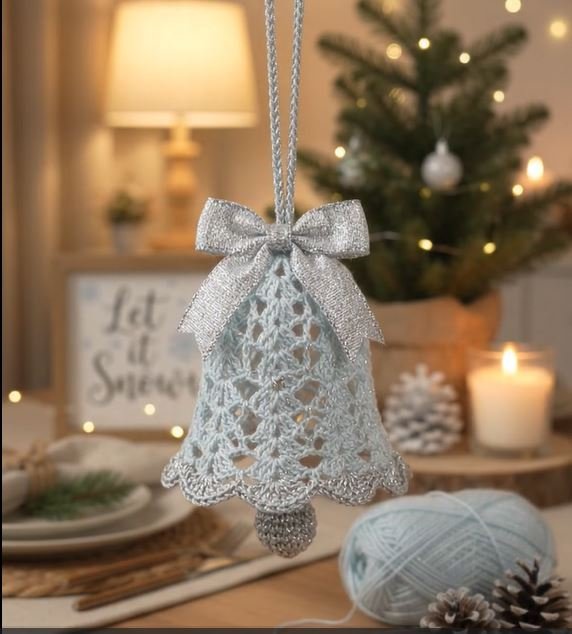
This crochet lace bell ornament is a small, airy bell in icy blue with a scalloped silver hem, a glittering silver clapper, and a metallic ribbon bow at the crown. Worked from the top down in joined rounds, it shows off an open shell-and-mesh lace that lets tree lights glow through the stitches.
Most crochet Christmas ornaments are stuffed and solid. This one is dimensional lace: the mesh tiers are stiffened lightly so the bell holds its flared shape and swings gently when hung. It’s a good choice if you want something more refined than a typical amigurumi decoration and still finish it in an evening.
The bell works for tree décor, gift toppers, mantel garlands, and wedding or winter-party favors. Several in a row also make a good craft-fair set. The finishing is the most recognizable part: soft pastel blue lace, a ruffled silver edge and a sparkly ribbon bow.
It’s easy to personalize. Try white and gold for a classic look, red and silver for traditional Christmas, or soft pink and pearl for a nursery. Worked in DK yarn with a larger hook, the same pattern makes a bigger bell for a door or wreath.
🔍 C. Main Pattern Overview
This pattern makes one lace bell ornament with these parts:
- 🔔 Bell body: a solid cap, then six lace tiers worked in 6 repeating panels, and a silver scalloped hem.
- 🔔 Clapper: a small stuffed silver bead.
- 🎀 Hanging cord: a three-strand braided cord.
- 🎀 Bow: a ribbon bow, not crocheted.
Design note: The reference shows the look: icy blue lace, silver trim, and a bow on a braided hanger. The stitch structure is my own. It uses six panels, so counts divide evenly and the lace stays symmetrical.
📌 Save this pattern: Pin it, bookmark it, or use the print button to take it to your craft table. (Email capture placeholder: insert your subscribe form or “send me the PDF” prompt here.)
🎯 D. Skill Level
Intermediate. The lace is repetitive and easy to memorize, but it has long chain spaces, a magic ring and metallic yarn, which are a little less forgiving.
Techniques used:
- Magic ring
- Working into chain spaces
- Chain-space lace with shells
- Joined rounds with slip stitch joins
- Yarn color change at the hem
- Making a small stuffed sphere
- Braiding a cord
- Tying a ribbon bow
📏 E. Finished Size
Approximately 2.5 in (6.5 cm) tall and 2.5 in (6.5 cm) wide at the hem, excluding the hanger and clapper. With the clapper, expect about 3.25 in (8.5 cm) total height.
Size depends on:
- Yarn weight and hook: DK yarn with a 3.5 mm hook gives roughly 3.5–4 in (9–10 cm).
- Tension: tighter stitches make a smaller, stiffer bell.
- Stiffening: blocking over a form opens the lace and adds height.
- Hem tension: a loose scalloped edge flares more.
🧮 F. Gauge
Gauge isn’t critical for a decorative ornament, but consistent tension matters because the lace relies on even chain spaces.
For reference: about 6–7 sc per inch (2.5 cm) worked in the cap, with a 2.5 mm hook and light/sport-weight yarn. If your cap (R5) lies flat at about 1.25 in (3 cm) across, you’re on track. Loose tension makes a floppy bell; go down a hook size if the lace won’t hold its shape.
🧶 G. Required Yarn Amounts
| Item | Color | Approximate amount |
|---|---|---|
| Bell body (cap and lace tiers) | 🧵 Icy Blue (mercerized cotton or soft acrylic blend, light fingering to sport weight) | ~35 yd (32 m) |
| Hem, clapper, braided cord | 🧵 Silver metallic (similar weight, or lace weight doubled) | ~15–20 yd (14–18 m) |
| Clapper stuffing | White polyester fiberfill | a small pinch |
| Bow | Silver glitter ribbon, 5/8 in (16 mm) wide | ~16 in (40 cm) |
Total: roughly 50–55 yd (46–50 m) of yarn, so one small ball of each color is plenty, with a little left over.
🧰 H. Materials
- 2.5 mm (US B-1/C-2) crochet hook
- Icy Blue yarn and Silver metallic yarn as listed above
- Silver glitter ribbon, 5/8 in (16 mm) wide, about 16 in (40 cm)
- Polyester fiberfill, a small pinch
- Yarn needle
- Scissors
- Stitch markers (1–2)
- Pins
- Clear-drying fabric glue, or a needle and matching thread
- Fabric stiffener (optional)
- Plastic wrap and a small form for blocking, such as a small balloon or ornament-shaped form (optional)
⚠️ Safety note: The clapper is a small part. This ornament is decorative and not for use as a toy, so keep it away from babies, toddlers and pets.
🛍️ Supplies We Recommend: a 2.5 mm hook, light-weight mercerized cotton in icy blue, silver metallic yarn, 5/8 in silver glitter ribbon, and a small bottle of fabric stiffener.
🔤 I. Abbreviations — US Terms
| Abbreviation | Meaning |
|---|---|
| MR | Magic ring |
| R | Round |
| ch | Chain |
| sl st | Slip stitch |
| sc | Single crochet |
| dc | Double crochet |
| inc | Increase (2 sc in the same stitch) |
| dec | Decrease (sc 2 stitches together) |
| st(s) | Stitch(es) |
| sk | Skip |
| sp | Space |
| rep | Repeat |
| x | Times (repeat the instructions in parentheses this many times) |
📝 J. Notes Before You Begin
- Cap rounds (R1–R5) are worked in continuous rounds without joining. Use a stitch marker to mark the first stitch of each round.
- Lace rounds (R6–R13) are worked in joined rounds. Do not turn. Always work with the right side facing you.
- Counts: The count in parentheses at the end of each round is the total number of stitches. Chain spaces are listed separately.
- Color change: Join silver at R12. Change colors at the end of R11 and fasten off the blue.
- Stuffing: Only the clapper is stuffed. Stuff it firmly so it keeps a round shape.
- Beginning chain: In rounds that start with ch 3, the ch 3 counts as the first dc.
- Metallic yarn can split or snag. Work it with a smooth hook and slightly looser tension than the blue yarn.
🪡 K. Complete Pattern
🔔 Bell Body
Purpose: the main lace bell.
Yarn: Icy Blue, then Silver for the hem.
Quantity: make 1.
Cap (continuous rounds)
R1: MR 6. (6)
R2: inc around. (12)
R3: (1 sc, inc) x6. (18)
R4: (2 sc, inc) x6. (24)
R5: (3 sc, inc) x6. (30)
Sl st in the next st to finish R5. Do not fasten off.
Lace tiers (joined rounds, 6 repeating panels)
R6: Ch 1. *Sc in next st, ch 4, sk 4 sts; rep from * 5 more times. Join with sl st to first sc. (6 sc, 6 ch-4 sps)R7: Sl st into first ch-4 sp. Ch 3, 4 dc in same sp. *Sc in next sc, 5 dc in next ch-4 sp; rep from * 4 more times. Sc in last sc. Join with sl st to top of beg ch-3. (6 shells of 5 dc, 6 sc = 36 sts)R8: Sl st in each of next 2 dc (you are on the center dc of the shell). Ch 1, sc in same dc. *Ch 5, sc in center dc of next shell; rep from * 4 more times. Ch 5, join with sl st to first sc. (6 sc, 6 ch-5 sps)R9: Sl st into first ch-5 sp. Ch 3, 2 dc, ch 2, 3 dc in same sp. *Sc in next sc, (3 dc, ch 2, 3 dc) in next ch-5 sp; rep from * 4 more times. Sc in last sc. Join with sl st to top of beg ch-3. (6 double shells of 6 dc each, 6 sc = 42 sts, 6 ch-2 sps)R10: Sl st in each of next 2 dc, sl st into ch-2 sp. Ch 1, sc in same ch-2 sp. *Ch 7, sc in next ch-2 sp; rep from * 4 more times. Ch 7, join with sl st to first sc. (6 sc, 6 ch-7 sps)R11: Sl st into first ch-7 sp. Ch 3, 6 dc in same sp (7 dc total). *Sc in next sc, 7 dc in next ch-7 sp; rep from * 4 more times. Sc in last sc. Join with sl st to top of beg ch-3. (6 fans of 7 dc, 6 sc = 48 sts)Fasten off the blue yarn.
🧵 Silver hem
R12: Join Silver in any st. Ch 1, sc in same st and in each st around. Join with sl st to first sc. (48)
R13: *Sk 1 st, 5 dc in next st, sk 1 st, sl st in next st; rep from * 11 more times. (12 scallops)
Fasten off and weave in the ends.
Placement note: The 12 scallops sit evenly under the 6 lace panels, 2 per panel, because each panel is 8 stitches wide at R11 and each scallop uses 4.
🔔 Clapper
Purpose: a small sparkling bead that hangs below the hem.
Yarn: Silver.
Quantity: make 1.
R1: MR 6. (6)
R2: inc around. (12)
R3: (1 sc, inc) x6. (18)
R4: sc around. (18)
R5: sc around. (18)
R6: (1 sc, dec) x6. (12)
Stuff firmly with a small pinch of fiberfill.
R7: dec around. (6)Fasten off, leaving a 6 in (15 cm) tail. Sew the last round closed and leave the tail free. This is the clapper’s hanging strand.
🎀 Braided Cord
Purpose: the hanger.
Yarn: Silver.
Quantity: make 1.
- Cut 3 strands of Silver, each 20 in (50 cm).
- Knot the strands together at one end, then braid them tightly into a plait, stopping about 1 in (2.5 cm) from the end.
- Knot the braid’s end, then trim any stray ends.
- Fold the braid in half so the two knotted ends meet. Tie them together in a large double overhand knot. The knot should be bigger than the magic ring opening.
🎀 Bow
Purpose: the ribbon bow at the crown.
Quantity: make 1.
- Cut one piece of ribbon 5.5 in (14 cm) for the loops.
- Cut two pieces 3 in (7.5 cm) for the tails, and one piece 2 in (5 cm) for the center wrap.
- Overlap the ends of the long piece at the center back, then pinch the center to form two loops.
- Wrap the 2 in piece around the pinched center, then glue or stitch it in place at the back.
- Place the two 3 in tails behind the bow, spread them in a V, and secure them at the back. Cut each tail end in a diagonal or V shape.
🎨 L. Styling / Assembly / Stability / Final Shaping
Recommended assembly order
- Weave in all ends on the bell body.
- Optional: block the bell. Wrap a small balloon or ornament form in plastic wrap, dampen the bell with fabric stiffener, and slip it over the form. Pull each ch-space and scallop into an even shape and let it dry completely.
- Thread the clapper’s tail up through the magic ring from the inside, so the clapper hangs inside the bell.
- Thread the braided cord’s knotted end through the magic ring from the outside, so the loop sits on top and the big knot rests inside.
- Tie the clapper tail to the big knot with a square knot and trim. The clapper should hang about 0.75 in (2 cm) below the hem. Adjust the length before tying.
- Attach the bow at the base of the cord, where it meets the bell. Pin it first, check the symmetry, then glue or stitch it in place.
Stability
The bell hangs, so it needs no internal structure. Stiffening is only for shape. If the bell droops, either go down a hook size or stiffen it again.
Final shaping checklist
- ✅ All 6 panels are even, with no skipped or doubled stitches
- ✅ The scallops are evenly spaced around the hem
- ✅ The clapper hangs just below the edge
- ✅ The bow is centered over the cord
- ✅ The knot inside the bell is secure
- ✅ All loose ends are woven in
- ✅ The bell hangs straight, not tilted
💡 M. Helpful Crochet Tips
- 💡 Work the long chain spaces (R8 and R10) loosely so the lace can open. Tight chains pull the bell into a cone.
- 💡 Mark the first stitch of the cap rounds with a marker. The cap is only 30 stitches and miscounts are easy to catch early.
- 💡 In R7, R9 and R11, the beginning ch 3 counts as the first dc. Check this before you finish the round, because the join is easy to misplace.
- 💡 Count your panels after every lace round. You should always have 6 shells, fans or chain spaces.
- 💡 If your metallic yarn splits, use a hook with a smooth, rounded head and hold the yarn a little more loosely.
- 💡 Block the bell on a form. Without it, the lace stays slightly collapsed.
- 💡 Tie the cord knot larger than the magic ring. A small knot slips through the hole.
- 💡 Keep clapper stitches tight. Loose stitches show the stuffing through the metallic yarn.
- 💡 For a larger bell, use DK yarn and a 3.5 mm hook. The pattern stays the same and the bell comes out about 4 in (10 cm).
🧼 N. Care Instructions
Spot-clean only, with a damp cloth and mild soap. Because the bell is stiffened, avoid soaking it. Air dry completely. Store flat or in a small box away from direct sunlight, and wrap it in tissue between seasons to keep the bow from crushing. Metallic yarn and glitter ribbon can snag, so keep the ornament away from rough surfaces.
Closing Section
You now have a lace bell that holds its shape, catches the light, and looks far more complex than it is to make. Make a few in a color story to hang as a set, or make one to top a gift. Swap the silver for gold, or choose a softer ribbon. The same design also works for wedding favors, nursery mobiles, or wreath accents.
When you finish yours, share it. I’d love to see your colors.
Post-Article Engagement & Distribution Block
Share the Love: Loved this bell? Save it to your Christmas crochet board, share it with a crafty friend, and tag your finished ornament so others can see it.
Suggested categories: Crochet Patterns · Christmas Crochet · Crochet Ornaments · Free Patterns
Suggested tags: crochet bell, crochet ornament, Christmas ornament pattern, lace bell, silver bell ornament, icy blue crochet, winter crochet, free crochet pattern, handmade Christmas decor, crochet lace pattern, shell stitch ornament, crochet gift topper
Comment invitation: What color combination are you planning for your bell: classic white and gold, bold red and silver, or something unexpected?
You Might Also Like:
- Crochet Snowflake Ornament Pattern
- Crochet Christmas Tree Ornament Pattern
- Crochet Star Ornament Pattern
- Crochet Mini Stocking Ornament
- Crochet Angel Ornament Pattern
Printable/PDF note: A print-friendly or PDF version of this pattern can be offered through a print plugin. <!– AD SLOT: pre-faq –>
❓ R. FAQ
1. How big is this crochet bell ornament?
About 2.5 in (6.5 cm) tall and 2.5 in wide with light-weight yarn and a 2.5 mm hook, before stiffening.
2. Can I use a different yarn?
Yes. Mercerized cotton gives the crispest lace. Soft acrylic works too but is a little less crisp. For a larger bell, use DK yarn with a 3.5 mm hook.
3. What hook size should I use?
A 2.5 mm hook for light fingering or sport yarn. If your lace looks loose or sags, go down a size.
4. Do I need fabric stiffener?
It’s optional, but it helps the bell hold its flared shape and keeps the lace open. It isn’t required.
5. How do I make the bell hang straight?
Block it on a form, and make sure the clapper strand and cord knot are secured in the center of the bell.
6. Is it safe for children?
It’s a decorative piece. The clapper is a small part, so keep it away from babies and toddlers.
7. How do I change the colors?
Replace Icy Blue and Silver with any pair. A light body with a metallic or darker hem keeps the scalloped edge visible.
8. How long does it take to make?
Most crocheters finish it in about 1.5 to 3 hours, depending on lace experience and finishing steps.