🧸 Spiral Stacked-Ring Christmas Tree Ornament — Free Crochet Pattern
🧸 Spiral Stacked-Ring Christmas Tree Ornament — Free Crochet Pattern
Amigurumi Pattern · Holiday Décor · Beginner-Friendly
📖 B. Introduction
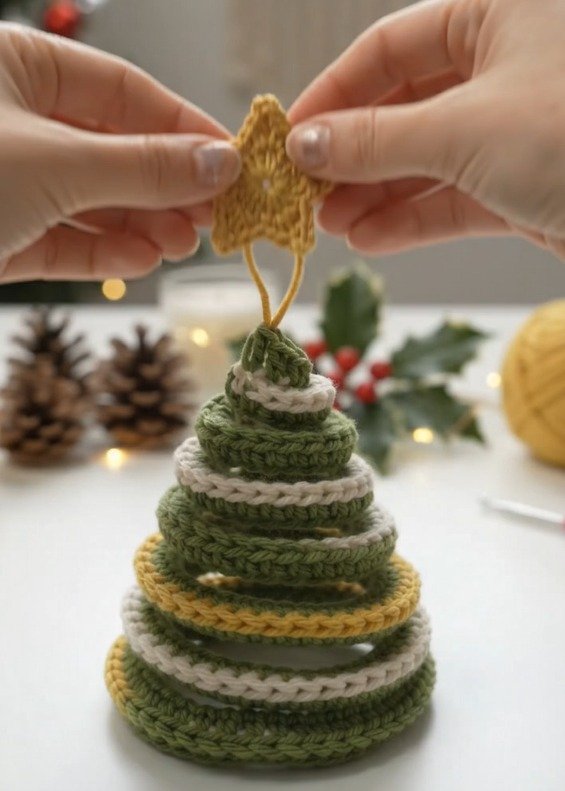
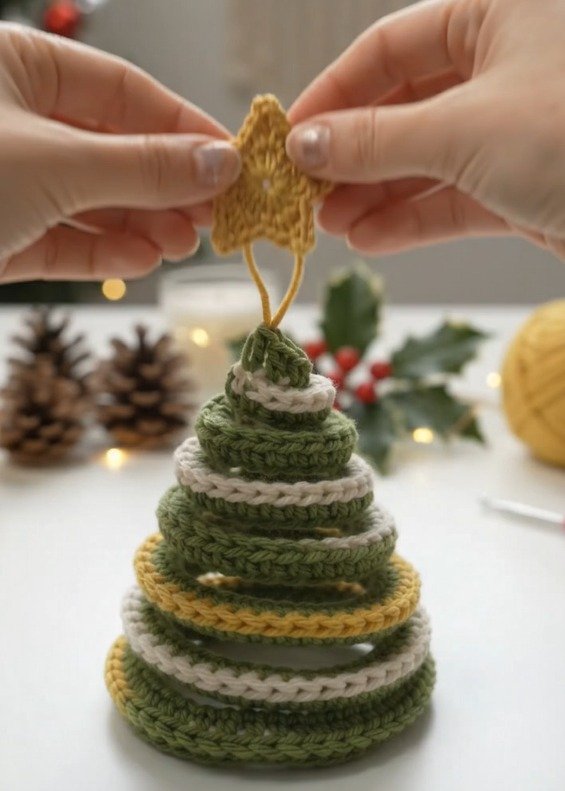
This crochet Christmas tree ornament is built from a stack of yarn-wrapped cord rings, each one slightly smaller than the last, so the piece tapers into a soft, rustic little cone without a single increase round in sight. It’s a different animal from the usual sc-in-the-round amigurumi tree: instead of stitching a spiral shell and stuffing it, you crochet single crochet directly around loops of cotton cord, then stack those covered rings from biggest to smallest like a tiny knitted wedding cake.
The appeal is really in how fast and forgiving it is. There’s no gauge swatch to fuss over, no fiddly invisible decreases, and no stuffing to pack evenly — you’re covering a cord core, so every ring comes out firm and true to shape on the first try. That makes it an easy weeknight project when you want something finished before the kettle’s cold, and a great one for using up the odd small balls of green, cream, and mustard yarn left over from bigger projects.
It reads as farmhouse-Christmas rather than glossy-ornament: the ridged rope texture under the stitches gives each ring a subtle coiled, basket-woven look, and the color-blocked stripes running up the cone read almost like a knitted advent calendar in miniature. Hang a few from mismatched heights on the tree, line them along a mantel, tuck one into a gift box as a topper, or make a set of six for a craft-fair table — the small size and quick build make batch-making genuinely realistic.
Because the whole design comes down to rings and stripes, personalizing it is simple: swap the palette to red and cream for a classic look, charcoal and gold for a more modern mantel display, or all-white for a Scandinavian, minimalist tree. Add a seventh, tinier ring at the top for a taller silhouette, or drop to four rings for a stubby, wide tree that works well as a place-card holder base. A wooden bead glued to the very top in place of the hanging loop turns it into a free-standing mini tree instead of an ornament.
Thank you for supporting this site by sharing it with your friends!
🔍 C. Main Pattern Overview
What you’re making: a 6-tier cone-shaped ornament, built by single crocheting over cotton cord rings of decreasing size and stacking them into a tree shape, finished with a twisted-cord hanging loop.
Why it’s different: most amigurumi trees are worked as a single spiral shell with increases. This one skips shaping altogether — every ring is a flat, closed loop of covered cord, and the tapering shape comes entirely from cutting each ring’s cord a little shorter than the one below it.
Time to make: roughly 60–90 minutes per ornament once you’re comfortable with the technique, including assembly — most of that is the six quick rounds of single crochet, not any fussy shaping.
Skills you’ll pick up: working single crochet around a cord core instead of into stitches, joining a cord into a smooth ring, clean color changes between rounds, and stacking/securing multiple crocheted pieces into one stable 3-D shape.
🎯 D. Skill Level
Easy — Beginner-Friendly.
Every stitch used is a basic single crochet, and there’s no shaping to track — but working around a cord core (rather than into a previous round of stitches) is a slightly different feel than typical amigurumi, so this sits just above true beginner level.
Techniques used:
- Single crochet (sc) worked around a cord/rope core
- Closing cord ends into a smooth, seamless ring
- Clean color changes between rounds
- Twisted-cord (or chain) hanging loop
- Stacking and securing multiple finished pieces into one stable form
📏 E. Finished Size
- Height: approximately 8 cm / 3.25 in (excluding hanging loop)
- Base diameter: approximately 6.5 cm / 2.5 in
- Hanging loop: approximately 4 cm / 1.5 in
What changes the size:
- Cord thickness — a thicker cord (4–5 mm) makes each ring chunkier and the finished tree taller and bolder; a thinner cord (2 mm) gives a dainty, delicate ornament.
- Yarn weight and hook size — DK yarn with a smaller hook produces a tighter, smaller tree; bulky yarn with a larger hook scales everything up.
- Number of rings — adding a 7th tier at the top makes a taller, more slender tree; dropping to 4 tiers makes a short, squat one.
- Tension — pulling stitches snug keeps rings compact; a looser tension will visibly enlarge each ring’s diameter.
🧮 F. Gauge
Exact gauge isn’t critical here — what matters is full, even coverage of the cord. As a reference point using worsted weight (US 4) yarn, a 3.5 mm hook, and 3 mm cotton cord: 7 sc = 4 cm worked around the cord.
🧵 Aim for stitches snug enough that the cord underneath never peeks through, but not so tight that the ring buckles or ripples. If you can see cord between stitches, go down a hook size or crochet more tightly; if the ring is cupping instead of lying flat, loosen up slightly or size up your hook.
🧶 G. Required Yarn Amounts
Amounts below are generous estimates for one ornament in worsted weight cotton or cotton-acrylic blend yarn:
- Forest green (main color): approximately 15 g / 30 m — used on 3 of the 6 rings
- Cream/ecru: approximately 8 g / 16 m — used on 2 rings
- Mustard yellow (accent): approximately 5 g / 10 m — used on 1 ring
- Cotton cord/rope (3 mm): approximately 75 cm total, cut into 6 graduated pieces
- Total project estimate: approximately 28–30 g of yarn plus notions
One skein of each color easily makes 4–6 ornaments, which is worth knowing if you’re batch-making for gifts or a craft fair.
🧰 H. Materials
- 3.5 mm (US E/4) crochet hook
- Worsted weight cotton or cotton-blend yarn in forest green, cream, and mustard yellow
- 3 mm cotton cord, clothesline cord, or piping cord, approximately 75 cm total
- Tapestry/yarn needle
- Scissors
- Fabric glue or a low-temp hot glue gun (for securing cord rings and stacking tiers)
- Removable tape or a small clip (to hold cord ends together while joining the ring)
- Stitch marker (optional, to mark the start of each round)
⚠️ Safety note: hot glue and small cord ends aren’t appropriate for young children to handle unsupervised. If gifting to a household with small kids or pets, secure all ends firmly and consider fabric glue over hot glue for a lower-risk bond.
<!– AD SLOT: post-materials –>
🔤 I. Abbreviations — US Terms
| Abbreviation | Meaning |
|---|---|
| ch | chain |
| rnd | round |
| sc | single crochet |
| sl st | slip stitch |
| st(s) | stitch(es) |
| FO | fasten off |
| RS | right side |
📝 J. Notes Before You Begin
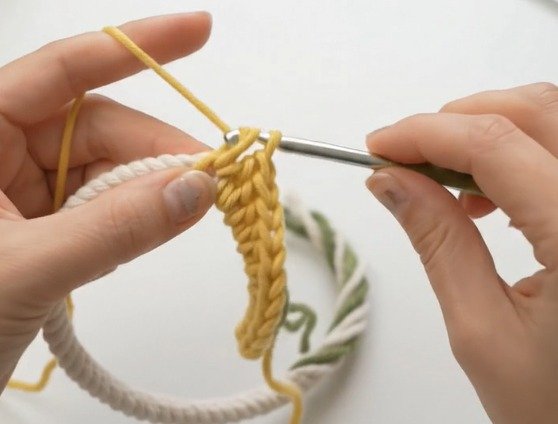
- Each ring is a closed loop worked in joined rounds, not a continuous spiral — join every round with a slip stitch to the first stitch, then chain 1 (this ch-1 doesn’t count as a stitch) before starting the next round.
- To start a ring, overlap the two cut ends of your cord by about 1 cm, secure with a small piece of tape or a dab of glue, and let it dry/set before crocheting over the join — this keeps the seam from working loose mid-round.
- Work your first sc directly around the cord (not into a stitch), covering the taped join completely as you go, so it disappears inside the stitches.
- Color changes: work the last yarn-over of the final sc in the old color with the new color, then continue in the new color. Leave 10–15 cm tails for weaving in — you’ll use some of these tails to help sew tiers together later, so don’t trim them short.
- Because you’re covering a cord rather than building fabric from stitches, gaps show up more visibly than in standard amigurumi — check every few stitches that the cord isn’t peeking through underneath.
- 💡 Save your longest yarn tails from Rings 5 and 6 (the smallest two) — they’re the most convenient ones for stitching the top tiers together later.
🪡 K. Complete Pattern
🔔 Ring 1 — Base (largest tier)
Yarn: Cream · Quantity: Make 1 · Cord length: 20 cm, joined into a ring
Rnd 1: Join cream with a sc around the joined cord, then sc evenly around the entire ring, covering the cord completely. (44 sc)
Rnd 2: Ch 1, sc in each st around. (44 sc)
Sl st to join, FO leaving a 15 cm tail.
🔔 Ring 2 — Lower body
Yarn: Forest green · Quantity: Make 1 · Cord length: 17 cm, joined into a ring
Rnd 1: Join green with a sc around the joined cord, sc evenly around. (38 sc)
Rnd 2: Ch 1, sc in each st around. (38 sc)
Sl st to join, FO leaving a 15 cm tail.
🔔 Ring 3 — Mustard band
Yarn: Mustard yellow · Quantity: Make 1 · Cord length: 14 cm, joined into a ring
Rnd 1: Join mustard with a sc around the joined cord, sc evenly around. (32 sc)
Rnd 2: Ch 1, sc in each st around. (32 sc)
Sl st to join, FO leaving a 15 cm tail.
🔔 Ring 4 — Upper body
Yarn: Forest green · Quantity: Make 1 · Cord length: 11 cm, joined into a ring
Rnd 1: Join green with a sc around the joined cord, sc evenly around. (26 sc)
Rnd 2: Ch 1, sc in each st around. (26 sc)
Sl st to join, FO leaving a 12 cm tail.
🔔 Ring 5 — Cream trim
Yarn: Cream · Quantity: Make 1 · Cord length: 8 cm, joined into a ring
Rnd 1: Join cream with a sc around the joined cord, sc evenly around. (20 sc)
Rnd 2: Ch 1, sc in each st around. (20 sc)
Sl st to join, FO leaving a 12 cm tail.
🔔 Ring 6 — Treetop
Yarn: Forest green · Quantity: Make 1 · Cord length: 5 cm, joined into a ring
Rnd 1: Join green with a sc around the joined cord, sc evenly around. (14 sc)
Rnd 2: Ch 1, sc in each st around. (14 sc)
Sl st to join, FO leaving a 20 cm tail (this longer tail will anchor the hanging loop).
🎀 Hanging Loop
Yarn: Mustard yellow · Quantity: Make 1
Cut two 25 cm strands of mustard yellow yarn. Fold them in half together to make a 4-strand loop.
Twist gently, then let the loop double back on itself once for a corded look, and knot the cut ends together.
Set the loop aside — it gets anchored into the center top of Ring 6 during assembly.
🎨 L. Styling / Assembly / Stability / Final Shaping
Recommended assembly order:
- Lay Ring 1 (cream, largest) flat as your base.
- Center Ring 2 (green) on top of Ring 1, letting the front edge sit about 1 cm in from Ring 1’s front edge so a cream border peeks out below it all the way around.
- Repeat this centered, slightly-inset stacking with Ring 3 (mustard), Ring 4 (green), and Ring 5 (cream), always checking from above that the stack is staying centered rather than leaning to one side.
- Before placing Ring 6, tuck the knotted end of the hanging loop into the center top of Ring 6 and dab it with glue so it’s anchored before the final tier goes on.
- Set Ring 6 (with its loop) on top as the treetop, leaving the loop standing free above the stack.
Securing the tiers: run a thin bead of fabric glue or hot glue along the underside edge of each ring before placing it on the one below, pressing gently for a few seconds until tacky. Once the glue sets, thread the leftover yarn tails from each ring through to the ring below and take 2–3 small tacking stitches at the front, back, and both sides to lock the stack together permanently — glue alone can loosen with handling, but glue plus a few anchor stitches holds for years.
Symmetry check: turn the finished ornament so you’re looking straight down from the top — the loop should sit dead-center over the middle of Ring 1’s circle. If it’s off-axis, the tree will hang crooked; nudge the top tiers before the glue fully cures.
Stability for tabletop use: if you’d like this to stand as a mini tree rather than hang as an ornament, skip the hanging loop and instead glue a 6.5 cm circle of felt to the base of Ring 1 for a flat, non-slip bottom.
✅ Rings centered and stacked in size order (largest to smallest) ✅ Hanging loop anchored and glued before the final tier was placed ✅ Each tier reinforced with tacking stitches, not glue alone ✅ Stack checked from above for a centered, straight hang ✅ All tails woven in and trimmed close ✅ Cord joins on each ring fully hidden under stitches
💡 M. Helpful Crochet Tips
- 💡 Tape the cord ends together and let any glue set for a full minute before you start crocheting the join — stitching over a join that’s still shifting is the #1 cause of a lumpy Ring 1.
- 💡 Work Rnd 1 of each ring a little more snugly than feels natural; the cord core has some give, and stitches that feel “just right” often loosen slightly once the ring is handled.
- 💡 Keep a scrap of the previous round’s color visible for a stitch or two into the color change — it makes it much easier to see exactly where to switch mid-stitch for a clean, non-jagged stripe line.
- 💡 Dry-stack all six rings (no glue yet) before you commit, and look at the silhouette from the side — this is your only chance to adjust ring order or spacing before it’s permanent.
- 💡 If a ring comes out slightly oval instead of round, reshape it gently with your fingers right after the last round while the cord still has some flexibility, before the yarn tension sets.
- 💡 Cut all six cord lengths at once at the start, rather than one at a time, so the graduated taper between tiers stays consistent instead of drifting as you go.
- 💡 A toothpick or bamboo skewer is the easiest tool for pushing a thin bead of glue precisely along a ring’s underside without getting it on the visible stitches.
- 💡 If you’re batch-making several ornaments, crochet all of one ring size first (all six Ring 1s, then all Ring 2s, etc.) — it keeps your tension and stitch count consistent across the batch.
🧼 N. Care Instructions
This ornament is decorative rather than washable — the glued cord joins and stacked tiers aren’t built to survive submersion. Spot-clean with a barely damp cloth if needed, and let it air-dry fully before hanging it again. Store flat or gently cushioned rather than stacked under heavier ornaments, since the tiers can compress out of shape under sustained weight. Keep it out of direct sunlight for extended periods if you’ve used a mustard or other warm-toned yarn, as strong light can fade warm colors faster than cool ones over time.
Closing Section
Once you’ve made one of these, the second one goes together in a fraction of the time — the technique clicks fast, and from there it’s really just deciding on a palette. Keep a set in the classic green-cream-mustard shown here for a rustic mantel display, or run a batch in red and white for a more traditional look under the tree. However you finish it, this is the kind of small, sturdy ornament that survives being packed away and pulled back out year after year — and it makes a genuinely lovely handmade gift tag or stocking topper for anyone on your list. Make one, hang it up, and tag your finished tree — I’d love to see which colorway you land on.
Post-Article Engagement & Distribution Block
📌 Share the Love: If you make this ornament, save this pattern to Pinterest and tag your finished piece — nothing makes a designer’s day like seeing your version of the pattern out in the wild.
Suggested categories: Christmas Crochet, Amigurumi Patterns, Holiday Décor, Beginner Crochet
Suggested tags: crochet Christmas ornament, spiral crochet tree, corded crochet, rope crochet technique, beginner amigurumi, farmhouse Christmas decor, crochet stocking stuffer, mini crochet tree, holiday crochet pattern, quick crochet gift, cotton cord crochet, crochet tree topper, stash-buster crochet pattern
❓ Tell me in the comments: Which color combination are you picturing for your first one — the rustic green-and-mustard shown here, or something bolder like red and gold?
You Might Also Like:
- Crochet Rope Wreath Ornament
- Mini Corded Gnome Ornament
- Stacked-Ring Crochet Basket
- Crochet Pinecone Garland
- Wrapped-Cord Star Ornament
🖨️ Printable version: A print-friendly, ad-free PDF of this pattern can be made available through your site’s print plugin for readers who’d rather work from paper than screen.
<!– AD SLOT: pre-faq –>
❓ R. FAQ
Can I make this without cotton cord? Yes — a soft jewelry cord, paracord, or even tightly twisted kitchen twine will work as a substitute core, as long as it holds its circular shape once joined.
What size hook and cord should I use for a bigger tree? Scale up together: try a 5 mm hook with bulky yarn over a 5 mm cord for a tree roughly double this size, adjusting your first-round stitch counts up proportionally.
My rings look a little wavy instead of flat — what happened? This usually means the stitches are too loose for the cord thickness. Try a hook one size smaller, or crochet each stitch slightly tighter, so the yarn compresses snugly around the cord.
Is this pattern safe for a baby’s nursery or a toy? Not as written — the glued joins and small cord loop aren’t appropriate for a child’s toy. Treat this as a decorative ornament kept out of reach of young children, not a plaything.
Can I skip the hanging loop and use this as a place-card holder? Yes — glue a felt circle to the base instead of adding the loop, and tuck a folded paper name card into the top ring’s opening.
How many balls of yarn do I need to make a full set of ornaments? One small skein of each of the three colors comfortably makes 4–6 ornaments, since each individual ornament uses well under 30 g total.
Do I need to block or steam the finished piece? No — because the shape comes from the cord core rather than the stitches, blocking has little effect here and isn’t necessary.