Blue Butterfly Crochet Table Runner — Free Doily Pattern
Crochet Home Décor · Table Runner · Intermediate
📖 Introduction
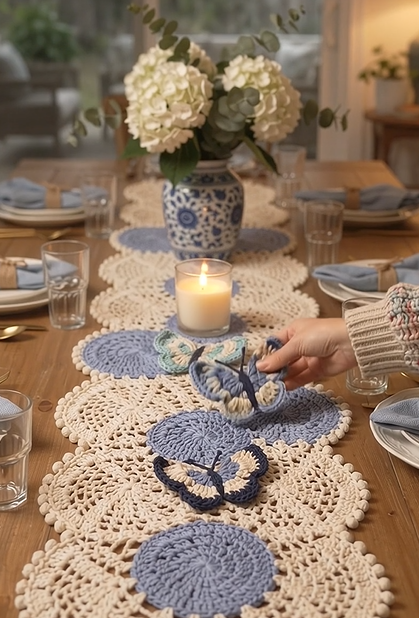
This blue butterfly crochet table runner turns a row of lacy cotton doilies into a single garden-inspired centerpiece, with two hand-crocheted butterflies resting on top like they just landed there. It’s built from joined medallions rather than one long panel, so the piece drapes and pools slightly at the edges of a table the way heirloom lace does — but the ombré blue centers and layered-wing butterflies give it a fresher, more modern look than a vintage doily runner.
This is the project to make when a plain table runner feels too flat for the occasion but a full crochet tablecloth feels like too much commitment. It works a shower, a spring or summer dinner, or a everyday table that could use one unmistakably handmade detail. The graduated blue centers — a soft grey-blue, a dustier mid-blue, and a near-navy — read like a single dip of ombré even though each disc is worked in one solid color, and the butterflies are left loosely tacked so they can be repositioned or lifted off entirely between uses.
Because the runner is modular, size and color are both easy to customize. Add or remove medallions to fit a table from four seats to twelve, swap the ecru cotton for white or natural linen-look yarn, or replace the blue palette with blush, sage, or a single monochrome tone. The butterflies are optional appliqués, so the base runner works on its own as a doily runner if you’d rather skip them, or you can scatter three or four across the full length for a busier look.
🔍 Main Pattern Overview
The runner is built in three independent components that are then assembled:
- Doily Medallions — round, lacy crochet circles with a scalloped picot-and-bobble edge, worked flat in joined rounds. These form the visible “runner” shape when laid in an overlapping row.
- Color Block Centers — smaller solid discs worked in single crochet, in three blue shades, sewn on top of three of the medallions to create the ombré effect.
- Appliqué Butterflies — two layered-wing butterflies with a chain-and-slip-stitch body and antennae, tacked lightly onto two of the medallions.
Medallions are joined edge-to-edge with a handful of whip stitches at the touching points, not sewn flat along a full seam — this keeps the lace edges dimensional and lets the runner flex over a table’s centerline rather than lying rigid.
📌 Save or pin this pattern now — you’ll want the stitch counts handy once you’re mid-medallion.
🎯 Skill Level
Intermediate. Every individual technique is approachable, but the pattern assumes comfort working in continuous joined rounds, reading a picot stitch, and finishing pieces neatly enough that seams and tacking stitches stay invisible.
Techniques used:
- Magic ring start
- Working in joined rounds (not spiral)
- Basic increase patterns to keep a flat circle
- Picot stitch and bobble (or popcorn) stitch for the scalloped edge
- Color changes with a clean join
- Simple appliqué / whip-stitch assembly
- Blocking a lace motif
📏 Finished Size
- Each doily medallion: approximately 20 cm / 8 in diameter after blocking
- Full runner (5 medallions, overlapped): approximately 100 cm x 20 cm / 39 in x 8 in
- Each butterfly: approximately 7 cm / 2.75 in wingspan
What changes the size: Yarn weight is the biggest lever — this pattern uses a fine cotton (similar to a 3/DK-weight cotton cord); moving to a bulkier cotton with a larger hook will produce noticeably bigger medallions from the same stitch counts. Adding or removing medallions changes total runner length in roughly 20 cm / 8 in increments. Blocking firmly also opens the lace pattern and adds 1–2 cm to each medallion’s diameter, so block a test piece before deciding your final medallion count.
🧮 Gauge
Gauge is not critical to the finished look of this project, but consistent tension matters more here than in most crochet — an uneven tension will show as a warped, non-circular medallion once blocked.
Approximate gauge: first 3 rounds of the medallion measure about 6 cm / 2.4 in across before blocking. Work a full test medallion first; if it cups or ruffles, your tension is too tight or too loose relative to your hook, not “wrong” in an absolute sense — adjust the hook size up or down a half step.
🧶 Required Yarn Amounts
| Color | Approx. Amount |
|---|---|
| Ecru / natural cotton (medallion base + border) | 220–250 g total for 5 medallions |
| Soft grey-blue (Center 1) | 10 g |
| Dusty mid-blue (Center 2) | 10 g |
| Deep navy-blue (Center 3) | 10 g |
| Sage / seafoam (Butterfly A wings) | 5 g |
| Navy + dusty blue (Butterfly B wings, two-tone) | 5 g combined |
| Dark thread or fine yarn (butterfly bodies + antennae) | small scrap |
Total project estimate: approximately 260–290 g of cotton yarn across all colors.
🧰 Materials
- Hook: 3.5 mm (E/4) crochet hook, or the size that gives you the gauge above
- Yarn: fine cotton or cotton-blend yarn (DK-weight or a 3-strand cotton cord), in ecru plus 5 accent colors as listed above
- Yarn/tapestry needle for weaving in ends and assembling
- Scissors
- Stitch markers (2–3, for tracking round starts)
- Rust-proof pins and a blocking mat or a towel-covered surface for blocking each medallion flat
- Optional: spray starch or fabric stiffener, for extra-crisp scallops if the runner will be styled rather than laundered regularly
⚠️ Small crocheted appliqué pieces and loose antennae ends are a choking hazard around small children or pets — this runner is a decorative tabletop piece, not intended as a play item.
🔤 Abbreviations — US Terms
| Abbrev. | Meaning |
|---|---|
| MR | Magic ring |
| ch | Chain |
| sc | Single crochet |
| hdc | Half double crochet |
| dc | Double crochet |
| tr | Treble crochet |
| sl st | Slip stitch |
| inc | Increase (2 sc in same st) |
| st(s) | Stitch(es) |
| rnd(s) | Round(s) |
| picot | ch 3, sl st into first ch of the 3 |
| bobble | 4 dc worked into same st, yarn over and pull through all loops on hook |
| fo | Fasten off |
📝 Notes Before You Begin
- Medallions are worked in joined rounds: each round ends with a slip stitch to the first stitch, and the next round begins with a chain-1 or chain-2 turning/standing chain as noted. Do not work in a continuous spiral for this pattern — the picot border relies on defined round breaks to sit evenly.
- Use a stitch marker in the first stitch of each round if you tend to lose track of round starts; the join point is easy to miscount in the busier border rounds.
- Stuffing does not apply to this pattern — the medallions and color-block centers are flat, unstuffed pieces.
- Color changes happen at the join of a round: work the last slip stitch of the old color, then draw the new color through to begin the chain of the next round, so the color change sits cleanly at the round seam rather than mid-round.
- Leave a 15 cm / 6 in tail on every piece meant for sewing (color-block centers, butterfly wings, bodies) — short tails make neat blocking and assembly much harder.
- Block every medallion and every butterfly wing before assembly. Lace pieces that are joined unblocked will never lie fully flat afterward.
🪡 Complete Pattern
🔔 Doily Medallion (make 5)
Color: Ecru Starting point: Magic ring
R1: MR, ch 1 (does not count as st), 8 sc into ring. Join with sl st to first sc. (8)
R2: Ch 3 (counts as first dc), dc in same st, 2 dc in each st around. Join to top of ch-3. (16)
R3: Ch 1, (sc, ch 2, skip 1 st) around. Join to first sc. (8 ch-2 spaces)
R4: Sl st into first ch-2 space, ch 3, (3 dc, ch 2, 3 dc) in same space — this forms the first "shell." (3 dc, ch 2, 3 dc) in each remaining ch-2 space around. Join. (8 shells)
R5: Ch 1, sc in first dc, sc in each dc across shell, (3 sc, ch 3, 3 sc) in each ch-2 corner space, continue around. Join. (this round should measure roughly 12–13 cm / 5 in across at this point — check before continuing)
R6: Ch 4 (counts as dc + ch 1), skip 1 st, (dc, ch 1, skip 1 st) around, working (dc, ch 2, dc) in each corner ch-3 space from R5. Join to 3rd ch of ch-4. (this opens the lacy mesh body of the doily)
R7 (scallop/picot border): Ch 1, sc in first st, *ch 3, picot, ch 3, skip 2 sts, sc in next st, bobble in next st, sc in next st* — repeat around, adjusting the last repeat to land back at the join. Fasten off, leaving a 20 cm / 8 in tail for joining to the next medallion.
Stitch count checkpoint: By the end of R2 you should have 16 stitches; if you don’t, recount before continuing to R3 — every later round depends on that base being accurate.
Weave in the starting tail now; leave the fastening-off tail long for medallion-to-medallion joining later.
🎨 Color Block Center (make 3: 1 each in soft grey-blue, dusty mid-blue, deep navy)
Yarn/color used: One solid color per disc, as listed in Required Yarn Amounts Quantity: 3 total Starting point: Magic ring
R1: MR, ch 1, 6 sc into ring. Join. (6)
R2: Ch 1, inc in each st around. Join. (12)
R3: Ch 1, (1 sc, inc) x6. Join. (18)
R4: Ch 1, (2 sc, inc) x6. Join. (24)
R5: Ch 1, (3 sc, inc) x6. Join. (30)
R6 (finishing round): Ch 1, sl st evenly around to create a firm, non-curling edge. Fasten off, leaving a 20 cm / 8 in tail for sewing.
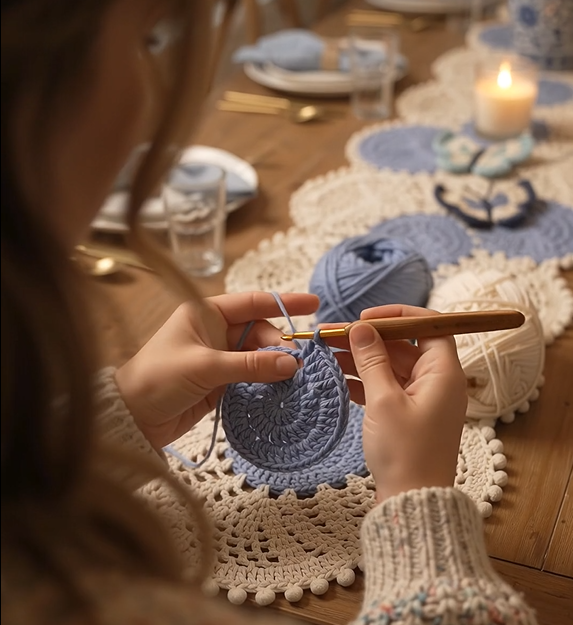
These discs finish at roughly 8–9 cm / 3.25 in across — smaller than the doily medallion, so they sit centered inside R5 of the doily as a color-block “eye” rather than covering the lace border.
🧵 Work the finishing slip-stitch round loosely — a tight sl st round will pull the disc into a slight cup instead of lying flat.
🦋 Butterfly (make 2: Butterfly A in sage/seafoam two-tone, Butterfly B in dusty blue/navy two-tone)
Each butterfly is built from 4 wing pieces (2 large, 2 small), a chained body, and two chain antennae.
Large Wing (make 2 per butterfly)
R1: MR, ch 1, 5 sc into ring, turn.
R2: Ch 1, inc in first sc, sc in next 3, inc in last sc, turn. (7)
R3: Ch 1, inc in first sc, sc across to last st, inc in last st, turn. (9)
R4: Ch 1, sc around the entire outer edge of the piece without increasing, working 3 sc into the point at the tip to turn the corner cleanly. Fasten off, leaving a 15 cm / 6 in tail.
Small Wing (make 2 per butterfly)
R1: MR, ch 1, 4 sc into ring, turn.
R2: Ch 1, inc in first sc, sc in next 2, inc in last sc, turn. (6)
R3: Ch 1, sc around the outer edge without increasing, working 3 sc into the tip point. Fasten off, leaving a 15 cm / 6 in tail.
Two-tone note: For Butterfly B, work the large wings in navy and the small wings in dusty blue (or the reverse) so the color break falls along the natural seam where the wings overlap, rather than mid-piece.
Body & Antennae
Ch 8 with a strand of dark thread or fine yarn. Fasten off, leaving both a starting and ending tail of 10 cm / 4 in each — this chain becomes the body.
For antennae: ch 4, sl st back down the chain to the base, ch 4 again from the same base point, sl st back down. Fasten off leaving a short tail to anchor at the head end of the body.
Assembly of one butterfly: Lay the two large wings side by side, points facing outward, with the two small wings overlapping the lower/inner edge of each large wing. Lay the body chain down the center seam where all four wings meet, and whip-stitch through all layers at the center point only — the wings should stay free and slightly cupped away from the table, not flattened. Tack the antennae chain to what will be the “head” end of the body.
✅ Both butterflies complete when: wings lie in a natural cupped V, body chain is secured only at the center (not along its full length), and antennae sit forward of the wings, not tangled into them.
🎨 Styling / Assembly / Stability / Final Shaping
Recommended assembly order:
- Block all 5 doily medallions and all 3 color-block centers first — flat, right side up, pinned lightly at the scallop points until fully dry.
- Sew each color-block center into place on 3 of the 5 medallions, using the reserved tail and small whip stitches through the back loops only, so no stitching shows on the front. Leave 2 medallions plain ecru (these become the runner’s visual “breathing room” between blue centers).
- Lay the 5 medallions out in your intended order — this pattern alternates plain / blue / plain / blue / blue-toned for a gradual rather than symmetrical ombré, but arrange to taste before joining.
- Join adjacent medallions where their scalloped edges naturally touch, using 3–4 whip stitches through the outer picot loops only. Do not sew a continuous seam — this keeps the border dimensional.
- Once the full runner is joined and laid flat, position the two blocked butterflies on top of two of the medallions (photographed styling places one on a plain ecru medallion near the center and one straddling the join between two medallions).
- Tack each butterfly’s body center to the runner beneath it with 2–3 small stitches — enough to keep it from sliding when the runner is moved, loose enough to lift and reposition if desired.
Symmetry check: Lay the finished runner flat and confirm the color-block centers form a visual gradient (or your chosen order) when viewed from either end of the table — it’s easy to join medallions in a mirrored order by accident.
Stability: Because the runner has no rigid backing, it will move slightly with tablecloth fabric or a bare wood surface. A thin strip of non-slip shelf liner cut to fit beneath the runner (not visible once styled) keeps it from creeping if that’s a concern for your table.
💡 Helpful Crochet Tips
- 💡 Block every medallion before joining, not after — an unblocked lace piece will pull the whole runner out of shape once several are connected.
- 💡 Use a lighter hand on the finishing slip-stitch round of the color-block centers; over-tightening is the most common cause of cupping.
- 💡 Keep a single stitch marker in the very first stitch of every round on the doily medallion — the picot border round is easy to miscount without it.
- 💡 If your bobble stitches look flat instead of raised, check that you’re pulling the working loop up slightly before the final yarn-over — bobbles need a touch of extra loft to read as a texture, not just a bump.
- 💡 Whip-stitch the butterfly wings’ center point through the back loops of the innermost round only — stitching through the tips will flatten the natural cupped shape.
- 💡 Test your medallion join spacing with pins before sewing — lay all 5 pieces out and adjust overlap so the runner reads as one continuous shape rather than 5 separate circles touching at single points.
- 💡 If using a fuzzier or more rustic cotton, size down your hook slightly from the stated gauge — fuzzier fibers tend to make lace stitches look less defined at true gauge.
- 💡 Keep the two butterflies asymmetrical in placement (not mirrored end-to-end) — it reads more like they landed naturally rather than as a printed pattern.
🧼 Care Instructions
Hand-wash in cool water with a mild detergent if the runner picks up dust or spills; cotton lace holds its shape best when reshaped and pinned flat to dry rather than tumble-dried. Avoid wringing — press gently between towels to remove excess water first. Because the navy and darker blue accents are worked in solid cotton, wash the runner separately the first time to rule out any dye transfer onto the ecru base before laundering it alongside other linens. Store flat or loosely rolled rather than folded, to avoid a permanent crease across the lace medallions, and keep it out of direct sunlight for extended periods, as saturated blues are more prone to fading than the neutral ecru.
Closing
However many medallions you land on, this is a runner that rewards a slower, one-piece-at-a-time build — each doily is a satisfying, self-contained finish before you’re on to the next. Once it’s joined and the two butterflies are settled into place, it’s an easy piece to dress a table up or down: styled with a single taper candle and a loose flower arrangement for something quieter, or laid under a full place setting for something more occasion-worthy. If you make a longer version for a larger table, or swap in your own color story, it’s worth documenting your center-color order before you start — small changes to the gradient sequence change the whole read of the finished piece.
Share the Love
Made your own version? Save this pattern, share a photo of your finished runner, and tag it so other makers can find it.
Suggested categories: Table Décor, Doilies & Lace, Home Accessories, Butterfly Crochet
Suggested tags: crochet table runner, butterfly crochet pattern, doily table runner, crochet home decor, blue crochet pattern, free crochet pattern, cotton crochet doily, crochet appliqué, spring table decor, ombre crochet, lace table runner, intermediate crochet pattern
Tell us: What color palette would you use for your table — would you keep the blue ombré or swap in a different color story entirely?
You might also like:
- Scalloped Cotton Coaster Set
- Dragonfly Appliqué Placemats
- Ombre Lace Doily Wall Hanging
- Butterfly Garden Baby Blanket
- Round Lace Trivet Trio
A print-friendly version of this pattern can be made available through a print/PDF plugin for readers who prefer a paper copy at the hook.
SEO Package
- SEO title: Blue Butterfly Crochet Table Runner — Free Doily Pattern
- Meta description: Crochet a blue butterfly table runner from joined lace doilies with ombré color-block centers. Free pattern with stitch counts, sizing, and assembly steps.
- Focus keyword: blue butterfly crochet table runner
- Secondary keywords: crochet table runner pattern, butterfly crochet appliqué, crochet doily runner, ombre crochet centerpiece, free crochet table runner pattern, crochet butterfly applique pattern, cotton crochet doily pattern, lace crochet table runner, crochet home decor pattern, scalloped crochet edging pattern
- Suggested URL slug: /blue-butterfly-crochet-table-runner
- Suggested H2/H3 keyword variants: “How to Crochet a Doily Table Runner,” “Crochet Butterfly Appliqué Tutorial,” “Ombre Blue Crochet Centerpiece,” “Joining Crochet Doilies into a Runner”
- Suggested internal-anchor-text phrases: “this butterfly appliqué technique,” “our full doily runner collection,” “a matching coaster set in the same palette,” “more ombré crochet home decor patterns”
- Suggested image file names & alt text:
blue-butterfly-crochet-table-runner-hero.jpg— “Blue butterfly crochet table runner styled on a wood dining table with candles”crochet-doily-medallion-closeup-bobble-border.jpg— “Close-up of crochet doily medallion showing picot and bobble scalloped border”crochet-butterfly-applique-flat-lay.jpg— “Flat lay of finished crochet butterfly appliqué with layered wings before attaching to runner”
- Suggested schema/structured-data notes: A CraftProject or HowTo schema type fits best where the platform supports it, populated with name, hero image, an approximate totalTime for the full runner, the supply list from Materials, and the tool list (hook size, needle); otherwise standard Article schema with the hero image and meta description is a safe fallback.
- Suggested Pinterest title: Blue Butterfly Crochet Table Runner (Free Doily Pattern)
- Suggested Pinterest description: A lacy crochet table runner made from joined doily medallions with ombré blue color-block centers and two crochet butterfly appliqués. Free pattern with full stitch counts.
- Pinterest hashtags: #crochetpattern #crochettablerunner #crochetdoily #freecrochetpattern #crochethomedecor #butterflycrochet #crochetappliqué #cottoncrochet
- Pinterest pin image concepts: styled overhead flat-lay of the full runner on a set table with candle and florals; in-hand close-up showing the bobble border texture and one butterfly appliqué mid-attachment
❓ FAQ
Can I make this runner longer for a bigger table? Yes — each medallion adds roughly 20 cm / 8 in to the total length. Add medallions in pairs if you want the color-block centers to stay symmetrical from both ends of the table.
What yarn substitutions work well for this pattern? Any fine cotton or cotton-blend yarn at a similar weight works; mercerized cotton gives the crispest stitch definition for the picot border, while a softer cotton blend will drape more and show the lace pattern a little less sharply.
Do the butterflies need to be sewn on permanently? No — tacking them at just the center point with 2–3 stitches lets you lift them off for washing the runner or rearrange them along its length.
What hook size should I use if my gauge doesn’t match? Size down for a smaller, denser medallion or size up for a larger, more open one; the finished look tolerates some variation, but stay consistent across all 5 medallions so they match each other.
Is this pattern beginner-friendly? It’s rated intermediate mainly because of the joined-round picot border and appliqué assembly; a confident beginner who has already worked a simple round motif and a basic picot stitch could still manage it with a bit more time.
How do I keep the color-block centers from puckering the doily underneath? Block the doily flat first, then sew the center on with slightly loose whip stitches through back loops only — pulling the sewing yarn too tight is the main cause of puckering.
Can I skip the butterflies entirely? Yes — the runner is a complete, finished piece with just the five doily medallions and color-block centers if you’d rather leave it as a doily runner without appliqués.