Crimson Red Petal Lace Table Runner: Free Crochet Pattern
Crochet Pattern · Home Décor · Lace Table Runner · Intermediate
📖 Introduction
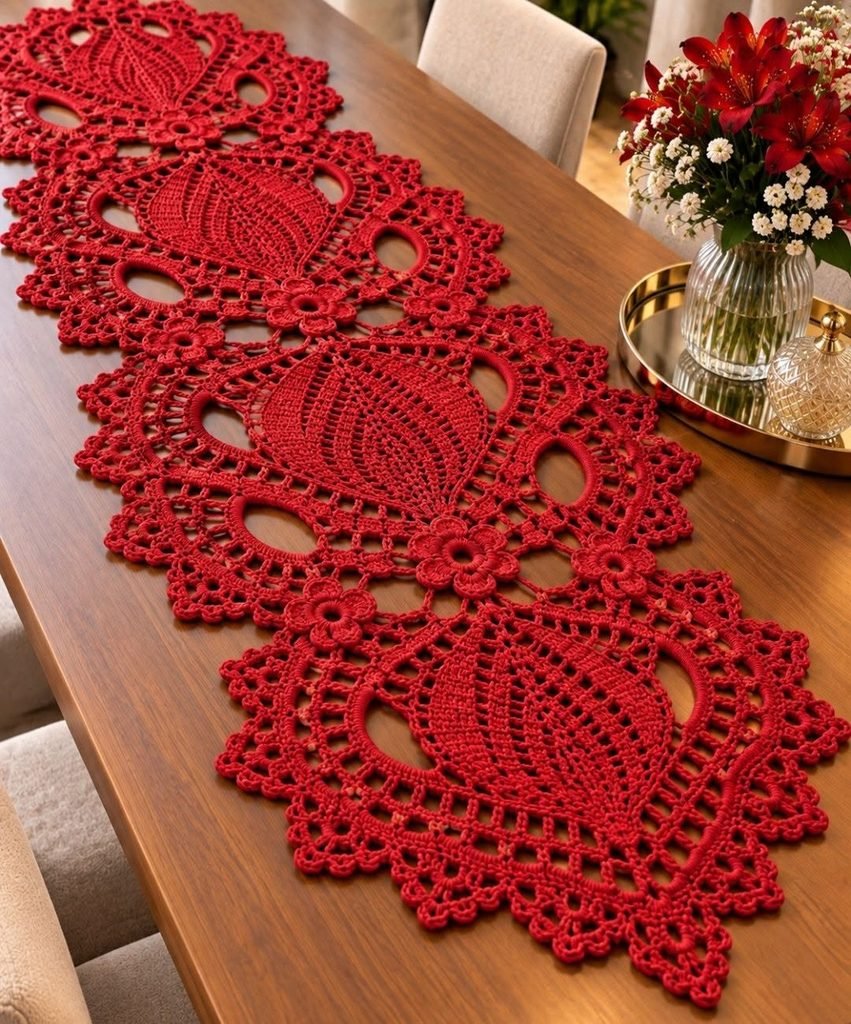
This crochet table runner is built from four leaf-centered lace motifs in deep crimson thread. Each motif has a ribbed, almond-shaped center, four open oval windows, a mesh band and a scalloped edge tipped with tiny picots. The motifs meet tip to tip and are finished with layered crochet flowers at the joins. The result is a slim, heirloom-style runner that looks equally at home on a dining table, sideboard or console.
The main appeal is that every motif is worked in the round from a single chain, so there is no separate leaf to sew and no motif is worked from a different starting point. Once you have made one, you have made all four. The design also grows well: add a fifth motif for a longer table, or move to thicker cotton for a bolder statement.
Deep red suits Christmas and Valentine’s tables, and it also works as an everyday accent against wood or a white cloth. The runner makes a good wedding or housewarming gift, a keepsake for a milestone anniversary, or a strong item for a craft-fair table.
The most recognizable details are the raised, sc-covered window rings, the vertical front-post “veins” on the leaf, and the flowers stitched over each join. The pattern uses a leaf-with-ribs interpretation of these features rather than copying any existing chart.
Personalizing is simple. Try ivory, sage or midnight blue thread, or swap the flowers for buttons or beads. To change the size, follow the yarn-weight notes in the Finished Size section.
🔍 Main Pattern Overview
The runner is four identical motifs (Make 4), joined at one point during the final round, plus crocheted flowers that bridge and reinforce the joins.
Motif structure
| Rounds | Section | Purpose |
|---|---|---|
| R1–R4 | Leaf center | Chain-based oval, pointed tips, front-post ribs |
| R5–R7 | Window rounds | Sc frame, chain arches, arches covered in sc |
| R8–R10 | Mesh and edge | Dc/ch-1 mesh, ch-sp arches, picot-tipped shells |
Stitch count at a glance (per motif)
| Round | Count |
|---|---|
| R1 | 44 sc |
| R2 | 46 dc + 2 ch-2 sps |
| R3 | 50 dc/FPdc + 2 ch-2 sps |
| R4 | 54 dc/FPdc + 2 ch-2 sps |
| R5 | 58 sc + 2 ch-2 sps |
| R6 | 18 sc + 4 ch-16 arches + 2 ch-6 loops |
| R7 | 112 sc |
| R8 | 58 dc + 54 ch-1 sps |
| R9 | 28 sc + 22 ch-5 arches + 2 ch-7 arches |
| R10 | 196 sts + 24 picots |
Design notes: I made these choices myself; none are verified from the photo.
- The photo shows a staggered layout. I use a straight tip-to-tip line for reliable joining.
- The oval windows are D-shaped rings hugging the leaf, which is simple to crochet and blocks into a soft oval.
- Flowers are made separately and sewn on after blocking.
📌 Save or print this pattern.
🎯 Skill Level
Intermediate. The stitches are simple, but the pattern needs steady tension, careful counting and comfort with thread.
Techniques involved:
- Chain-based oval foundation
- Pointed tips with (dc, ch 2, dc)
- Front post double crochet (FPdc) ribs
- Skipping stitches for chain arches
- Working single crochet over a chain
- Dc/ch-1 mesh, ch-sp arches and picot shells
- Making a joining picot
- Making flowers from a magic ring
- Wet blocking lace
📏 Finished Size
Approximate blocked sizes (thread + 2.0 mm hook):
- One motif: 20 × 16 cm (8 × 6¼ in)
- Runner (4 motifs): about 80 × 16 cm (31½ × 6¼ in)
- Large flower: about 3.5 cm (1⅜ in); small flower: about 2.5 cm (1 in)
What changes the size:
- Thread weight and hook: DK-weight cotton with a 3.5 mm hook roughly doubles every dimension. Three motifs would then make a runner about 120 cm (47 in) long.
- Tension and blocking: loose chains and aggressive blocking both add length.
- Number of motifs: each extra motif adds about 20 cm (8 in).
🧮 Gauge
Exact gauge isn’t critical for a lace runner, but consistency is. Firm stitches and relaxed chains give clean windows and crisp shells.
Check: after R4, the leaf center should measure about 9 cm (3½ in) long × 4.5 cm (1¾ in) wide before blocking. If yours is noticeably larger or smaller, adjust your hook before continuing.
🧶 Required Yarn Amounts
🧵 Color: Crimson Red (any saturated red).
| Component | Qty | Approx. thread |
|---|---|---|
| Motifs | 4 | 210–240 m (230–262 yd) |
| Large flower base | 3 | 15–20 m (16–22 yd) |
| Small flowers | 9 | 25–30 m (27–33 yd) |
| Tails and swatch (~10%) | — | 25–30 m (27–33 yd) |
| Total | approx. 275–320 m (300–350 yd) |
Buy at least 330 m (360 yd) to be safe, all from the same dye lot.
🧰 Materials
- Size 3 mercerized cotton crochet thread (or fingering-weight mercerized cotton), Crimson Red, about 330 m (360 yd)
- 2.0 mm (US B-1) steel or aluminum hook
- Tapestry needle
- Sharp scissors
- At least 3 stitch markers
- Rustproof T-pins and foam or interlocking blocking mats
- Measuring tape
- Optional: fabric stiffener or starch
Safety: the flowers are sewn on, but the runner is not a toy. Keep loose flowers away from small children and pets.
🛍️ Supplies We Recommend (placeholder): a 2.0 mm steel hook, size 3 mercerized cotton thread, rustproof blocking pins, a set of interlocking foam mats. [Insert your own affiliate links.]
🔤 Abbreviations — US Terms
| Abbrev. | Meaning |
|---|---|
| beg | beginning |
| ch | chain |
| ch-sp | space created by chains |
| dc | double crochet |
| FPdc | front post double crochet: yarn over, insert hook front-to-back-to-front around the post of the indicated stitch, complete as a dc |
| hdc | half double crochet |
| MR | magic ring |
| R | round |
| RS | right side |
| sc | single crochet |
| sl st | slip stitch |
| st(s) | stitch(es) |
| tr | treble crochet |
| ( ) | work all stitches into the same st or sp |
| ×N | repeat the bracketed sequence N times |
| picot | ch 3, sl st in 3rd ch from hook |
📝 Notes Before You Begin
- Joined rounds: every round is worked with the RS facing you, never turned. Ch 3 at the start of a dc round counts as the first dc; ch 1 at the start of an sc round does not count.
- Tip A and Tip B: the two ends of the leaf. Tip A is where R2 begins. Place a stitch marker in the ch-2 sp at tip A after R2 and move it up each round through R5. Every round starts at tip A.
- Over-the-chain sc (R7): work the sc into the space beneath the chain, encasing it. Keep the chain relaxed so the window stays open and oval.
- Chains: work them loosely. Tight chains pinch the windows.
- Left-handed crocheters: mirror all left/right cues in the joining and flower-placement notes.
- Ends: weave in as you go, along the wrong-side of solid stitches, not through open mesh.
🪡 Complete Pattern
🍃 Motif (Make 4)
Color: Crimson Red. Worked in the round from a chain oval.
Leaf Center (R1–R4)
R1: Ch 22. 3 sc in 2nd ch from hook, sc in next 19 ch, 3 sc in last ch. Working along the other side of the foundation ch, sc in next 19 bottom loops. Join with sl st to first sc. (44)
The first 3 sc are tip A; the 3 sc in the last ch are tip B.
R2: Sl st in next sc (middle sc of tip A). Ch 3 (counts as dc), ch 2, dc in same st. Dc in next 21 sc. (Dc, ch 2, dc) in next sc. Dc in next 21 sc. Join to top of beg ch 3. (46 dc + 2 ch-2 sps)
Place a marker in the tip A ch-2 sp.
R3:
- [Tip A] Sl st in ch-2 sp. Ch 3 (counts as dc), ch 2, dc in same sp. Dc in next 2 dc.
- [Side 1] Dc in next 3 dc, (FPdc around next dc, dc in next 2 dc) ×4, FPdc around next dc, dc in next 3 dc.
- [Tip B] Dc in next 2 dc, (dc, ch 2, dc) in ch-2 sp, dc in next 2 dc.
- [Side 2] Dc in next 3 dc, (FPdc around next dc, dc in next 2 dc) ×4, FPdc around next dc, dc in next 3 dc.
- [Tip A] Dc in last 2 dc. Join to top of beg ch 3. (50 sts + 2 ch-2 sps)
R4:
- [Tip A] Sl st in ch-2 sp. Ch 3 (counts as dc), ch 2, dc in same sp. Dc in next 3 dc.
- [Side 1] Dc in next 3 dc, (FPdc around next FPdc, dc in next 2 dc) ×4, FPdc around next FPdc, dc in next 3 dc.
- [Tip B] Dc in next 3 dc, (dc, ch 2, dc) in ch-2 sp, dc in next 3 dc.
- [Side 2] Repeat Side 1 sequence.
- [Tip A] Dc in last 3 dc. Join to top of beg ch 3. (54 sts + 2 ch-2 sps)
💡 Keep the FPdc directly above the previous ones so the ribs stack in straight columns.
🪟 Window Rounds (R5–R7)
R5: Sl st in tip A ch-2 sp. Ch 1, (sc, ch 2, sc) in same sp. Sc in next 27 dc. (Sc, ch 2, sc) in ch-2 sp of tip B. Sc in next 27 dc. Join to first sc. (58 sc + 2 ch-2 sps)
Between the two ch-2 sps there are 29 sc: 1 pair-sc, 27, 1 pair-sc.
R6:
- [Tip A] Sl st in ch-2 sp. Ch 1, (sc, ch 6, sc) in same sp.
- [Side 1] Sc in next sc, ch 16, skip 11 sc, sc in next sc, sc in next 4 sc, ch 16, skip 11 sc, sc in next sc.
- [Tip B] (Sc, ch 6, sc) in next ch-2 sp.
- [Side 2] Repeat Side 1 sequence.
- Join with sl st to first sc. (18 sc, 4 ch-16 arches, 2 ch-6 loops)
Side check: 1 + 11 skipped + 1 + 4 + 11 skipped + 1 = 29.
R7: Ch 1, sc in same sc as join.
- [Tip A] 7 sc over ch-6 loop, sc in next sc. (9 sts)
- [Side 1] Sc in next sc, 20 sc over ch-16 arch, sc in next sc, sc in next 4 sc, 20 sc over ch-16 arch, sc in next sc. (47 sts)
- [Tip B] Sc in next sc, 7 sc over ch-6 loop, sc in next sc. (9 sts)
- [Side 2] Repeat Side 1 sequence. (47 sts)
- Join to first sc. (112)
🎀 Lace Mesh and Picot Edge (R8–R10)
R8:
- [Tip A] Ch 3 (counts as dc, stands over first sc), (ch 1, skip 1 sc, dc in next sc) ×4. (9 sts)
- [Side 1] Dc in next sc, (ch 1, skip 1 sc, dc in next sc) ×23. (47 sts)
- [Tip B] Dc in next sc, (ch 1, skip 1 sc, dc in next sc) ×4. (9 sts)
- [Side 2] Dc in next sc, (ch 1, skip 1 sc, dc in next sc) ×23. (47 sts)
- Join to top of beg ch 3. (58 dc + 54 ch-1 sps)
R9:
- [Tip A] Ch 1, sc in first ch-1 sp, ch 7, skip next 2 ch-1 sps, sc in next ch-1 sp.
- [Side 1] Sc in next ch-1 sp, (ch 5, skip next ch-1 sp, sc in next ch-1 sp) ×11.
- [Tip B] Sc in next ch-1 sp, ch 7, skip next 2 ch-1 sps, sc in next ch-1 sp.
- [Side 2] Sc in next ch-1 sp, (ch 5, skip next ch-1 sp, sc in next ch-1 sp) ×11.
- Join to first sc. (28 sc, 22 ch-5 arches, 2 ch-7 arches)
R10:
- [Tip A shell] Ch 1. In ch-7 arch work (sc, hdc, 2 dc, tr, picot, tr, 2 dc, hdc, sc). Sl st in each of next 2 sc.
- [Side 1] (In next ch-5 arch work (sc, hdc, 2 dc, picot, 2 dc, hdc, sc), sl st in next sc) ×10, then one more shell in next ch-5 arch. (11 shells) Sl st in each of next 2 sc.
- [Tip B shell] In ch-7 arch work (sc, hdc, 2 dc, tr, picot, tr, 2 dc, hdc, sc). Sl st in each of next 2 sc.
- [Side 2] Repeat Side 1. (11 shells) Sl st in each of next 2 sc (landing on first sc). Fasten off. (196 sts + 24 picots)
Name the shells for joining: tip A shell; S1-1…S1-11; tip B shell; S2-1…S2-11.
⚠️ Count the 11 skipped stitches twice on each R6 arch. It’s the most common place to go wrong.
🔗 Joining Motifs 2–4
Lay the finished motifs in a row, tip A of each motif at the top and tip B at the bottom. Motif 1 stays complete and free. Motifs 2, 3 and 4 each attach at their tip A shell to the previous motif’s tip B shell.
On motifs 2, 3 and 4, work R10 as written except at the tip A shell picot. Replace it with a joining picot: ch 1, sl st in the center picot of the previous motif’s tip B shell, ch 1, sl st in top of the last stitch worked.
Motif 1’s tip A and motif 4’s tip B keep their regular picots.
🌸 Flowers
Small flower (Make 9)
R1: MR, ch 1, 5 sc in ring, join with sl st to first sc. (5)
R2: (Sc, hdc, 2 dc, hdc, sc) in each sc around. Join, fasten off. (5 petals, 30 sts)
Large flower base (Make 3)
R1: MR, ch 1, 10 sc in ring, join with sl st to first sc. (10)
R2: (Sc, hdc, 3 dc, hdc, sc) in next sc, sl st in next sc; repeat 4 more times. Fasten off. (5 petals, 35 sts + 5 sl sts)
Leave a small (about 3 mm) opening in each MR center for the open-centered look.
🎨 Styling / Assembly / Stability / Final Shaping
Recommended assembly order
- Make motif 1 through R10.
- Make motifs 2–4, joining at tip A as described.
- Weave in all ends.
- Make 3 large flower bases and 9 small flowers.
- Wet block the joined runner (see below).
- Sew a small flower over each large flower base, offsetting the petals.
- Sew a layered large flower over each tip join, catching both motifs.
- Sew a small flower across each side gap at every junction, with one edge anchored to each adjacent shell (S1-11 to S1-1, and S2-1 to S2-11).
- Optional: starch lightly and let dry flat.
Blocking and stability: soak the runner in cool water, press out excess without wringing, and pin it flat. Pin each picot, and shape each ch-16 window into an oval with a pin at either end and one in the middle of the arch. Let it dry completely before removing pins.
Styling: center the runner along the table’s length. Because there are no stuffed parts, the flowers are the only raised details. Sewing them after blocking keeps them from being pressed flat.
Symmetry check: lay the runner out and confirm that all four leaf tips point along the same axis and that the flowers sit evenly on each join.
✅ Final Shaping Checklist
- ✅ Leaf ribs are straight and evenly spaced
- ✅ All eight windows on the runner are open, oval and even in size
- ✅ Every tip A and tip B lines up down the length of the runner
- ✅ Picots are pinned open and evenly spaced
- ✅ Joins hold firmly
- ✅ Flowers sit centered on the joins with no gaps
- ✅ All ends are woven in
- ✅ The runner lies flat with no cupping
💡 Helpful Crochet Tips
- 💡 Keep a marker in the tip A ch-2 sp through R5. It orients every following round.
- 💡 Work the FPdc around the post exactly above the previous FPdc. Drifting shifts the ribs off their columns.
- 💡 Before chaining an R6 arch, mark the anchor stitch (the 13th on each side) so you can find it quickly.
- 💡 Chain the arches loosely, even if you have to go up a hook size just for those chains.
- 💡 On R7, aim for one sc per chain plus four extra spread evenly. Bunching all four in one spot distorts the window.
- 💡 Keep the joining picot chains short (ch 1) so the two tip shells sit snugly against each other.
- 💡 Join a new ball at the end of a round, not in the middle of a window arch.
- 💡 Dark red dyes can bleed. Test-wash a swatch in cool water before the first full wash.
🧼 Care Instructions
- Hand wash in cool water with mild detergent. Wash separately from light-colored fabrics.
- Do not wring; press out water with a towel.
- Lay flat to dry, re-pinning if needed to reshape windows and picots.
- Iron on the cotton setting using a pressing cloth, or restore crispness with starch.
- Store flat or rolled around a cardboard tube, with acid-free tissue between layers.
- Keep away from direct sunlight to prevent fading, and away from candle flames and hot dishes.
🧡 Closing Thoughts
A finished lace runner represents many quiet hours, and it shows in the details: the ribbed leaves, the sturdy window rings, the little flowers at each join. Wherever it ends up, on a holiday table, a dresser or a gift-wrapped shelf, it carries the mark of handwork.
Try a new color, a longer chain of motifs, or heavier thread for a bolder version. When you finish your runner, share a photo and tell us what you changed.
📌 Post-Article Engagement and Distribution Block
Share the Love: Loved this pattern? Save it to your Pinterest boards, share it with your crochet friends, and tag us in your finished runner photos.
Suggested categories: Crochet Patterns · Home Décor · Table Runners and Doilies · Free Patterns
Suggested tags: crochet table runner, lace crochet pattern, red crochet runner, crochet doily pattern, thread crochet, motif runner, Christmas table décor, crochet home decor, free crochet pattern, crochet flower embellishment, picot edging, heirloom crochet, crochet gift idea
Comment invitation: Which finish would you choose for your runner: crisp starched lace, or soft and drapey?
You Might Also Like:
- Ivory Lace Doily Set Crochet Pattern
- Crochet Flower Coasters
- Crochet Christmas Table Runner
- Crochet Snowflake Table Mat
- Vintage-Style Crochet Bread Basket Cover
Printable/PDF: A print-friendly version can be offered via your print plugin. [Insert download link when available.] <!– AD SLOT: pre-faq –>
❓ FAQ
What thread and hook do I need for this crochet table runner?
Size 3 mercerized cotton crochet thread with a 2.0 mm (US B-1) hook. If you prefer a bolder look, DK-weight cotton with a 3.5 mm hook roughly doubles the size.
How long is the finished runner, and can I make it longer?
About 80 cm (31½ in). Each extra motif adds about 20 cm (8 in), and you join them exactly the same way.
Is this pattern beginner-friendly?
It’s best for intermediate crocheters. All stitches are basic, but counting, FPdc and skipping stitches for the window arches call for some experience.
How do I make the oval windows?
You chain a long arch (R6), then work single crochet over the chain (R7). The result is a raised ring. Blocking with pins gives the windows their oval shape.
Do you have to block a crochet lace runner?
Yes. Blocking opens the windows, evens the shells and gives the runner its final size. It’s the single most important finishing step.
Can I use a different color?
Yes. Any color works. For dark shades, test-wash a swatch first to check colorfastness.
How do I stiffen the runner?
Dip it in fabric stiffener or light starch after washing, pin it flat, and let it dry completely before unpinning.