Little Feet Crochet Sandals: 4 Adorable Animal Baby Shoe Patterns (Free Pattern Set)
Amigurumi Baby Shoes · Nursery & Gift Crochet · Beginner-to-Intermediate
📖 B. Introduction
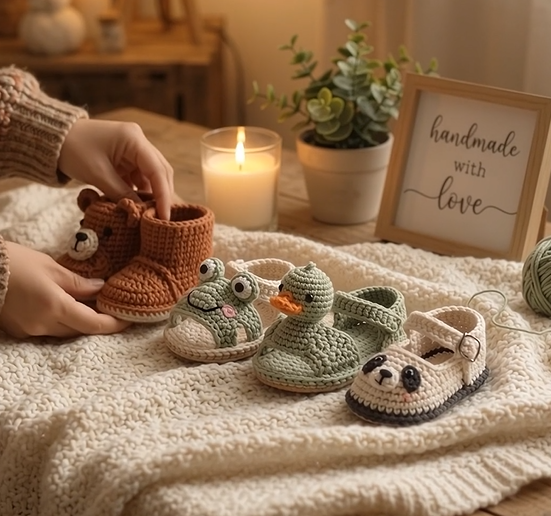
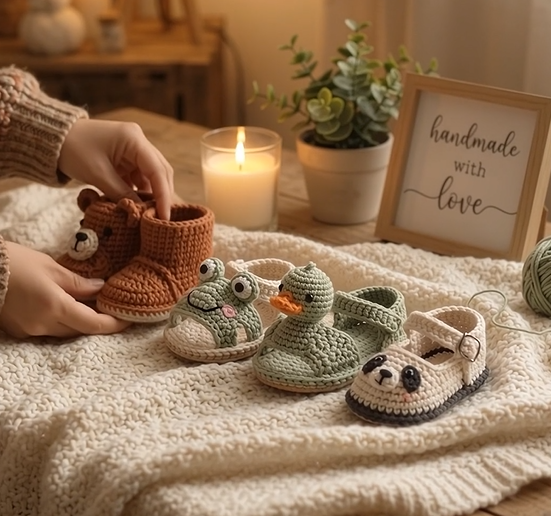
Little Feet Crochet Sandals are a set of four amigurumi-style baby shoes — a wide-eyed frog, a round-billed duckling, a black-and-white panda, and a fuzzy-eared teddy bear — each built on the same soft, sturdy sole so a beginner can master one shape and then customize the rest. If you’ve ever wanted baby shoes that look like tiny stuffed animals wrapped around a foot, this is the set that gets you there.
The appeal here isn’t just cuteness — it’s practicality. These are worked in firm, tightly-tensioned single crochet, so they hold their shape on wobbly newborn feet instead of flopping over like a knit bootie. That makes them genuinely wearable, not just a photo prop, though most crocheters will admit these end up as keepsakes and nursery-shelf decor as often as actual footwear. They’re a natural fit for baby showers, hospital-bag “coming home” outfits, milestone photos, and character-loving grandparents who want the whole barnyard-and-woodland set.
What makes each design read instantly is a single anchor feature: the frog’s bulging embroidered eyes sitting right on the toe strap, the duck’s blunt orange bill in contrasting yarn, the panda’s soft black eye patches against cream, and the bear’s rounded ears peeking up from an ankle-boot shaft. None of them require complicated colorwork — every character comes together with basic color changes, simple appliqué shapes, and embroidered facial details.
All four share one sole and wall construction, so once you’ve made one pair, the rest go faster. Swap the accent color for any animal you like (a cream bear, a yellow duck, a pink pig), size up the sole for a 3–6 or 6–12 month fit, or leave off the face entirely for a plain colorwork sandal. Below you’ll find the complete construction for all four designs, written so you can make one or the whole set.
🔍 C. Main Pattern Overview
This set includes four uppers built on one shared sole and ankle-wall base:
| Design | Style | Closure | Signature Detail |
|---|---|---|---|
| 🐸 Frog | Open sandal | Ankle strap + button | Bulging appliqué eyes, pink cheek blush |
| 🦆 Duck | Open sandal | Ankle strap + button | Contrast bill, rounded head shape |
| 🐼 Panda | Closed mary-jane | Side strap + button | Black eye patches, contrast sole trim |
| 🐻 Bear | Ankle boot | Pull-on, no closure | Rounded ears, cream muzzle |
📌 Save this pattern to your craft board — you’ll want it open on your phone while you crochet.
🎯 D. Skill Level
Skill Level: Beginner-to-Intermediate
The sole and wall are genuinely beginner-friendly — single crochet, one increase round, and continuous spiral rounds. The intermediate rating comes from the finishing techniques used across the set:
- Invisible increases and decreases for smooth shaping on the toe and heel curves
- Color changes carried invisibly up the inside of the work
- Simple appliqué pieces (bill, ears, eye patches, muzzle) sewn on after stuffing
- Basic embroidery for facial features (straight stitch, French knot, satin stitch)
- Working in continuous spiral rounds without joining, using a stitch marker throughout
If you’ve made at least one amigurumi animal or crocheted a hat in continuous rounds, you have every skill this set requires.
📏 E. Finished Size
Sole length: approximately 9.5 cm / 3.75 in (Newborn–3 months)
Ankle circumference (bear boot shaft): approximately 11.5 cm / 4.5 in
This is written for a newborn/0–3 month foot. To size up:
| Adjustment | Effect |
|---|---|
| Add 4 extra stitches to the sole foundation chain | Roughly one size up (3–6 months) |
| Add one extra increase round to the sole | Widens and lengthens proportionally |
| Switch to a bulkier yarn + larger hook, same stitch counts | Sizes up while keeping the pattern simple |
| Add 2–3 rounds to the ankle wall before shaping | Taller boot shaft / higher sandal strap |
Finished size will also shift slightly with stuffing density and individual tension — always check against a real baby foot or a printed foot-length guide before gifting.
🧮 F. Gauge
Gauge is secondary to tension for this project. What matters most is a tight, dense fabric with no visible gaps between stitches, since these are worked without a lining and stuffed lightly for structure.
Approximate gauge: 7 sc x 8 rounds = 2.5 cm (1 in) in single crochet, worked tightly with a hook one size smaller than the yarn label recommends.
If your fabric feels loose or floppy, drop down a hook size before worrying about matching the exact stitch count above.
🧶 G. Required Yarn Amounts
Worsted weight (US 4 / medium) cotton or cotton-blend yarn, used double-stranded is not required — this pattern uses a single strand held tightly.
| Design | Main Color | Accent Color(s) | Approx. Yardage |
|---|---|---|---|
| 🐸 Frog | Sage green — 1 skein | White, black, pink embroidery floss | ~35 g / 75 yds |
| 🦆 Duck | Sage green — 1 skein | Orange, white, black | ~30 g / 65 yds |
| 🐼 Panda | Cream — 1 skein | Black, pink embroidery floss | ~30 g / 65 yds |
| 🐻 Bear | Terracotta/rust — 1 skein | Cream, black embroidery floss | ~35 g / 75 yds |
Total for all four pairs: approximately 130 g / 280 yds combined, plus small amounts of embroidery floss and one skein of fiberfill (about 15 g total).
🧰 H. Materials
- 3.5 mm (US E/4) crochet hook, or one size smaller than your yarn’s recommended hook, for a tight gauge
- Worsted weight cotton or cotton-blend yarn in main and accent colors (see chart above)
- Small amounts of black, white, orange, and pink yarn or embroidery floss for facial details
- Polyester fiberfill stuffing
- Yarn/tapestry needle
- Stitch markers (essential — this pattern is worked in continuous, unjoined rounds)
- Sewing pins, for holding appliqué pieces before stitching
- 4 small flat buttons (approx. 1 cm / 0.4 in), for the frog, duck, and panda straps
- Sharp embroidery needle, for facial details
⚠️ Safety note: These are photo-and-keepsake-friendly shoes, but buttons, safety eyes, and small appliqué pieces are a choking hazard for babies who mouth their feet or hands. For any shoe a baby will actually wear, embroider all facial features rather than using safety eyes or buttons, and reinforce every appliqué piece with tightly woven-in, doubled thread. Never leave a baby unsupervised while wearing crocheted footwear. <!– AD SLOT: post-materials –>
🛍️ Supplies We Recommend
A size E/4 (3.5mm) crochet hook, a smooth worsted-weight cotton yarn that holds stitch definition well, and polyester fiberfill are the only specialty supplies this project needs — everything else is likely already in your stash.
📌 Want a printable, ad-free version of this pattern? Save your email below and we’ll send the PDF straight to your inbox.
🔤 I. Abbreviations — US Terms
| Abbreviation | Meaning |
|---|---|
| ch | chain |
| sc | single crochet |
| inc | increase (2 sc in same stitch) |
| dec | invisible decrease |
| sl st | slip stitch |
| BLO | back loop only |
| st(s) | stitch(es) |
| rnd(s) | round(s) |
| MR | magic ring |
| ( ) | stitch count at end of round |
| [ ] | repeat instructions inside brackets the stated number of times |
📝 J. Notes Before You Begin
- Work in continuous spiral rounds throughout — do not join or chain up unless noted. Use a stitch marker on the first stitch of each round and move it up as you go.
- Stuff firmly but not overfull — you want the shoe to hold its shape without the seams straining or the sole cupping upward.
- Carry unused colors loosely up the inside of the work when a color reappears within a few rounds, rather than cutting and rejoining each time.
- All appliqué pieces (bill, ears, patches, muzzle) are worked separately and sewn on after the main upper is complete and lightly stuffed.
- Weave in every tail through several stitches and back through itself — these pieces get handled constantly, so a loose end will work its way out.
- The sole and lower wall are identical for all four designs. Make this piece twice for whichever animal(s) you’re crocheting, then follow that design’s individual instructions from Round 6 onward.
🪡 K. Complete Pattern
👣 Shared Base: Sole & Ankle Wall (Make 2 per pair)
Worked in Main Color (MC) for your chosen design.
R1: Ch 12. Sc in 2nd ch from hook and in next 9 ch (10), 3 sc in last ch (3),
    rotate to work into bottom loops of foundation ch: sc in next 9 unworked
    loops (9), 3 sc in last loop (3). (26)
R2: Sc in next 10 (10), inc in next 3 (6), sc in next 10 (10), inc in next 3 (6). (32)
R3: Sc in BLO around. (32)
R4: Sc around. (32)
R5: Sc around. (32)
At the end of Round 5, fasten off if making the sandal/mary-jane styles (Frog, Duck, Panda) — you’ll pick the color back up in the next section. For the Bear boot, do not fasten off; continue directly into the Bear Boot Shaft instructions.
🧵 This 5-round base is identical for every design in this set — the animal character only begins to take shape from here.
🐸 Frog Sandal
Upper strap base — rejoin MC in any st of Round 5:
R6: Sc in first 6 sts only (6) — these 6 stitches form the front toe panel.
    Turn.
R7: Ch1, sc in each of 6 sts (6). Turn.
R8: Ch1, sc in each of 6 sts (6). Fasten off, leaving a long tail.
Ankle strap: With MC, join in the stitch directly opposite the toe panel (at the back of Round 5). Ch 14 (adjust length to fit snugly around ankle), sl st into the stitch on the opposite side of the shoe to form the strap. Fasten off. Sew a button to the strap end and work a corresponding loop or use a stitch gap as the buttonhole.
🧠 Face Appliqué (Make 2 eyes in white, Make 2 pupils in black):
Eye (white): MR 5, sc around. (5) Fasten off, leaving tail for sewing.
Pupil (black): MR 4, sc around. (4) Fasten off.
Sew pupils centered onto eyes. Position both eyes side-by-side at the top of the toe panel (R6–R7), so they sit just above where the foot slides in. Embroider a wide, gently curved smile in black straight stitch across the front of the toe panel, and add two small pink satin-stitch circles beneath the eyes for cheeks.
✅ Frog assembly checklist:
- ✅ Eyes centered and level with each other
- ✅ Smile embroidered before stuffing the toe panel
- ✅ Strap tested for snug (not tight) fit before final button placement
🦆 Duck Sandal
Follow the Frog Sandal’s toe panel and ankle strap construction exactly (R6–R8, plus strap), substituting your duck’s sage-green MC.
👂 Bill Appliqué (orange):
R1: MR 6. (6)
R2: Inc around. (12)
R3: Sc around. (12)
R4: (sc4, dec) around. (10)
Flatten and fasten off, leaving a tail. Stuff very lightly — the bill should stay mostly flat, not round.
Sew the bill horizontally across the center of the toe panel, slightly lower than where the Frog’s eyes sat. Embroider two small black straight-stitch eyes just above the bill in white yarn with black French-knot pupils, positioned closer together than the frog’s for a rounder, more duckling-like face.
💡 Keep the duck’s eyes small and close-set — this single change is what makes the duck read as a different animal from the frog, even though the base shoe is identical.
🐼 Panda Mary-Jane
This design closes fully over the top of the foot instead of leaving an open toe.
Continuing from Round 5 of the shared base, in MC (cream):
R6: Sc around, decreasing the front 10 sts down to 6 by working [dec, sc1] x3
    across the front only, sc around the remaining sts unchanged. (28)
R7: Sc around. (28)
R8: Sc in first 22 sts only (this leaves an opening for the foot at the
    back/ankle). Fasten off.
Side strap: Join MC at one side of the ankle opening. Ch 10, sl st into the opposite side of the opening to close it into a strap-over-the-top closure. Fasten off and sew a button through both strap layers.
🖤 Eye Patches (Make 2, black):
R1: MR 6. (6)
R2: Inc around. (12)
Flatten slightly and sew one patch over each side of the upper front, angled outward like a classic panda eye mask. Embroider a small white highlight dot and add pink blush beneath each patch in satin stitch.
Work a contrast trim in black around the entire bottom edge of Round 1 (the sole) using a single round of slip stitches, for a defined two-tone sole line like the reference design.
✅ Panda finishing checklist:
- ✅ Both eye patches angled symmetrically
- ✅ Sole trim worked evenly with no puckering
- ✅ Strap closes flat, without pulling the front panel out of shape
🐻 Bear Ankle Boot
Continuing directly from Round 5 without fastening off, in MC (terracotta):
R6: Sc around. (32)
R7: Sc around. (32)
R8: Sc around. (32)
R9: (sc6, dec) around. (28)
R10: Sc around. (28)
R11: Sc around, sl st in next st, fasten off.
This taller wall (R6–R11) forms the boot shaft; the Round 9 decrease pulls it in slightly at the ankle so the boot doesn’t flare.
👂 Ears (Make 2, terracotta with cream center):
R1: With terracotta, MR 5. (5)
R2: Inc around. (10)
Fasten off. With cream, embroider or appliqué a small flat circle onto the center of each ear before attaching. Sew both ears to the top front edge of the boot shaft, spaced about 2 cm apart.
🐻 Muzzle (Make 1, cream):
R1: MR 6. (6)
R2: Inc around. (12)
R3: Sc around. (12)
Stuff lightly and sew to the front of the boot, positioned in the lower-middle third of the shaft. Embroider a small black triangle nose at the top center of the muzzle and a short vertical straight stitch down from it, then two black French-knot eyes above the muzzle, spaced to match the ear placement.
💡 Because the bear boot has no strap or opening, get the foot-hole size right on your gauge swatch before committing — this style has to stretch on rather than fasten.
🎨 L. Styling / Assembly / Stability / Final Shaping
Head-to-toe alignment: For every design, dry-fit all appliqué pieces with pins before sewing anything permanently. Step back and check that both shoes in a pair are facing the same direction and that facial features sit at matching heights — small placement differences are much more noticeable on a finished pair than on a single shoe.
Stability: Stuff the sole and lower wall firmly enough that the shoe stands upright on its own without tipping. A too-lightly-stuffed sole will cup at the edges and cause the shoe to rock.
Recommended assembly order:
- Crochet both soles/walls for the pair.
- Complete each design’s upper shaping (toe panel, boot shaft, or closure).
- Crochet all appliqué pieces (eyes, bill, ears, muzzle, patches) before stuffing the main shoe.
- Lightly stuff the main upper.
- Pin-fit all appliqué pieces and embroidery placement; adjust until symmetrical.
- Sew appliqué pieces permanently, then embroider remaining facial details.
- Attach straps and buttons last, once the face is finished and you can see the whole shoe.
💡 M. Helpful Crochet Tips
💡 Work your sole one size smaller in hook than you think you need — a loose sole is the single biggest reason amigurumi shoes lose their shape over time.
💡 Pin every appliqué piece in place and photograph both shoes side by side before sewing — asymmetry is far easier to catch in a photo than in your hands.
💡 When embroidering eyes, work through the stuffed shoe at a slight angle rather than straight in and out — this keeps the stitches from sinking into the fiberfill.
💡 For the frog and duck straps, test the button placement with the strap unfastened first; babies’ ankles vary more than you’d expect even within one size.
💡 Keep a small dish of your accent colors nearby while working the main color rounds — most of your color changes on this set happen within just a few rounds of each other.
💡 If a round feels tight or won’t lie flat, don’t force it — a puckered round on the sole will show as a permanent dent in the finished shoe.
💡 Weave the fastening tail from each appliqué piece through the main body at least twice in different directions before trimming; these pieces get the most handling of the whole project.
💡 Block the finished pair lightly with a damp cloth and let them air-dry stuffed — this helps set the shape permanently.
🧼 N. Care Instructions
Hand-wash only, in cool water with a gentle detergent — do not machine wash or tumble dry, as agitation will felt cotton yarn and distort the shape. Reshape the soles and stuffing by hand while damp, then air-dry flat away from direct sunlight or heat, which can fade the sage green, terracotta, and cream colorways unevenly. If you used embroidered features rather than safety eyes, check stitching periodically for wear, since handmade footwear that’s actually worn will see more friction than a shelf-display piece.
Closing Section
However many of these four you end up making, the real win is the shared base — once that sole and wall feel automatic in your hands, each animal is really just an afternoon of appliqué and embroidery layered on top. Keep a set in cream or white and you’ve got a blank canvas for any character you want to design next. Make the full set for one baby, split them up as shower gifts for four different friends, or make just the bear boots for the practical, easy-on option and save the sandals for photos. However you use them, they’re the kind of handmade piece that gets kept long after they’ve been outgrown — so take a picture of your finished pair, and tag it when you share it. I’d love to see which one you made first.
Post-Article Engagement & Distribution
📌 Share the Love: If you made a pair (or all four!), snap a photo and tag it — nothing makes a pattern day better than seeing your version in the wild. Save this post to your crochet board so you can find it again at 11pm when the yarn urge strikes.
Suggested categories: Amigurumi, Baby & Nursery, Free Patterns
Suggested tags: crochet baby shoes, amigurumi sandals, crochet baby booties, newborn crochet pattern, crochet animal shoes, panda amigurumi, frog crochet pattern, duck baby booties, teddy bear crochet boots, baby shower gift crochet, free crochet pattern, beginner amigurumi, crochet for babies, cotton yarn baby pattern, handmade baby gift
❓ Comment invitation: Which one are you making first — the frog, the duck, the panda, or the bear boots? Drop a comment below; I always end up making “just one more” once I start this set.
You Might Also Like:
- Woodland Fox Baby Booties
- Bunny Ear Baby Slippers
- Little Feet Crochet Sandals: Farm Animal Edition
- Cozy Lamb Crochet Baby Boots
- Mini Amigurumi Keepsake Ornaments (Matching Set)
Printable note: A print-friendly, ad-free PDF version of this pattern can be made available through your site’s print plugin or a linked download.