Crochet Spiral Christmas Tree Ornament — A Wire-Crochet Holiday Pattern
Amigurumi Pattern · Holiday Décor · Beginner-Friendly
📖 Introduction
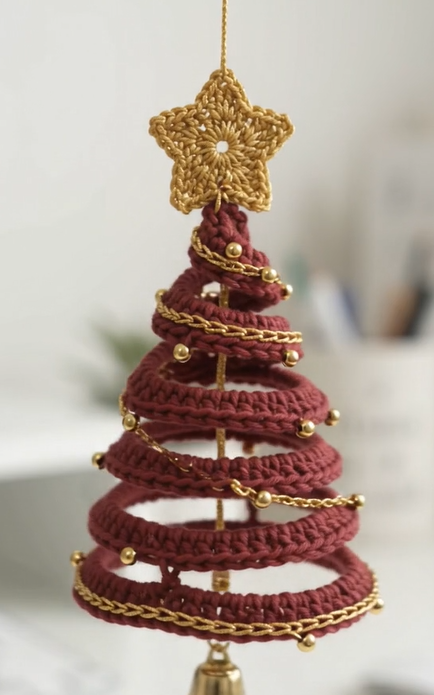
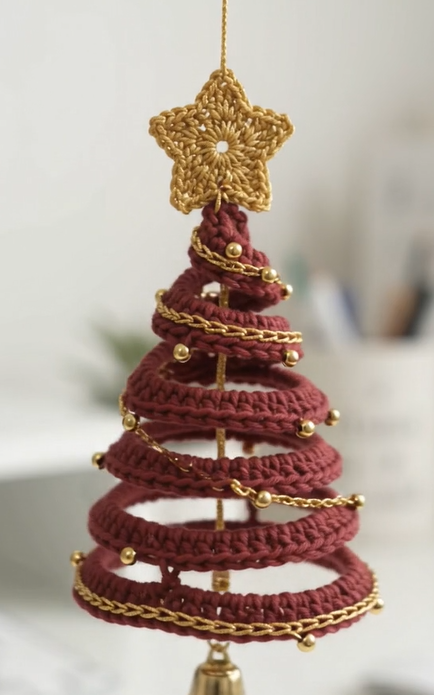
This crochet spiral Christmas tree ornament turns a single length of wire-wrapped single crochet into a miniature, cone-shaped tree — four descending loops of deep wine-colored cord, laced with a gold metallic trim and a scatter of tiny gold seed beads, finished with a crocheted gold star and a small brass bell swinging from the tip. It hangs from a delicate gold cord loop and reads, at a glance, as jewelry for your tree rather than a typical stitched ornament.
The appeal is in the contrast: soft, textured yarn against hard, glinting metal. It photographs beautifully on a bare branch, works as a standalone gift topper, and — because each one takes under an hour once you’ve made your first — it’s a fast, satisfying project for holiday craft-fair inventory or a set of matching tree ornaments for gifting. The wine-and-gold palette reads as elegant rather than novelty, so it suits a minimalist or “quiet luxury” tree as easily as a traditional one.
The most distinctive visual detail is the open spiral itself: unlike a solid crocheted cone, this design leaves air between each loop, so the gold trim and beads are visible from every angle and the ornament catches light as it turns. A single wire spine runs invisibly through the center, holding the spiral’s shape permanently — no stuffing, no sewing a seam, no felt backing.
Swap the wine yarn for emerald, ivory, or classic red for a different look, trade the gold trim for silver or copper, or size the whole spiral up by using a longer wire and one or two extra loops for a slightly taller tree. The bell and star topper are both optional and easy to substitute with a wooden bead, a tiny pompom, or a jump ring alone.
🔍 Main Pattern Overview
This isn’t a stuffed amigurumi — it’s a wire-crochet cord technique. You crochet a firm single crochet tube directly over a length of craft wire, which lets the finished cord hold any shape you bend it into. Here, that cord is shaped into four decreasing loops stacked into a cone, wound alongside a strand of gold metallic cord threaded with seed beads, and topped with a tiny flat crochet star. The whole build — wire spiral, crochet cord, trim wrap, star, and bell — comes together in roughly 45–60 minutes once you’re comfortable with crochet-over-wire.
🎯 Skill Level
Easy, suited to a confident beginner who has crocheted single crochet before.
- Single crochet (sc) worked over a wire core
- Basic wire shaping (bending, no soldering or wire tools needed)
- Simple bead stringing
- A small flat motif (5-point star) worked from a magic ring
- Whipstitch/sewing for attaching the star and hanging loop
📏 Finished Size
Approximately 9 cm (3.5 in) tall from the top of the hanging loop to the bottom of the bell, with a base loop about 4 cm (1.6 in) across. Size scales directly with your wire length: a longer core wire and wider first loop make a taller, fuller tree; a shorter one makes a mini version suitable for a bottle-brush-tree scale display.
🧮 Gauge
Exact gauge is not critical here — what matters is a tight, even wrap so the wire never peeks through bare yarn. Work your single crochet stitches snugly against the wire rather than to a swatch measurement; a looser gauge will leave gaps and a floppier spiral that won’t hold its shape.
🧶 Required Yarn Amounts
- Wine/burgundy DK-weight cotton or cotton-blend yarn: approximately 8–10 m (main spiral cord)
- Gold metallic embroidery thread or fine metallic cord: approximately 1.5 m (trim wrap)
- Gold DK-weight or metallic yarn: small amount, under 2 m (star topper)
- Gold metallic thread: approximately 15 cm (hanging loop, if not using a jump ring)
🧰 Materials
- 1.5–2.0 mm crochet hook (US steel 6/7 or similar, sized to your yarn)
- Wine/burgundy DK cotton yarn
- Gold metallic cord or embroidery thread for the trim wrap
- Small amount of gold yarn for the star topper
- 1 length (~20 cm) of 20–22 gauge craft/floral wire for the tree spine
- Approximately 12–15 small gold seed beads (3–4 mm)
- 1 small gold jump ring
- 1 small brass or gold jingle bell
- Yarn/tapestry needle
- Scissors
- Small round-nose or flat-nose pliers (for shaping wire and closing the jump ring)
- Optional: fabric glue or clear nail polish to seal the fasten-off ends
⚠️ Small-parts note: seed beads, the jump ring, and the bell are choking hazards. Keep finished ornaments away from young children and pets, and glue-seal all findings if the ornament will be handled often.
Supplies We Recommend: a 1.5mm steel crochet hook, DK-weight cotton yarn in a rich jewel tone, fine gold metallic cord, and a bag of 3–4mm gold seed beads.
🔤 Abbreviations — US Terms
| Abbrev. | Meaning |
|---|---|
| ch | chain |
| sc | single crochet |
| sl st | slip stitch |
| MR | magic ring |
| dc | double crochet |
| tr | treble crochet |
| st(s) | stitch(es) |
| rep | repeat |
📝 Notes Before You Begin
- The main spiral is worked as one continuous crochet-over-wire cord, not in separate rounds — you’ll crochet directly around the wire the entire length, then shape the covered wire into loops afterward.
- Pre-string your gold seed beads onto the metallic trim cord before you begin wrapping — there’s no way to add them once the wrap is underway.
- Work your single crochet snugly; a firm gauge is what gives the spiral its structure, since there’s no stuffing to hold the shape.
- Leave a 10 cm working tail at both the start and end of the wire cord for sewing the bell loop and hanging loop.
🪡 Complete Pattern
🔔 Core Spiral Cord
Step 1 — Prepare the wire. Cut a 20 cm length of craft wire. Leave 2 cm bare at one end (this becomes your bottom point, where the bell attaches) and begin crocheting from there.
Step 2 — Foundation. Make a slip knot in your wine yarn. Holding the slip knot against the wire about 2 cm from its end, work your first single crochet directly over the wire by inserting your hook under the wire (not through it) and pulling the working yarn through, catching the wire inside every stitch.
Step 3 — Wrap the wire. Continue single crochet over the wire in a tight, continuous tube:
Work sc over wire until 18 cm of wire is fully covered. (approx. 55–60 sc)
Check as you go that no bare wire shows between stitches; if it does, add an extra sc in that spot before continuing.
Step 4 — Fasten off. When 18 cm of the wire is covered (leaving 2 cm bare at the top for the hanging loop), fasten off and weave in the end along the last few stitches rather than cutting it flush, so the tail is secured inside the cord.
🎨 Shaping the Spiral
Step 5 — Form the loops. Starting from the bottom (bare) end, bend the covered wire into 4 decreasing loops, stacking each smaller loop slightly above and inside the one below it, like a cone-shaped spring:
- Loop 1 (bottom, largest): approx. 4 cm diameter
- Loop 2: approx. 3 cm diameter
- Loop 3: approx. 2.2 cm diameter
- Loop 4 (top, smallest): approx. 1.5 cm diameter
Use your fingers or round-nose pliers to curve each loop evenly, checking that the loops stack with visible gaps between them, as in the reference photo, rather than lying flat against each other.
Step 6 — Set the bottom point. Curl the bare 2 cm of wire at the base into a small closed loop with pliers — this is the attachment point for the bell.
🧵 Gold Trim Wrap
Step 7 — String the beads. Thread 12–15 gold seed beads onto your length of gold metallic cord before you begin wrapping.
Step 8 — Wrap the spiral. Starting at the bottom loop, wind the beaded gold cord diagonally around the burgundy spiral, following its spiral path upward. Slide a bead into place every 3–4 cm of wrap so beads sit evenly spaced along the outside of each loop, echoing the photo’s diagonal beaded stripe.
Step 9 — Secure the ends. Tuck both ends of the gold cord into the crochet stitches at the top and bottom of the spiral and secure with a small stitch of matching thread, or a dot of glue.
🎓 Star Topper
Worked flat in gold yarn from a magic ring.
R1: MR 5. (5)
R2: (ch 3, sl st in same st, sl st in next st) x5, sl st to join. (5 points)
Fasten off, leaving a 15 cm tail for attaching.
🔔 Hanging Loop & Bell
Step 10 — Attach the hanging loop. Open the gold jump ring, thread it through the bare wire loop at the top of the spiral, and close it with pliers.
Step 11 — Attach the bell. Open a second small jump ring (or use a short length of gold thread), thread it through the bell’s loop and through the curled wire point at the base of the spiral, then close securely.
Step 12 — Attach the star. Center the star over the top loop of the spiral and sew it in place through its middle round using the tail left from the star, tacking it to two or three points of contact so it sits flat against the top of the tree.
🎨 Styling / Assembly / Stability / Final Shaping
Assembly order: wire spine → crochet-over-wire wrap → shape into loops → wrap gold trim and beads → attach star → attach hanging loop → attach bell.
Symmetry check: hold the finished ornament up by its hanging loop and let it settle — the loops should nest in a roughly even cone with the bell hanging centered underneath. Adjust individual loops by hand if one sits off-center; the wire core will hold the new position.
Stability: the wire spine is what keeps this ornament’s shape — there’s no need for stuffing or a rigid backing. If a loop feels floppy, it usually means the crochet gauge was too loose in that section; you can compress the stitches slightly with your fingers to tighten it.
✅ Final Shaping Checklist
- ✅ All four loops decrease evenly from bottom to top
- ✅ No bare wire is visible through the crochet wrap
- ✅ Gold trim spirals in one continuous diagonal line
- ✅ Beads are evenly spaced along the trim
- ✅ Star sits centered and flat at the top loop
- ✅ Bell hangs freely without twisting
- ✅ Hanging loop is securely closed
- ✅ All yarn tails are woven in or glued flat
💡 Helpful Crochet Tips
💡 Work the crochet-over-wire foundation stitches slightly tighter than feels natural — they loosen a little once you start shaping the loops.
💡 Bend the loops before you fully commit to their final spacing; wire crochet holds a shape well but can be re-adjusted a few times before the yarn fibers start to show wear.
💡 If your beads are too large to sit flush against the gold cord, switch to a finer cord or smaller bead size rather than forcing them — this keeps the wrap from bunching.
💡 A dab of clear nail polish on both fastened-off ends prevents the fine wire-wrapped cord from unraveling over time.
💡 Make several spirals in one sitting while your wire-wrapping tension is consistent — it’s the hardest part to match if you return to the project days later.
💡 If the top loop feels too small to sew the star to comfortably, widen it by half a centimeter; the star will still read as proportional.
💡 Test the bell’s jump ring closure by gently tugging before you consider the ornament finished — it’s the piece most likely to work loose with handling.
🧼 Care Instructions
Spot-clean only — do not machine wash, as the wire core can bend out of shape and metallic threads may tarnish or fray in water. Store flat or gently nested in tissue paper rather than pressed under other ornaments, since the loops can be flattened by sustained weight. Keep out of direct sunlight for extended periods to prevent the wine yarn from fading unevenly against the gold trim.
Closing
What starts as one length of wire and a few meters of yarn ends up looking like a small piece of metalwork once the gold trim and beads catch the light. Make a set in different colorways for a coordinated tree, or a single one as a gift tag topper on a wrapped present. However you use it, I’d love to see your version — tag your finished spiral tree so I can share it.
Share the Love
If you made this pattern, save it, share a photo, and tag it so other makers can find it too.
Suggested categories: Amigurumi & Ornaments, Holiday Décor, Wire Crochet Suggested tags: crochet christmas ornament, spiral tree ornament, wire crochet pattern, gold beaded ornament, beginner crochet ornament, DIY tree topper, crochet holiday décor, mini crochet tree, jingle bell ornament, quick crochet gift, wine and gold ornament, crochet over wire tutorial
Comment invitation: What colorway would you make first — the wine-and-gold shown here, or something brighter for a kids’ tree?
You Might Also Like:
- Crochet Wire-Wrapped Snowflake Ornament
- Mini Beaded Crochet Wreath
- Crochet Star Garland
- Wire-Core Crochet Holly Sprig
- Beaded Crochet Icicle Ornament
❓ FAQ
Can I make this without wire? Not for this exact design — the wire core is what lets the spiral hold its open, cone-shaped loops without stuffing or a rigid form.
What size hook should I use for such fine wire crochet? A small steel hook in the 1.5–2.0 mm range gives the tight gauge needed to fully cover the wire; a larger hook will leave gaps.
Can I substitute the metallic trim cord? Yes — a fine metallic embroidery thread, thin ribbon, or even a second color of yarn will work, though true metallic cord gives the closest look to the photographed version.
Is this pattern safe for a tree with small children or pets nearby? The beads, bell, and jump rings are small parts and a choking/swallowing risk, so hang finished ornaments out of reach or skip the loose bead trim for a household with young children or pets.
How do I keep the wire from poking through the yarn? Work your single crochet stitches snugly and check every few stitches that the wire is fully enclosed; going back to add an extra stitch over a gap is easier than unraveling later.
Can I make a bigger version? Yes — use a longer starting wire (add roughly 5 cm of wire per additional inch of finished height) and crochet a correspondingly longer cord, then shape 5–6 loops instead of 4.