Crochet Santa Spiral Ornament: A Free Amigurumi Christmas Pattern
Amigurumi Pattern · Christmas Ornament · Easy-to-Intermediate
📖 B. Introduction
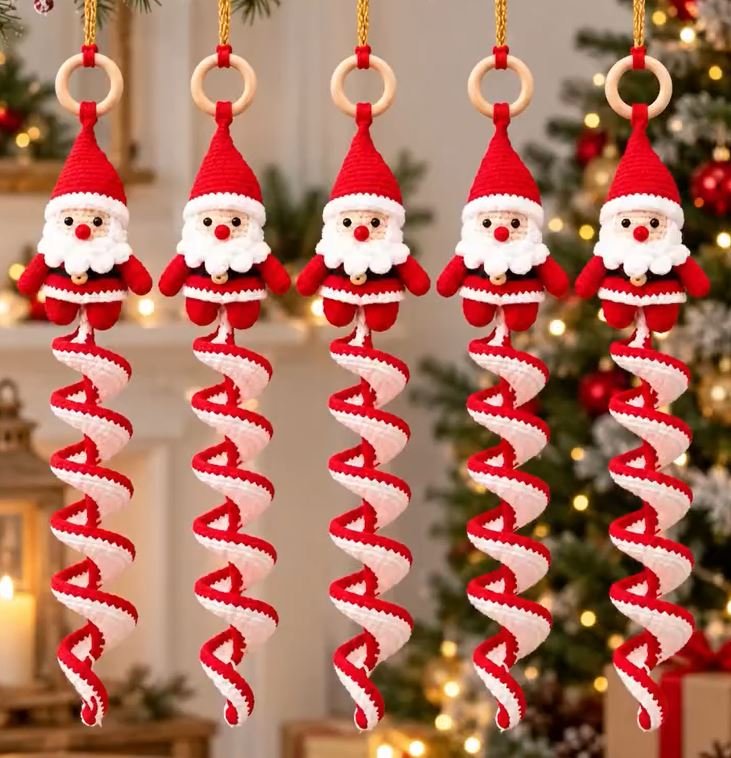
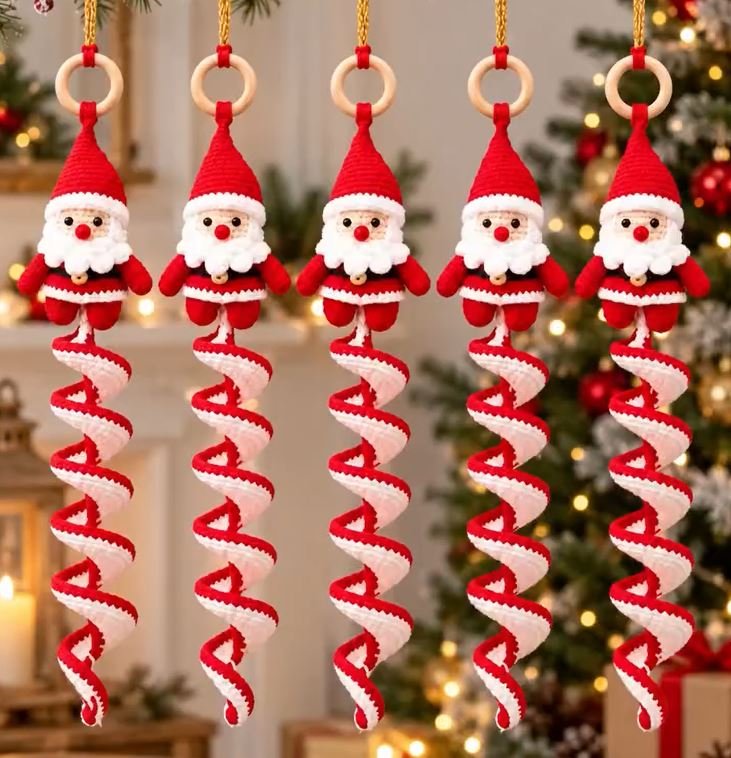
This crochet Santa spiral ornament is a tiny, plump-cheeked Santa who dangles from a natural wooden ring, trailing a candy-striped spiral ribbon that twirls like an icicle. The finished ornament hangs about 14 inches (35 cm) from ring to spiral tip. Hung in a row of several, as in the inspiration photo, the spirals sway and catch the light of the tree.
The appeal is the contrast between a small, firmly stuffed amigurumi figure and a light, springy tail. The Santa is quick to make because every piece is a simple tube or cone worked in continuous rounds. The spiral is a single flat strip that curls on its own once you stretch and shape it. It also uses very little yarn, so a whole set can come from a few partial skeins.
The distinctive details are the tall, pointed red hat with a fluffy white brim, a round red nose, and a flat beard with a small white moustache. The red coat has a white hem band and a single gold button, and the short red legs and little arms are set in a cheerful, slightly raised pose.
These ornaments suit tree decorating, hanging from a mantel or window, gift-topper tags, teacher and neighbor gifts, and craft-fair inventory. Personalizing is easy. You can make a green-and-white elf version, a blue-and-silver winter version, or a pastel set for a nursery. You can also change the spiral length or add a name tag on the back.
🔍 C. Main Pattern Overview
This pattern makes one Santa ornament. Repeat it for a set. Each ornament is built from these parts:
- 🎓 Hat (red with a white brim, plus a double-strand hanging loop for the wooden ring)
- 🧠 Head (peach)
- 🎀 Beard, moustache, and nose (white, white, red)
- 👗 Coat/body (red with a white hem band)
- 🦵 Legs (make 2, red)
- 💪 Arms (make 2, red)
- 🔔 Spiral ribbon (a flat strip in red and white that curls into a helix)
Construction is simple. Work the head, body, legs, arms, and hat in continuous spiral rounds. Work the beard and spiral flat, in rows. Then sew everything together and shape the spiral.
📌 Save this pattern: Get the printable PDF and our holiday pattern bundle by email.
🎯 D. Skill Level
Easy to intermediate. The Santa is beginner-friendly. The spiral is what bumps the rating up, because it asks you to work into foundation-chain free loops and shape a curl.
Techniques used:
- Magic ring (MR) and working in continuous rounds
- Increasing and decreasing evenly in rounds
- Color changes at the end of a round or row
- Working flat in rows, including into free loops of a foundation chain
- Light stuffing and invisible-style sewing
- Basic embroidery (blush) and attaching safety eyes
📏 E. Finished Size
| Part | Approximate size |
|---|---|
| Santa figure (hat tip to feet) | 4.5–5 in (11.5–12.5 cm) |
| Spiral (hanging, gently stretched) | about 7 in (18 cm) |
| Wooden ring | 1.25 in (30 mm) |
| Total, ring to spiral tip | about 14 in (35 cm), not counting the hanging cord |
Size changes with yarn weight, hook size, and tension. Stuffing density affects the Santa, and the spiral’s length depends on how far you stretch it. A heavier yarn and larger hook will make a bigger Santa and a wider, floppier spiral. The spiral instructions below are written for DK-weight cotton on a 2.5 mm hook.
🧮 F. Gauge
For amigurumi, tight and consistent tension matters more than an exact gauge match. Stuffing should never show through the stitches. A reasonable target in single crochet with DK cotton and a 2.5 mm hook is about 7 sc and 7.5 rounds per 1 inch (2.5 cm).
If your stitches are loose, go down a hook size. If the spiral feels stiff and refuses to curl, go up a hook size for the spiral only.
🧶 G. Required Yarn Amounts
All amounts are approximate for one ornament.
| Color | Used for | Approximate amount |
|---|---|---|
| 🧵 Red DK cotton | Hat, body, legs, arms, nose, spiral edges | 40 yd (37 m) |
| 🧵 White DK cotton | Hat brim, body hem, beard, moustache, spiral | 22 yd (20 m) |
| 🧵 Peach / skin-tone DK cotton | Head | 10 yd (9 m) |
| 🧵 Pink (scrap) | Cheek blush (optional) | a few inches |
| Polyester fiberfill | Head, body, legs, arms, hat | about 0.5 oz (14 g) |
For a set of five, plan on about 200 yd (183 m) of red, 110 yd (100 m) of white, and 50 yd (46 m) of peach. Buy a little extra of each, since dye lots vary.
🧰 H. Materials
- 2.5 mm (US B/1 or C/2) crochet hook
- DK-weight cotton yarn in red, white, and peach, plus pink scrap
- Polyester fiberfill
- Two 6 mm black safety eyes
- One wooden ring, 1.25 in (30 mm)
- Gold hanging cord, about 12 in (30 cm)
- One small gold button or bead, about 8 mm (design choice)
- Yarn needle
- Stitch markers (at least 1)
- Sewing pins
- Scissors
- Optional: fabric stiffener or a 1:1 white glue and water mix for setting the spiral shape
- Optional: a 1 in (2.5 cm) dowel or marker for shaping the spiral
⚠️ Safety: Safety eyes, buttons, and the wooden ring are small parts and choking hazards. This ornament is not a toy and should not be given to children under 3. For child-adjacent gifts, embroider the eyes and skip the button.
🛍️ Supplies We Recommend : a 2.5 mm hook with an ergonomic handle, a bag of polyester fiberfill, 6 mm black safety eyes, 30 mm wooden rings, and metallic gold cord.
🔤 I. Abbreviations: US Terms
| Abbreviation | Meaning |
|---|---|
| MR | Magic ring |
| ch | Chain |
| sl st | Slip stitch |
| sc | Single crochet |
| inc | Increase (2 sc in the same stitch) |
| dec | Decrease (sc2tog; an invisible decrease works too) |
| st(s) | Stitch(es) |
| R | Round |
| x | Times (repeat the instructions in parentheses) |
| ( ) | Total stitch count at the end of a round or row |
📝 J. Notes Before You Begin
- Continuous rounds: Work the head, body, legs, arms, nose, moustache, and hat in a spiral without joining. Place a stitch marker in the first stitch of each round and move it up as you go.
- Flat pieces: The beard and spiral are worked back and forth in rows. Turn at the end of each row, and ch 1 at the start of each row (the ch 1 does not count as a stitch).
- Stuffing: Stuff firmly in small pieces. The head and body should keep their shape. The legs and arms should be firm but slightly squishy.
- Color changes: Change to the new color on the last pull-through of the last stitch of the old color.
- Sewing tails: Leave a long tail (about 8 in / 20 cm) on any piece that is sewn on.
- Design choices (not visible in the photo): The stitch counts, the dimensions, the double-strand hanging loop, the gold button, and the 12-stitch beard are all my own decisions. The photo only suggests the general look.
- Spiral note: The spiral’s tight curl comes from stitching twice as many stitches in Row 1 as there are chains underneath. Do not skip the increase row.
🪡 K. Complete Pattern
🎓 Hat
Yarn: Red, then white. Quantity: Make 1.
R1: MR 6. (6)
R2: sc around. (6)
R3: (1 sc, inc) x3. (9)
R4: sc around. (9)
R5: (2 sc, inc) x3. (12)
R6: sc around. (12)
R7: (3 sc, inc) x3. (15)
R8: sc around. (15)
R9: (4 sc, inc) x3. (18)
R10: sc around. (18)
R11: (5 sc, inc) x3. (21)
R12: sc around. (21)
R13: (6 sc, inc) x3. (24)
R14: sc around. (24)
Change to white.
R15: (3 sc, inc) x6. (30)
R16: sc around. (30)
R17: sc around. (30)
Sl st into the next stitch and fasten off, leaving a tail for sewing. Stuff the hat very lightly, only enough to keep the cone shape.
🔔 Hanging loop (red): Join red yarn at the center of R1 (the hat tip). Ch 8, slide the wooden ring onto the chain, and sl st into the same spot to close the loop. Repeat once more with a second ch 8 through the ring, then fasten off and weave in the ends. Two strands make the loop sturdy enough to hold the ornament.
🧠 Head
Yarn: Peach. Quantity: Make 1.
R1: MR 6. (6)
R2: inc around. (12)
R3: (1 sc, inc) x6. (18)
R4: (2 sc, inc) x6. (24)
R5–R9: sc around. (24) (5 rounds)
Eyes: Before continuing, insert the safety eyes between R6 and R7, with 5 stitches between them. Count rounds from the magic ring, which is the top of the head. Secure the backs.
R10: (2 sc, dec) x6. (18)
R11: (1 sc, dec) x6. (12)
Stuff firmly.
R12: dec around. (6)
Fasten off and close the hole, leaving a short tail.
🎀 Nose
Yarn: Red. Quantity: Make 1.
R1: MR 6. (6)
R2–R3: sc around. (6)
Stuff with a tiny amount of fiberfill.
R4: dec x3. (3)
Fasten off and close, leaving a tail for sewing.
🎀 Moustache
Yarn: White. Quantity: Make 2.
R1: MR 6. (6)
R2: (1 sc, inc) x3. (9)
R3: sc around. (9)
Fasten off, leaving a tail for sewing.
🎀 Beard
Yarn: White. Quantity: Make 1. Work flat.
Ch 13.
Row 1: sc in 2nd ch from hook and in each ch across. (12)
Row 2: ch 1, turn. sc across. (12)
Row 3: ch 1, turn. sc across. (12)
Row 4: ch 1, turn. dec, sc 8, dec. (10)
Row 5: ch 1, turn. sc across. (10)
Row 6: ch 1, turn. dec, sc 6, dec. (8)
Row 7: ch 1, turn. dec, sc 4, dec. (6)
Row 8: ch 1, turn. dec, sc 2, dec. (4)
Fasten off, leaving a long tail for sewing along the top edge (Row 1). Row 1 is the widest edge and goes on the face.
👗 Coat / Body
Yarn: Red, then white, then red. Quantity: Make 1.
R1: MR 6. (6)
R2: inc around. (12)
R3: (1 sc, inc) x6. (18)
R4: (2 sc, inc) x6. (24)
Change to white.
R5–R6: sc around. (24) (2 rounds: the white hem band)
Change to red.
R7–R10: sc around. (24) (4 rounds)
R11: (2 sc, dec) x6. (18)
R12: sc around. (18)
R13: (1 sc, dec) x6. (12)
Stuff firmly. Fasten off, leaving a long tail for sewing the head on.
🦵 Legs
Yarn: Red. Quantity: Make 2.
R1: MR 6. (6)
R2: inc around. (12)
R3–R7: sc around. (12) (5 rounds)
Stuff firmly. Fasten off, leaving a tail for sewing.
💪 Arms
Yarn: Red. Quantity: Make 2.
R1: MR 6. (6)
R2: (1 sc, inc) x3. (9)
R3–R7: sc around. (9) (5 rounds)
Stuff lightly. Fasten off, leaving a tail for sewing.
🔔 Spiral Ribbon
Yarn: White and red. Quantity: Make 1. Work flat.
With white, ch 61.
Row 1: 2 sc in 2nd ch from hook and in each ch across. (120)
Row 2: ch 1, turn. sc in each st across. (120) Change to red in the last stitch.
Row 3: ch 1, turn. sc in each st across. (120)
Fasten off the red. Rotate the strip so the foundation chain edge is facing you.
Row 4: Join red in the first free loop of the foundation chain. Sc in each free loop across. (61) (61 free loops: the 60 chains you worked into, plus the first chain where the hook entered.)
Fasten off and weave in the ends.
Shaping: The strip will already tend to curl. Wrap it around a dowel or marker, or simply stretch it between your hands, into a helix. If you plan to stiffen it, brush it lightly with stiffener, wrap it loosely around the dowel, and let it dry fully before removing it.
🎨 L. Styling / Assembly / Stability / Final Shaping
Recommended Assembly Order
- Hat: Make the hat with its hanging loop through the wooden ring.
- Head: Make the head, insert the eyes, stuff, and close.
- Face details: Sew the nose to R8, centered, and sew the two moustache ovals just below the nose, angled slightly outward. Add blush with pink yarn: two small stitches under each eye at R8.
- Beard: Pin the beard’s top edge (Row 1) across the lower front of the head at about R9. Sew it down, then tack the beard’s lower edge to the body once the head is attached.
- Hat on head: Place the hat with the brim’s front edge at about R4 and the back edge at R2, so it tilts slightly forward. Sew around the inside of the brim.
- Head to body: Stuff the body fully. Sew the head onto the neck with the head turned slightly to one side. Reinforce with a second pass of stitches.
- Legs: Sew the legs to the underside of the body, flat ends against R3–R4, about 2 stitches apart on either side of the center.
- Arms: Sew the arms to the sides of the body at about R9, angled slightly upward.
- Button: Sew the gold button or bead to the front center, just above the white band (around R8).
- Spiral: Sew the spiral’s starting end to the underside of the body, between the legs, so the spiral hangs straight down.
- Shape and hang: Adjust the spiral. Add the gold cord to the ring.
Stability and Balance
The Santa hangs from the ring by the hat. Tension should be tight enough that the stuffed head and body don’t sag. If the Santa tilts forward, add a few stitches to reinforce the neck on the back side. Because the spiral is light, it will not pull the figure out of balance.
Final Shaping Checklist
- ✅ Eyes level, with 5 stitches between them
- ✅ Nose centered and moustache symmetrical
- ✅ Beard covers the head’s lower edge and sits flat
- ✅ Hat brim sits evenly across the forehead
- ✅ Arms angled upward by the same amount
- ✅ Legs flat and symmetrical under the body
- ✅ Spiral hangs straight and its coils are evenly spaced
- ✅ Hanging loop is secure through the wooden ring
- ✅ All loose ends woven in
- ✅ Stuffing firm with no gaps showing
💡 M. Helpful Crochet Tips
- 💡 Keep the head’s round count honest. The eye position depends on counting rounds from the magic ring, so mark R6 with a stitch marker before inserting the eyes.
- 💡 Use a single, firm stitch marker on the spiral. The strip is flat, so marking the first stitch of Row 1 helps you keep the 2-sc-per-chain count correct.
- 💡 Don’t pull the foundation chain tight. A tight chain makes Row 1 hard to work and distorts the curl.
- 💡 Stuff the hat only lightly. Too much stuffing makes the cone bulge instead of staying pointed.
- 💡 Test the curl before sewing. Stretch the spiral first. If it won’t curl, drop to a smaller hook for the next one.
- 💡 Use a stiffener sparingly. It keeps the coils crisp but darkens white yarn slightly, so test on a scrap first.
- 💡 Sew the beard on before the hat. The hat brim should cover the top of the beard’s seam.
- 💡 Match your colors across a set. Using the same dye lot for all five ornaments keeps the red from varying.
- 💡 Anchor the ring loop twice. If you plan to hang these on a heavy tree, work the loop with a third strand.
🧼 N. Care Instructions
Spot-clean with a damp cloth and mild soap. If needed, hand-wash gently in cool water, squeeze out excess, and air-dry flat. Keep red and white pieces from soaking together, since red cotton may bleed on first wash. If the spiral has been stiffened, avoid wetting it. Store in a dry place, away from direct sunlight, which can fade red yarn. Keep safety eyes and the button firmly sewn if the ornament will be handled often.
🎄 Closing
Your Santa spiral is done, and it will sway on the tree for years. Make a few in the traditional colors, or change the palette for a different holiday look. They also make a thoughtful gift tied with a small tag. We’d love to see your finished ornaments, so share a photo of yours.
📣 Post-Article Engagement & Distribution Block
Share the Love: Loved this pattern? Save it to your Pinterest board, share it with a crochet friend, and tag us when you post your Santa spirals.
Suggested categories: Amigurumi Patterns · Christmas Crochet · Free Crochet Patterns
Suggested tags: crochet Santa, Santa ornament, amigurumi Christmas, spiral ornament, crochet Christmas ornament, free amigurumi pattern, crochet icicle, handmade Christmas gift, holiday crochet, crochet tree decoration, Santa amigurumi, crochet gift idea
Comment invitation: Which color combination would you try for your spiral, classic red and white, or something unexpected like green and gold?
You Might Also Like:
- Crochet Snowman Spiral Ornament
- Mini Amigurumi Reindeer Ornament
- Crochet Candy Cane Ornament
- Crochet Elf Hat Ornament
- Crochet Gingerbread Man Ornament
A print-friendly PDF version of this pattern can be offered through a print plugin. [Placeholder: add your download link.] <!– AD SLOT: pre-faq –>
❓ R. FAQ
How big is the finished Santa spiral ornament?
About 14 inches (35 cm) from the top of the ring to the spiral tip, with the Santa figure itself about 4.5–5 inches (11.5–12.5 cm) tall.
What yarn should I use for a crochet Santa ornament?
DK-weight cotton works best because it holds its shape and shows stitch definition. Acrylic or cotton blends also work, but a very soft yarn may make the spiral droop.
What hook size should I use for amigurumi?
Use a hook one or two sizes smaller than the yarn label suggests, here 2.5 mm, so the stuffing doesn’t show.
How do you make a crochet spiral stay curled?
The curl comes from working two stitches into each foundation chain. For extra hold, lightly apply fabric stiffener and dry it wrapped around a dowel.
Can I make the Santa spiral ornament larger?
Yes. Use a heavier yarn and bigger hook, or add a few extra stitches to Row 1 and chains to the foundation for a longer spiral.
Is this ornament safe for kids?
It contains small parts, so it is not suitable for children under 3. For safer gifting, embroider the eyes and omit the button.
How do I hang it on a tree?
Loop the gold cord through the wooden ring and tie it, then hang it from a branch or hook.
Can I use a different color for the beard or hat?
Yes. Swap in any colors you like, and keep the same stitch counts.