Midnight Blue Floral Crochet Table Runner (Free Pattern with Silver Leaves & Pearl Berries)
Crochet Home Décor Pattern · Winter & Holiday Table Runner · Intermediate
📖 Introduction
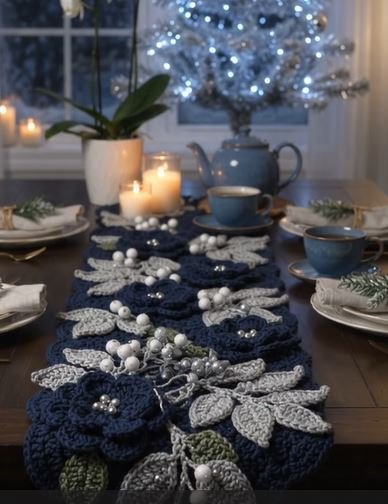
This midnight blue floral crochet table runner turns a plain dining table into a winter centerpiece. Ten layered, deep-navy flowers zigzag down a soft, drapey base. Silver-gray leaves fan out along both edges, and small white berry sprigs sit between them. Each flower has a little cluster of pearl beads in the center, so the runner catches candlelight without looking glittery.
What makes it worth the hours is the contrast. Navy against silver-gray and snow white looks deliberate in a way a red-and-green runner often doesn’t. It works for a Christmas table and stays on display through January. It also suits an evening dinner, a winter wedding, or a console table by a window.
The runner is made of four simple parts: a flat hdc base, three-layer flowers, flat leaves worked from a chain, and tiny stuffed berries. Nothing is worked in one giant piece, so you can make the motifs in any order and dip in and out over several weeks. The finished runner is approximately 13 × 52 inches (33 × 132 cm), which fits a standard dining table with room for place settings on either side.
Personalizing it is easy. Swap the navy for burgundy, forest green, or charcoal. Try sage leaves for a botanical look. Make it shorter by using fewer flowers, or make a matching pair of mini mats from one flower and three leaves each. The pattern gives the exact rows for changing the length.
🔍 Main Pattern Overview
The runner is built in five stages:
- Base: a flat rectangle of half double crochet with a two-round single crochet border.
- Flowers: 10 flowers, each made of three separately worked layers (8, 6, and 5 petals) that are stacked, then beaded.
- Leaves: 28 flat leaves worked from a chain, with a metallic embroidered vein.
- Berry sprigs: 12 slip stitch stems with three small stuffed berries each (36 berries in total).
- Assembly: the flowers go on first, then the leaves, then the sprigs.
Design note: This pattern was designed from a visual reference of a midnight blue floral runner with silver leaves and pearl berries. Every stitch count, construction choice, and layout measurement here is original. Where the reference didn’t show a detail (such as how the ends are finished), I made a design decision and say so in the pattern.
📌 Email capture placeholder: Want a printable version of this pattern? Add your email-signup form or “Save this pattern” button here.
🎯 Skill Level
Intermediate. The stitches are simple, but the project asks for patience and accuracy: a long base, 30 flower layers, and precise petal shaping.
Techniques used:
- Magic ring
- Increases and invisible decreases
- Half double, double, and treble crochet
- Working petals into chain arches
- Working from both sides of a foundation chain (leaves)
- Light stuffing of very small pieces
- Simple bead sewing and embroidered detail
📏 Finished Size
| Piece | Approximate size |
|---|---|
| Finished runner | 13 × 52 in (33 × 132 cm) |
| Large flower (stacked) | 4½ in (11.5 cm) across |
| Middle layer | 3¼ in (8 cm) across |
| Top layer | 2¼ in (5.5 cm) across |
| Leaf | 3 in (7.5 cm) long, 1¼ in (3 cm) wide |
| Berry | ¾ in (1.8 cm) across |
| Berry sprig | 4 in (10 cm) long |
What changes the size: yarn weight, hook size, and how loosely you crochet. The base drapes better when it’s a little loose. The berries and leaves look best when they’re tight. If your base comes out wider or narrower than 13 in, add or remove foundation chains before you start (see Gauge).
Changing the length: every 10 extra or fewer rows changes the length by about 4½ in (11.5 cm), which is one flower station.
🧮 Gauge
Gauge matters more here than in amigurumi because the runner has to fit a table. Work a swatch in the base stitch:
13 hdc × 9 rows = 4 in (10 cm), using a 5.0 mm (H-8) hook.
If you have more stitches than that, go up a hook size. If you have fewer, go down. Row gauge matters too, because it decides the final length. Count your rows as you go. Mark every 10th row with a removable stitch marker.
The flowers, leaves, and berries don’t need an exact gauge, but keep your tension consistent so the layers sit flat.
🧶 Required Yarn Amounts
All yarn is worsted weight (#4). These amounts are approximate and include yarn for tails and swatching.
| Color | Used for | Approximate amount |
|---|---|---|
| 🧵 Midnight Blue | Base, border, all flower layers | 750 yd (690 m) |
| 🧵 Silver Gray | Leaves and sprig stems | 140 yd (128 m) |
| 🧵 Snow White | 36 berries | 160 yd (146 m) |
| Silver metallic embroidery floss | Leaf veins | ~10 yd (9 m) |
| Polyester fiberfill | Berries only | ~1 oz (30 g) |
| Total yarn | approximately 1,050 yd (960 m) |
Bead count: about 60 round pearl-look beads (4–5 mm), in silver-gray or pearl white. That’s 5 per flower, plus a few spares.
🧰 Materials
- 🧵 Worsted weight yarn in Midnight Blue, Silver Gray, and Snow White
- 5.0 mm (H-8) crochet hook (base and flowers)
- 4.0 mm (G-6) crochet hook (leaves, sprigs, and berries)
- Silver metallic embroidery floss
- About 60 pearl-look beads, 4–5 mm
- Beading needle and strong thread in a matching shade
- Polyester fiberfill (a small handful)
- Yarn needle
- Stitch markers (for marking rows on the base and the start of spiral rounds)
- Sharp scissors
- T-pins or sewing pins
- Blocking mat or towel, measuring tape
🛍️ Supplies We Recommend: a set of ergonomic crochet hooks in H-8 and G-6 sizes, a pack of pearl beads with a beading needle, a bag of polyester fiberfill, and a flat blocking mat with T-pins. (Insert your affiliate links here.)
⚠️ Safety note: The beads and berries are small parts. This is a décor piece, not a toy. Keep it away from small children and pets that chew. Keep candles well away from the runner, because acrylic yarn can melt or burn.
🔤 Abbreviations — US Terms
| Abbreviation | Meaning |
|---|---|
| ch | chain |
| dc | double crochet |
| dec | invisible single crochet decrease |
| hdc | half double crochet |
| inc | increase: 2 sc in the same stitch |
| MR | magic ring |
| R | round |
| rep | repeat |
| sc | single crochet |
| sl st | slip stitch |
| st(s) | stitch(es) |
| tr | treble crochet |
| x | times (e.g., x8 means repeat 8 times) |
| ( ) | repeat what is inside the brackets as many times as stated |
📝 Notes Before You Begin
- Base: worked in flat rows, turning at the end of each row. The turning ch 2 does not count as a stitch.
- Flower layers: worked in a spiral (no joining) for the first rounds. Each layer’s last round is joined with a sl st. Use a stitch marker to mark the first stitch of the round.
- Leaves: joined at the end with a sl st. Leave a long tail for sewing.
- Berries: worked in a spiral. Use the 4.0 mm hook and pull your stitches snug so the stuffing doesn’t show.
- Tails: leave about 12 in (30 cm) on each flower layer, about 10 in (25 cm) on leaves and sprigs, and about 8 in (20 cm) on berries. You will use these to sew pieces together.
- Color changes: there are none within a piece. Each piece is made in one color.
- Assumption: the reference didn’t show how the runner ends were finished, so I designed straight ends with leaf sprays that overhang slightly at each end. You can trim them flush if you prefer.
- Pattern math: I have checked each round count. If your count is off, find the round where it changed and redo from there.
🪡 Complete Pattern
🍽️ Runner Base
Yarn: Midnight Blue, 5.0 mm hook Quantity: make 1
Row 1: Ch 43. Hdc in the 3rd ch from the hook and in each ch across. Ch 2, turn. (41) Row 2: Hdc in each st across. Ch 2, turn. (41) Rows 3–117: Rep Row 2. (41)
Do not ch 2 or turn after Row 117. Continue directly into the border.
Border
R1: Ch 1. Work 3 sc in the corner st (first st of the last row). Sc in each of the next 39 sts. Work 3 sc in the last st of the row (the corner). Working down the long side, sc in each row end (117 sc). Work 3 sc in the first ch of Row 1 (the corner). Sc in each of the next 39 ch. Work 3 sc in the last ch (the corner). Working up the other long side, sc in each row end (117 sc). Sl st to the first sc to join. (324)
R2: Ch 1. Sc in each st around, working 3 sc in the center st of each 3-sc corner group. Sl st to join. (332)
Fasten off and weave in the ends. Block the base by pinning it to a mat at 13 × 52 in and steaming or spraying it lightly. Let it dry fully.
💐 Flowers (Make 10)
Each flower is three layers that you stack. Make 10 of each layer: 10 bottom, 10 middle, 10 top.
Bottom Layer (8 petals)
Yarn: Midnight Blue, 5.0 mm hook
R1: MR 8. (8) R2: inc around. (16) R3: (1 sc, inc) x8. (24) R4: (Sc in next st, ch 5, skip 2 sts) x8. Sl st to first sc. (8 sc, 8 ch-5 arches) R5: In each ch-5 arch work (sl st, hdc, 2 dc, 2 tr, 2 dc, hdc, sl st). (8 petals of 10 sts each = 80 sts)
Fasten off, leaving a 12 in (30 cm) tail.
Middle Layer (6 petals)
Yarn: Midnight Blue, 5.0 mm hook
R1: MR 6. (6) R2: inc around. (12) R3: (1 sc, inc) x6. (18) R4: (Sc in next st, ch 4, skip 2 sts) x6. Sl st to first sc. (6 sc, 6 ch-4 arches) R5: In each ch-4 arch work (sl st, hdc, 4 dc, hdc, sl st). (6 petals of 8 sts each = 48 sts)
Fasten off, leaving a 12 in (30 cm) tail.
Top Layer (5 petals)
Yarn: Midnight Blue, 5.0 mm hook
R1: MR 5. (5) R2: inc around. (10) R3: (Sc in next st, ch 3, skip 1 st) x5. Sl st to first sc. (5 sc, 5 ch-3 arches) R4: In each ch-3 arch work (sl st, hdc, 3 dc, hdc, sl st). (5 petals of 7 sts each = 35 sts)
Fasten off, leaving a 12 in (30 cm) tail.
Assembling Each Flower
- Lay the bottom layer flat, right side up.
- Place the middle layer on top, rotated so its petals sit over the gaps between the bottom petals. Sew it on with a few stitches through the center.
- Place the top layer on top of the middle layer, again rotated so its petals fall between the middle petals. Sew it on.
- With beading thread, sew a cluster of 5 beads in the center: one in the middle and four around it. Knot and hide the thread in the flower.
💡 Finish and bead all 10 flowers before you sew anything to the runner. It is much easier to place beads on a loose flower.
🌿 Leaves (Make 28)
Yarn: Silver Gray, 4.0 mm hook
Ch 11.
R1:
- First side: Starting in the 2nd ch from the hook, work sc, hdc, 4 dc (one in each of the next 4 ch), hdc, sc, sl st. (9 sts; the next ch is the last one, at the tip)
- Tip: work 3 sc in the last ch. (3 sts)
- Second side: working into the free loops on the other side of the chain, sl st, sc, hdc, 4 dc, hdc, sc. (9 sts)
- Sl st to the first sc to join. (21 sts total)
Fasten off, leaving a 10 in (25 cm) tail at the base.
Vein: Thread a needle with silver metallic floss. Bring it up at the base of the leaf and work one long straight stitch along the center to about ¼ in below the tip. Anchor it with two tiny stitches. Hide the ends on the back.
🎀 Berries (Make 36) and Sprigs (Make 12)
Berries
Yarn: Snow White, 4.0 mm hook
R1: MR 6. (6) R2: inc around. (12) R3–R4: Sc around. (12) R5: (1 sc, dec) x4. (8)
Stuff lightly with fiberfill.
R6: dec x4. (4)
Fasten off, leaving an 8 in (20 cm) tail. Thread the tail through the front loops of the last 4 sts, pull tight, and knot.
Sprig Stems
Yarn: Silver Gray, 4.0 mm hook
Ch 18. Sl st in the 2nd ch from the hook and in each ch across. (17) Fasten off, leaving a 10 in (25 cm) tail at the base.
Finishing a sprig: Sew 3 berries to each stem: one at the tip (st 17), one at st 11, and one at st 5. Use the berry tails, then weave them into the stem.
🎨 Styling / Assembly / Stability / Final Shaping
Layout
Lay the blocked base flat and mark the centerline with pins.
- Flowers: Place them in a zigzag along the centerline. The first flower’s center is 6 in (15 cm) from one end, and the last is 6 in (15 cm) from the other end. Space the centers about 4½ in (11.5 cm) apart along the length, and alternate each flower 1 in (2.5 cm) to the left, then 1 in to the right, of the centerline.
- Leaves: Put 10 leaves along each long edge in loose pairs, angled outward, with the tips pointing toward the nearest end. Put 4 leaves at each end in a small fan that overhangs the end by about 1 in (2.5 cm). That is 28 leaves in total.
- Sprigs: Put 5 sprigs along each long edge, tucked between leaf pairs, and 1 sprig at each end in the middle of the leaf fan. That is 12 sprigs in total.
Recommended Assembly Order
- Block the base and let it dry completely.
- Make, stack, and bead all 10 flowers.
- Pin the flowers to the base in a zigzag, then sew each one on with small stitches through the back layer.
- Pin the leaves so their bases tuck under the flower edges or sit along the border. Sew each leaf down at the base only, so the tips stay free.
- Sew each sprig on so the berries sit between leaves.
- Do a final check from the side of the table: look for gaps, flat spots, and loose ends.
Stability
Sew each flower through the bottom layer in at least 4 places around the edge, as well as through the center. A runner gets pulled around during meals, and flowers that are only center-stitched will flop. The leaves only need to be sewn at the base.
✅ Final Shaping / Finishing Checklist
- ✅ All 10 flowers are sewn firmly in 4+ places
- ✅ Petals of each layer sit between the petals of the layer below
- ✅ Bead clusters are centered and secure
- ✅ Leaves are spaced evenly and angled in the same direction
- ✅ Sprigs are visible between leaves, not hidden under flowers
- ✅ End leaf fans are symmetrical
- ✅ All tails are woven in or hidden behind motifs
- ✅ The runner lies flat and the border isn’t rippling
💡 Helpful Crochet Tips
- 💡 Count rows as you go. Place a removable marker every 10 rows on the base so you never have to recount 117 rows.
- 💡 Make a swatch first. A runner that’s an inch too wide or too short is hard to fix after the flowers are on.
- 💡 Keep the layers loose and flat. If a flower layer cups, your tension is too tight. Go up half a hook size on the petals.
- 💡 Count the arches. It’s easy to skip or repeat a stitch in R4, which changes the number of petals. Count the ch-arches before starting petals.
- 💡 Work the leaf tip carefully. The 3 sc in the tip chain create the point. Make sure all three go into the same ch.
- 💡 Use a smaller hook for the berries. If you can see stuffing through the stitches, go down to 3.5 mm.
- 💡 Couch the vein if it puckers. If the metallic floss pulls the leaf, make a second, looser stitch along the same line.
- 💡 Use a thread that matches the navy. When you sew the flowers down, dark thread disappears into the yarn.
- 💡 Make motifs in batches. Make all the bottom layers, then all the middle ones, then all the top ones. You’ll find a rhythm and your sizes will match.
- 💡 Keep candles away. Acrylic melts and some fibers burn. Use flameless candles if you want candlelight.
🧼 Care Instructions
- Wash by hand in cool water with a mild detergent. Don’t wring or scrub the flowers.
- Test for dye bleed first. Dark navy sometimes bleeds onto light yarn. Soak one spare leaf in water and press it against a white cloth to check. If you see blue, rinse the whole runner in cold water with a little white vinegar, and wash it separately.
- Dry flat on a towel, reshaping the flowers and leaves as it dries. Don’t hang it while wet.
- Spot-clean small spills right away with a damp cloth.
- Store flat or rolled loosely, away from direct sunlight, which can fade dark blue.
- Beads: avoid soaking for long periods and don’t machine wash.
🎄 Closing
A table runner like this takes time, and that’s part of what makes it worth having. It will outlast the season you make it for, and every flower will carry the evening you made it. Use it as the centerpiece of a holiday meal, bring it out for a winter celebration, or wrap it as a gift for someone who loves to host.
Change the colors to match your own table, stretch it to fit a longer one, or shrink it to a single-flower coaster set. If you make one, I’d love to see it.
💌 Post-Article Engagement & Distribution Block
Share the Love: Made this runner? Pin it, share it, and tag us in your photos. Seeing your version on your own table is the best part of publishing a pattern.
Suggested categories: Crochet Patterns · Home Décor · Holiday Crochet · Free Patterns
Suggested tags: crochet table runner, floral crochet, midnight blue crochet, winter crochet decor, Christmas table decor, crochet flowers, crochet leaves, pearl bead crochet, layered flower crochet, silver and navy decor, handmade holiday decor, intermediate crochet pattern, crochet home decor, free crochet pattern
Comment invitation: Which color would you swap for the navy: deep burgundy, forest green, or something unexpected? Tell us and why.
You Might Also Like:
- Crochet Poinsettia Table Runner Pattern
- Winter Snowflake Crochet Coasters (Free Pattern)
- Crochet Flower Garland for the Holidays
- Crochet Napkin Rings with Leaf Accents
- Layered Crochet Flower Wreath Pattern
Printable/PDF note: A print-friendly or PDF version of this pattern can be offered through a print plugin. (Insert your print or PDF button here.)
❓ FAQ
How long does it take to crochet a table runner like this? Plan on roughly 25–32 hours in total: about 6 hours for the base, 7 for the flowers, 4 for the leaves, 3 for the berries, and 4 for assembly and beading.
What yarn is best for a crochet table runner? A smooth worsted acrylic or an acrylic blend works best because it’s easy to care for and holds color. Cotton works too, but it will be heavier and drape less.
Can I use a different hook size? Yes, but check your gauge. A bigger hook makes a wider, looser runner. If you change the hook for the base, recalculate the foundation chain so the width is right.
Is this crochet runner beginner-friendly? It’s intermediate. If you are comfortable with hdc, dc, tr, and working in a magic ring, you can do it. A beginner could make the base and leaves and use store-bought flowers instead.
How do I make the runner longer or shorter? Add or remove 10 rows and one flower for every 4½ in (11.5 cm). Adjust the leaf and sprig counts to match.
Can I wash a crochet table runner? Yes. Hand wash in cool water and lay it flat to dry. Test for dye bleed first, because dark yarn can stain light yarn.
Is it safe to use with candles on the table? Keep open flames well away from it. Acrylic yarn can melt or catch fire. Flameless candles are a better choice.
How do I keep the flowers from flopping? Sew each flower on at the center and in at least four spots around its edge.