Crochet Christmas Tree Ornament Pattern (Free): Red & Gold Scalloped Tiers
Crochet Pattern · Christmas Décor · Holiday Ornament · Easy Skill Level
📖 Introduction
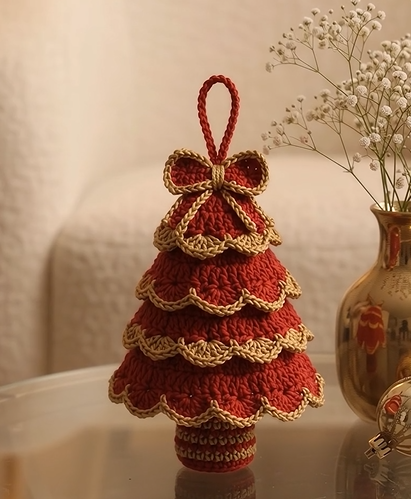
This crochet Christmas tree ornament has five tiers of cranberry-red scallops, each edged in antique gold. It has a gold-trimmed bow at the top, a loop for hanging, and a short striped trunk. It is sturdy enough to stand on a mantel or coffee table and light enough to hang from a wide branch. The tiers flare outward like layered petticoats, and the gold shell edging on each one catches the light.
Most crochet Christmas tree patterns are either a flat appliqué or a plain stuffed cone. This design sits between the two. The body is a firm, stuffed cone, and every tier is crocheted directly into loops left free on its surface, so there are no separate skirts to pin and sew. The tiers stay evenly spaced and level, and the finished tree holds its shape.
It is a good make for handmade Christmas gifts, teacher presents, advent-calendar surprises, or craft fairs, where red-and-gold holiday décor sells well. A single tree works as a tabletop accent. Three trees in different sizes make a small Christmas village display.
The details that make it recognizable are simple to work. The tiers get wider as they go down the tree, with 6 gold shells on the top tier and 30 on the bottom. The bow’s loops and tails are fully outlined in gold. The trunk has two thin gold stripes that repeat the trim above.
You can personalize it easily. Forest green with cream edging gives a classic look. Blush pink with silver suits a modern palette. All-white with metallic gold looks elegant. Switching to fingering-weight yarn and a smaller hook gives a genuine hanging-ornament size. The same cone-and-ledge construction works for any amigurumi Christmas tree colorway.
🔍 Main Pattern Overview
The tree is built in four main parts, plus a few small finishing pieces:
- 🔔 Cone body. Worked in continuous single-crochet rounds from the tip down. Five back-loop-only rounds leave “ledges” of free front loops for the tiers. The cone is closed with a flat base that holds a rigid disk inside.
- 🎄 Five scalloped tiers. Worked directly into the free front loops, starting with the bottom tier and working up. Each tier has red double-crochet rounds and a gold shell edge.
- 🪵 Trunk. A short, weighted cylinder with gold stripes, sewn to the center of the base.
- 🎀 Bow, tails, and hanging loop. Flat pieces with a gold outline, stacked over the tree tip.
Everything except the tiers and the gold edgings is worked in single crochet. Stitch counts are given at the end of every round.
📌 Save this pattern: [Placeholder: “Pin it, print it, or subscribe to get the ad-free printable version in your inbox.”]
🎯 Skill Level
Easy. A confident beginner who can work in the round can finish this tree.
Every stitch is basic. The only part that needs some patience is working the tiers into free front loops on an already-stuffed cone, and the long rounds on the bottom tiers (up to 120 stitches).
Techniques used:
- Magic ring and continuous single-crochet rounds
- Even increases and invisible decreases
- Back-loop-only rounds to create free-loop ledges
- Joined rounds of double crochet worked into free front loops
- Shell (scallop) edging
- Simple color changes for trunk stripes
- Flat rows plus an edging round with corner increases
- Inserting stability disks, stuffing firmly, and sewing assembly
📏 Finished Size
With DK-weight cotton and a 3.0 mm hook, worked at amigurumi tension:
| Measurement | Metric | Imperial |
|---|---|---|
| Total height (hanging loop to trunk base) | approx. 18 cm | approx. 7 in |
| Tree body (tip to bottom tier edge) | approx. 12.5 cm | approx. 5 in |
| Width across bottom tier | approx. 11.5 cm | approx. 4.5 in |
| Trunk height / diameter | approx. 3.5 cm / 2.6 cm | approx. 1.4 in / 1 in |
What changes the size:
- Yarn weight and hook. Fingering weight with a 2.25–2.5 mm hook makes a tree about 12–13 cm (5 in) tall. This is the better size for hanging on a real tree. Worsted weight with a 3.75 mm hook makes a tree about 22 cm (8.5 in) tall, which works as a centerpiece.
- Tension. Loose single crochet enlarges the cone and lets stuffing show through.
- Stuffing density. Under-stuffing makes the cone slump, so the tiers sit unevenly.
- Stiffening. Tiers treated with fabric stiffener flare outward more and add about 1 cm to the overall width.
🧮 Gauge
In amigurumi, the finished proportions matter more than exact gauge. Aim for tight, even stitches with no gaps. As a reference, the designer’s tension is:
22 sc × 24 rounds = 10 cm (4 in) in continuous single-crochet rounds, with DK cotton and a 3.0 mm hook.
A quicker check is 11 sc × 12 rounds = 5 cm (2 in). If your fabric shows gaps when stretched lightly, go down a hook size. The tiers use the same hook. The double-crochet rounds naturally loosen into soft, flared ruffles.
🧶 Required Yarn Amounts
| Color | Used for | Approximate amount |
|---|---|---|
| 🧵 Cranberry Red | Cone, base, tier bodies, trunk, bow, tails, hanging loop | approx. 90 m / 100 yd (about 45–50 g of DK cotton) |
| 🧵 Antique Gold | Tier scallops, bow and tail outlines, trunk stripes, bow center wrap | approx. 35 m / 40 yd (about 15–20 g; metallic blends vary) |
| Polyester fiberfill | Cone and trunk | approx. 15–20 g |
Total yarn: approximately 125 m / 140 yd. One 50 g skein of each color is enough, with some left over.
🧰 Materials
- 🧵 DK / light-worsted (#3) cotton or cotton-blend yarn in Cranberry Red
- 🧵 DK / light-worsted (#3) yarn in Antique Gold. A soft metallic blend works if its weight matches the red.
- 3.0 mm crochet hook (between US C/2 and D/3)
- Polyester fiberfill
- Plastic canvas or heavy card, cut into two circles: 7 cm (2.75 in) for the tree base and 2.5 cm (1 in) for the trunk base
- Optional: poly pellets tied into a small pouch of nylon or tulle, to weight the trunk
- Optional: fabric stiffener or heavy spray starch, for crisper flared tiers
- Stitch markers (at least 2)
- Tapestry or yarn needle
- Sewing pins
- Scissors
⚠️ Safety note: Plastic-canvas disks and poly pellets are hidden inside the piece, but they are small-part hazards if a seam fails. For a tree that may be handled by children under 3, or chewed by pets, leave out the pellets and use firmly packed fiberfill only. Treat the finished tree as décor, not a toy.
🛍️ Supplies We Recommend
- A 3.0 mm ergonomic crochet hook [affiliate link placeholder]
- A two-color bundle of DK cotton in red and gold [affiliate link placeholder]
- A bag of premium polyester fiberfill [affiliate link placeholder]
- A pack of 7-count plastic canvas sheets [affiliate link placeholder]
- Locking stitch markers [affiliate link placeholder]
<!– AD SLOT: post-materials –>
🔤 Abbreviations — US Terms
| Abbreviation | Meaning |
|---|---|
| BLO | back loop only |
| ch | chain |
| dc | double crochet |
| dec | invisible decrease: insert hook into the front loops of the next 2 sts, yarn over, pull through both front loops, then yarn over and pull through both loops on hook |
| FL | front loop |
| inc | increase: 2 sc in the same st |
| MR | magic ring |
| R | round (or row, where “Row” is written out) |
| rep | repeat |
| sc | single crochet |
| sl st | slip stitch |
| st(s) | stitch(es) |
| ( ) x6 | repeat the steps in parentheses the stated number of times |
| * … * | repeat the steps between asterisks as directed |
| (12) | stitch count at the end of the round or row |
📝 Notes Before You Begin
- Continuous vs. joined rounds. The cone, base, and trunk are worked in continuous spirals. Do not join or chain at the end of each round. Every tier is worked in joined rounds (sl st to close, then ch 3 to start). Each tier section says which to use.
- Stitch marker. Move a marker to the first stitch of each round on the spiral pieces. Use a second marker to flag each BLO ledge round as you finish it. This makes the free front loops much easier to find later.
- The ledge technique. When a round is worked in BLO, the unused front loops stay on the outside of the cone as a neat horizontal line. Each tier is built into one of these lines, so it is attached along its whole circumference.
- Tier direction. Hold the cone upside down (tip toward you, base away) while working the tiers. Each tier then grows toward the base, which is the direction it will hang.
- Tier order. Work the tiers from the bottom up (Tier 5 first, Tier 1 last). Lower tiers never block the ledges above them. If you work top-down, each finished tier hangs over the next ledge.
- Stuffing philosophy. Stuff the cone very firmly. It acts as a solid form for the tiers. The trunk should feel almost hard.
- Color changes. Change color on the last yarn-over of the stitch before the new color starts. Carry the unused color up the inside of the trunk. Do not cut it between stripes.
- Sewing tails. Leave a 30 cm (12 in) tail on the trunk, bow, tails, and hanging loop for assembly. Weave tier ends into the tier itself so they don’t show.
- Design assumptions. The reference video shows the finished look only. The stitch counts, the ledge spacing (every 5 rounds), and the tier heights here are my own design choices, made to reproduce the look and keep the tree stable.
🪡 Complete Pattern
🔔 Cone Body
Purpose: The stuffed base form that holds all five tiers.
Color: 🧵 Cranberry Red
Make: 1
Start: Magic ring, continuous rounds
R1: MR 6. (6)
R2: sc around. (6)
R3: (1 sc, inc) x3. (9)
R4: (2 sc, inc) x3. (12)
R5: sc around. (12)
R6: BLO sc around. (12)  ← Ledge 1 (Tier 1)
R7: (3 sc, inc) x3. (15)
R8: (4 sc, inc) x3. (18)
R9: (5 sc, inc) x3. (21)
R10: (6 sc, inc) x3. (24)
R11: BLO sc around. (24)  ← Ledge 2 (Tier 2)
R12: (7 sc, inc) x3. (27)
R13: (8 sc, inc) x3. (30)
R14: (9 sc, inc) x3. (33)
R15: (10 sc, inc) x3. (36)
R16: BLO sc around. (36)  ← Ledge 3 (Tier 3)
R17: (11 sc, inc) x3. (39)
R18: (12 sc, inc) x3. (42)
R19: (13 sc, inc) x3. (45)
R20: (14 sc, inc) x3. (48)
R21: BLO sc around. (48)  ← Ledge 4 (Tier 4)
R22: (15 sc, inc) x3. (51)
R23: (16 sc, inc) x3. (54)
R24: (17 sc, inc) x3. (57)
R25: (18 sc, inc) x3. (60)
R26: BLO sc around. (60)  ← Ledge 5 (Tier 5)
R27: sc around. (60)
Flat Base (continue in the same spiral)
R28: BLO (8 sc, dec) x6. (54)The BLO round folds the fabric inward and forms a sharp bottom edge.
- Stuff the cone very firmly through the opening, packing the tip first with small tufts.
- Place the 7 cm disk over the stuffing so it rests flat against the folded edge from R28. No stuffing should go under the disk.
R29: (7 sc, dec) x6. (48)
R30: (6 sc, dec) x6. (42)
R31: (5 sc, dec) x6. (36)
R32: (4 sc, dec) x6. (30)
R33: (3 sc, dec) x6. (24)
R34: (2 sc, dec) x6. (18)
R35: (1 sc, dec) x6. (12)
R36: dec x6. (6)
Fasten off. Thread the tail through the front loops of the last 6 sts, pull closed, and weave it in.
💡 Mark R34. Place a stitch marker or a contrasting thread in R34 now. Its 18 stitches match the trunk’s 18 stitches exactly, so it is your sewing line later.
🎄 Scalloped Tiers (Make 1 of Each, Bottom to Top)
Purpose: The five flared, gold-edged layers of the tree.
Colors: 🧵 Cranberry Red body, 🧵 Antique Gold edge
Setup: Hold the stuffed cone upside down. Every tier starts in the free front loops of its ledge round.
Shared gold scallop round (used as the final round of every tier):
Join Antique Gold with a sl st in any st of the last red round. Ch 1, sc in same st. *Skip next st, 5 dc in next st, skip next st, sc in next st.* Rep from * around, leaving off the final sc on the last repeat. Sl st to the first sc. Fasten off and weave in the end on the underside of the tier.
Each scallop uses 4 stitches, so every tier ends with its red stitch count divided by 4.
Tier 5 (bottom) — worked into the FL of R26
R1 (Red): Join with sl st in any free FL. Ch 3 (counts as dc), dc in same FL,
          2 dc in each remaining FL around; sl st to top of ch-3. (120)
R2 (Red): Ch 3 (counts as dc), dc in each st around; sl st to top of ch-3. (120)
R3 (Gold): Scallop round. (30 scallops)
Tier 4 — worked into the FL of R21
R1 (Red): Join in any free FL. Ch 3, dc in same FL, 2 dc in each remaining FL
          around; sl st to top of ch-3. (96)
R2 (Red): Ch 3, dc in each st around; sl st to top of ch-3. (96)
R3 (Gold): Scallop round. (24 scallops)
Tier 3 — worked into the FL of R16
R1 (Red): Join in any free FL. Ch 3, dc in same FL, 2 dc in each remaining FL
          around; sl st to top of ch-3. (72)
R2 (Red): Ch 3, dc in each st around; sl st to top of ch-3. (72)
R3 (Gold): Scallop round. (18 scallops)
Tier 2 — worked into the FL of R11
R1 (Red): Join in any free FL. Ch 3, dc in same FL, 2 dc in each remaining FL
          around; sl st to top of ch-3. (48)
R2 (Gold): Scallop round. (12 scallops)
Tier 1 (top) — worked into the FL of R6
R1 (Red): Join in any free FL. Ch 3, dc in same FL, 2 dc in each remaining FL
          around; sl st to top of ch-3. (24)
R2 (Gold): Scallop round. (6 scallops)
⚠️ Design choice: The bottom three tiers get an extra red round (R2) so that they are longer and the tree widens smoothly toward the base. Tiers 1 and 2 have one red round so the top stays narrow under the bow.
💡 Start at the back. Begin each tier’s joining sl st directly above or below the previous tier’s join. That keeps all the round seams in one line at the back of the tree.
🪵 Trunk
Purpose: Stand, weight, and the red-and-gold striped detail below the tiers.
Colors: 🧵 Cranberry Red, with 🧵 Antique Gold stripes
Make: 1
Start: Magic ring, continuous rounds
R1 (Red): MR 6. (6)
R2: inc around. (12)
R3: (1 sc, inc) x6. (18)
R4: BLO sc around. (18)
R5: sc around. (18)- Drop the 2.5 cm disk into the trunk so it lies flat on R1–R3.
R6 (Gold): sc around. (18)
R7 (Red): sc around. (18)
R8 (Red): sc around. (18)
R9 (Gold): sc around. (18)
R10 (Red): sc around. (18)
R11 (Red): sc around. (18)- Optional: Place the tied pellet pouch on top of the disk.
- Stuff the trunk firmly up to the rim.
- Sl st into the next st and fasten off, leaving a 30 cm (12 in) Red tail for sewing.
🎀 Bow
Purpose: The gold-outlined bow at the top of the tree.
Colors: 🧵 Cranberry Red body, 🧵 Antique Gold outline and center wrap
Make: 1
Start: Foundation chain, flat rows
Ch 21 (Red).
Row 1: sc in 2nd ch from hook and in each ch across. (20)
Rows 2–6: ch 1, turn, sc across. (20)
Fasten off Red.
Gold edging (worked in the round):
Edging R1: Join Gold in the first st of Row 6. Ch 1, 3 sc in same st,
sc in next 18 sts, 3 sc in last st. Working down the side, sc in each of the
4 row-ends of Rows 5–2. Working along the foundation chain, 3 sc in the first
ch, sc in next 18 ch, 3 sc in last ch. Working up the other side, sc in each
of the 4 row-ends of Rows 2–5; sl st to first sc. (56)
Fasten off, leaving a 40 cm (16 in) Gold tail.
Shape the bow:
- Fold both short ends to the center of the back so they overlap by about 1 cm.
- Sew them down with Red yarn.
- Pinch the middle to form two loops.
- Wrap the long Gold tail tightly around the center 10–12 times to make a thick knot band.
- Secure the wrap with a few stitches through the back and leave the remaining tail for attaching.
🎀 Bow Tails
Purpose: The two gold-edged tails that fall from under the bow onto Tier 1.
Colors: 🧵 Cranberry Red, 🧵 Antique Gold
Make: 1 strip, which forms both tails
Ch 20 (Red).
Row 1: sc in 2nd ch from hook and in each ch across. (19)
Fasten off Red.
Edging R1 (Gold): Join in the first st of Row 1. Ch 1, sc in same st and in
next 17 sts, 3 sc in last st. Rotate and work along the underside of the
foundation chain: sc in next 17 ch, 2 sc in the last ch (the base of the first
sc); sl st to first sc. (40)
Fasten off, leaving a 20 cm (8 in) tail. Fold the strip at its midpoint into an inverted “V” so the two tails spread about 3 cm (1.25 in) apart at their ends.
🔔 Hanging Loop
Purpose: Hanging, and the visual finish of the silhouette.
Color: 🧵 Cranberry Red
Make: 1
Ch 21.
Row 1: sl st in the back bump of 2nd ch from hook and in each ch across. (20)
Fasten off, leaving a 20 cm (8 in) tail. Working into the back bumps gives a firm, rounded cord that doesn’t twist.
🎨 Styling / Assembly / Stability / Final Shaping
Styling Notes
- The tiers should sit level and evenly stepped. Each gold scallop edge should overlap the top of the tier below it by about 0.5–1 cm, so no bare cone shows between layers.
- The trunk should stay visible below Tier 5 as a short, striped stump. It should not disappear under the tier.
- The bow sits directly on the tip, over the top of Tier 1. The loop rises straight out of the bow’s center band.
Recommended Assembly Order
- Crochet the cone (R1–R27), insert the base disk, stuff firmly, and close the base (R28–R36).
- Work the tiers bottom-up: Tier 5, 4, 3, 2, 1.
- Crochet, weight, and stuff the trunk.
- Pin the trunk to the base along the R34 marker line. Sew it with the Red tail, catching the trunk’s last round and one loop of each R34 stitch. Go around twice for strength.
- Make the hanging loop. Fold it in half and sew both ends securely into the tip (R1–R2).
- Make the bow tails. Pin the fold of the “V” at the front of the tip, just above Tier 1, and sew it in place.
- Make and shape the bow. Thread the loop through or behind its center band, then sew the bow over the tail fold with the Gold tail. Add 2–3 stitches through the back of the bow into the cone.
- Optional: stiffen and block the tiers (see Stability below).
Stability & Structure
- Base disk. The 7 cm disk keeps the bottom of the cone flat, so the trunk meets a level surface and the tree doesn’t lean.
- Trunk weighting. The pellet pouch lowers the center of gravity. Without it, the wide tiers make the tree slightly top-heavy on smooth surfaces. For a hanging-only ornament, leave the pellets out to keep it light.
- Balance check. Before sewing, stand the tree on the pinned trunk. If it leans, rotate the trunk a quarter turn or adjust the stuffing near the base.
- Reinforcement. Sew the loop ends through several stitches of the tip, from front to back and back again, so the tree can hang without the loop pulling out.
- Stiffening (optional). Brush fabric stiffener lightly onto the underside of each tier. Shape the tiers outward and let them dry with the tree standing on a cup. This gives the crisp, flared tiers seen in the reference.
✅ Final Shaping / Finishing Checklist
- ✅ All tier joins line up in one seam at the back
- ✅ Gold scallops fanned open and evenly spaced on every tier
- ✅ No bare cone visible between tiers
- ✅ Trunk centered and stands vertically when viewed from front and side
- ✅ Bow centered on the tip, with both loops the same size
- ✅ Tails symmetrical and resting on Tier 1
- ✅ Hanging loop upright and secure
- ✅ Tree stands without tipping on a flat surface
- ✅ All yarn ends woven in and trimmed inside the piece
💡 Helpful Crochet Tips
- 💡 Mark every ledge as you go. On a stuffed red cone, a BLO line is easy to lose. A marker in each ledge round saves a lot of searching later.
- 💡 Use the cone’s increase lines as guides. The three stacked increase columns work as a vertical grid, so you can check that each tier starts level.
- 💡 Stagger the increases if you prefer a rounder cone. The pattern stacks increases in three columns for easy counting, which can give a slightly triangular shape. The tiers hide this completely. If you want a perfectly round bare cone, shift where each round’s first increase falls.
- 💡 Don’t tighten up on the dc rounds. The tiers should ripple. Working the tier dc at the same tight tension as the cone makes them cup inward instead of flaring.
- 💡 Count the shells once, then trust the math. If a gold round ends with a half-scallop, a red round is off by a stitch. Frog the gold and recount the red, which should be 120, 96, 72, 48, or 24.
- 💡 Use jogless stripes on the trunk. At each stripe, work the first stitch of the new color, then slip stitch into the next stitch to lift the spiral step. The gold lines then look like continuous rings.
- 💡 Use two needles with metallic gold. If your gold yarn frays, wrap the center of the bow with a matching embroidery floss instead. Save the yarn for the crocheted edgings.
- 💡 Stuff the tip with a pencil eraser. Small tufts pushed into R1–R6 keep the top from collapsing under the bow and loop.
🧼 Care Instructions
- Spot-clean with a cloth dampened in cool water and a drop of mild soap. Blot, don’t rub.
- Do not machine-wash. The internal disks and optional pellets can shift, and stiffened tiers lose their shape.
- If you used stiffener, reshape the tiers with your fingers after cleaning. Re-apply a light coat of starch if needed.
- Colorfastness: Deep red dyes can transfer onto gold or light yarn when wet. Test with a damp white cloth before cleaning, and keep moisture to a minimum.
- Store each tree in a small box or wrapped in tissue, away from direct sunlight and humidity. This prevents fading and keeps the tiers from being crushed between seasons.
Closing
When the last gold scallop is fanned open and the bow is sewn in place, you have a tree that can go on a mantel, sit between candles, or hang from a sturdy branch year after year.
Try a pastel set for a modern palette. Crochet a small forest in three sizes. Or make a stack of them in classic red and gold as quick gifts for neighbors and teachers. These tend to become favorite Christmas pieces.
If you make one, share a photo of your tree so other readers can see your colorway.
Share the Love, Categories & More
📌 Share the Love: Save this pattern to your Christmas crochet board, share it with a crochet friend, and tag your finished tree. Every share helps us keep the patterns coming.
Suggested categories: Christmas Crochet Patterns · Holiday Home Décor · Free Crochet Patterns · Amigurumi
Suggested tags: crochet Christmas tree, Christmas tree ornament, free crochet pattern, amigurumi Christmas tree, crochet ornament, red and gold Christmas décor, scalloped crochet, holiday crochet, handmade Christmas gift, crochet tabletop tree, craft fair crochet, easy crochet Christmas, DK cotton crochet project
💬 Join the conversation: Which palette are you making yours in? Classic red and gold, or something unexpected like sage and cream? Tell us in the comments.
You might also like:
- Crochet Gingerbread House Ornament Pattern
- Scalloped Crochet Christmas Bauble Cover
- Mini Crochet Candy Cane Tree Topper
- Crochet Poinsettia Napkin Rings
- Amigurumi Snowman Tabletop Décor
🖨️ Printable version: A print-friendly or PDF version of this pattern can be offered here through a print plugin. [Placeholder] <!– AD SLOT: pre-faq –>
❓ FAQ
How big is this crochet Christmas tree ornament?
With DK cotton and a 3.0 mm hook, it is about 18 cm (7 in) tall including the loop, and about 11.5 cm (4.5 in) wide at the bottom tier. For a smaller hanging ornament, use fingering-weight yarn and a 2.25–2.5 mm hook to get a tree about 12–13 cm tall.
Can I hang it on a real Christmas tree?
Yes. Leave out the poly pellets and use a stiff branch near the trunk of your tree. The DK version is on the heavy side for thin branch tips. The fingering-weight version is the best choice if the tree will mainly hang.
What yarn works best for crochet Christmas tree ornaments?
Cotton or cotton blends are best. They give crisp stitch definition, the scallops hold their shape, and the fabric doesn’t fuzz. Acrylic works too, but the tiers will be softer and may need stiffener to flare.
Do I have to use plastic canvas?
It is strongly recommended for the tree base, because it keeps the tree standing straight. Heavy card is a good substitute for a piece that won’t be cleaned. For a hanging-only ornament, you can skip both disks and stuff very firmly.
Why is my tier cupping instead of flaring?
The double-crochet rounds are too tight, or the cone is under-stuffed. Loosen your tension on the tier rounds, check that the red round has doubled the ledge count, and add stuffing so the cone is fully firm.
Can I make it with fewer tiers?
Yes. Skip one ledge by working that BLO round as a normal sc round instead, and leave out the matching tier. Keep the bottom tier, because it frames the trunk and balances the silhouette.
Is this pattern safe for children?
It is intended as décor. The hidden disks and pellets are choking hazards if a seam opens. For a child-safe version, leave out the pellets, use fiberfill only, and sew all attachments with extra passes.