Spiral Icicle Snowflake Ornament — A Crochet Pattern (Free Pattern)
Amigurumi & Motif Pattern · Christmas Ornament · Beginner-to-Intermediate
📖 Introduction
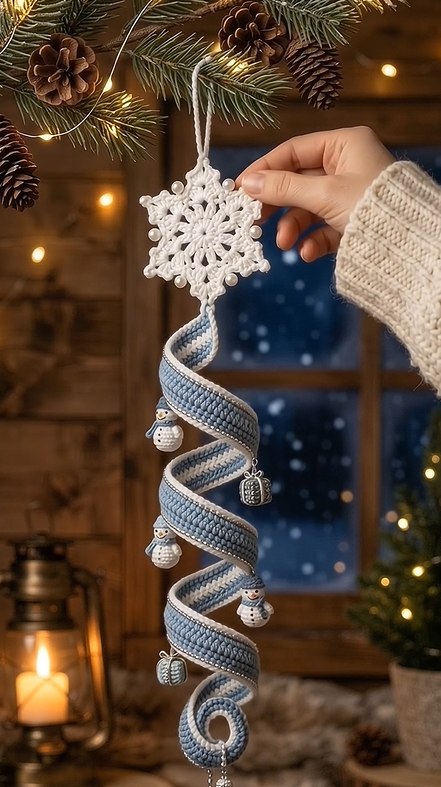
A spiral icicle snowflake ornament is a hanging Christmas decoration built from two crocheted pieces — a lacy, beaded snowflake motif and a striped, coiled “icicle” rope — joined into one dangling piece that twists gently whenever it catches a breeze near the tree or a window. It reads as a little more sculptural than a flat snowflake appliqué, because the spiral rope gives it real depth and movement instead of lying still against a branch.
The appeal here is that it solves two problems at once: people who love the look of a crocheted snowflake often find a flat motif underwhelming on its own once it’s off the page, and people who want an icicle ornament rarely find one with the softness and texture yarn gives that glass and plastic versions can’t. Combining them gives you an ornament with presence from across the room and detail worth a close look up close.
This piece works well as a tree ornament, a garland or wreath accent, a window hanger backlit by fairy lights, or a small hostess gift tied to a wrapped box. It also holds up as craft-fair inventory — the beading and dimensional shaping read as “handmade and considered” rather than “quick,” which matters when pricing finished pieces for sale.
The most distinctive details worth calling out: the snowflake is worked in two tones — a soft ice-blue center ring surrounded by white lace points — with small pearl beads tacked to each point tip and the very center, so it catches light the way a real snowflake crystal does. Below it, the rope is worked as a striped tube in the same blue and white, then coiled by hand into a loose corkscrew that tapers to a curled tip, with a few small metallic charms threaded onto jump rings and hung along the spiral for extra sparkle.
Personalizing it is straightforward: swap the blue for silver, gold, or a jewel tone to match an existing color scheme; make the snowflake alone as a flat ornament or gift-tag topper if you skip the rope; or lengthen the rope for a fuller icicle drop, or shorten it for a smaller tree.
💌 Thank you for supporting this site.
🔍 Main Pattern Overview
This pattern has two crocheted components — a snowflake motif and a striped spiral rope — joined at assembly, plus a small set of purchased charms attached at the end for sparkle. The snowflake is worked from a magic ring outward in three rounds; the rope is worked as a continuous tube around a length of bendable wire, then hand-coiled into its spiral shape once complete. Nothing here requires reading ahead — each component is self-contained, and the styling notes at the end tell you exactly how to bring the two pieces together.
📌 Want to save this for later? Pin it or bookmark this page — the full pattern is below.
🎯 Skill Level
Easy–Intermediate.
The stitches themselves are beginner-friendly, but two techniques push this past a true beginner project:
- Working a lace picot point (used on each snowflake tip)
- Crocheting around a wire core to build shape memory into the icicle rope
If you’ve made one motif project (a granny square, a doily, a simple flower) and one amigurumi or tube-based project, you have every skill this pattern needs.
📏 Finished Size
- Snowflake motif: approximately 8 cm / 3.25 in point to point
- Icicle rope (uncoiled length): approximately 30 cm / 12 in, coiling down to roughly 10–12 cm / 4–4.5 in once spiraled
- Total hanging length: approximately 20 cm / 8 in including the hanging loop
What changes the size: yarn weight is the biggest factor — moving from a size 3 (light) cotton to a size 4 (worsted) yarn with a larger hook will scale the snowflake up noticeably. Wire gauge and how tightly you coil the rope both affect the finished icicle length; a looser coil reads longer and lankier, a tighter coil reads shorter and chunkier. Fewer or more rounds on the rope before coiling will also shorten or lengthen the finished icicle.
🧮 Gauge
Exact gauge matters less here than tight, even tension — this is a motif and a wired tube, not a garment, so proportions and a clean lace pattern matter more than hitting a swatch measurement precisely.
For reference: Rounds 1–2 of the snowflake measure approximately 3 cm / 1.25 in across worked at the gauge below. If your center rounds come out noticeably larger or smaller than that, adjust your hook size before continuing so the finished snowflake keeps its proportions.
🧶 Required Yarn Amounts
- White (main, snowflake + rope stripes): approximately 15 g / 35 m
- Ice blue (snowflake center + rope stripes): approximately 10 g / 20 m
- Total project yarn: approximately 25 g across both colors — well within a single small skein or leftover scraps of each color
- Embroidery/sewing thread: a short length of white or clear thread for attaching pearl beads, negligible amount
🧵 Both colors are used in both pieces, so buy (or set aside) both before starting rather than partway through the rope.
🧰 Materials
- Size C/2 (2.75 mm) crochet hook (adjust for your yarn weight and tension)
- Size 3 (light/DK-weight) cotton or cotton-blend yarn in white and ice blue
- 10–12 small white pearl beads (approx. 4–6 mm) for the snowflake
- One 30 cm / 12 in length of bendable craft wire or floral wire (paddle wire or a cut chenille stem core), for shaping the icicle rope
- 3–4 small decorative charms (snowman, gift box, or icicle-shaped charms/beads work well) with jump rings, for hanging along the spiral
- Small pair of jewelry pliers, for opening and closing jump rings
- Yarn/tapestry needle
- Sewing needle and thread (for beads and charm attachment points)
- Scissors
- Stitch marker
- A pencil or narrow dowel (approx. 1 cm / 0.4 in diameter), used to help shape the spiral coil
- Optional: fabric stiffener spray, to help the coiled rope hold its shape permanently
⚠️ Small parts note: pearl beads, wire, and metal charms are a choking hazard. If this ornament will be anywhere near small children or pets, secure all embellishments with extra-strong knots and a dab of fabric glue, or omit them and rely on the crocheted lace shaping alone.
🛍️ Supplies We Recommend A size C/2 (2.75mm) hook, a light-weight cotton yarn in two coordinating colors, a small pack of craft pearls, and a length of 20-gauge floral wire will cover this whole project — check your local craft store’s holiday or jewelry-making aisle for the wire and charms if you don’t already have them on hand.
📩 Want a printable copy of this pattern to keep in your project binder? Save or pin this page so you can find it again.
🔤 Abbreviations — US Terms
| Abbreviation | Meaning |
|---|---|
| ch | chain |
| sl st | slip stitch |
| sc | single crochet |
| hdc | half double crochet |
| dc | double crochet |
| inc | increase (2 sc in same stitch) |
| MR | magic ring |
| picot | ch 3, sl st into 3rd ch from hook |
| rep | repeat |
| st(s) | stitch(es) |
| ( ) | stitch count at end of round/row, or instructions to repeat the enclosed set |
📝 Notes Before You Begin
- The snowflake is worked in joined rounds (each round ends with a slip stitch to the first stitch, then a turning chain begins the next round). This keeps the lace points symmetrical.
- The icicle rope is worked in a continuous spiral (no joining slip stitch, no turning chain) — use a stitch marker in the first stitch of each round and move it up as you go, so you always know where a round begins for color-change placement.
- Color changes on the rope happen at the start of a new round: finish the last stitch of the previous round with the new color already pulled through the final two loops, so the transition sits invisibly on the inside of the tube.
- Wire insertion: feed the wire in through the tube opening after the first 2–3 rounds are worked, rather than trying to crochet directly around it from round one — it’s far easier to control tension this way.
- Leave a 15 cm / 6 in tail at both the start and the fasten-off of the rope; these tails are used to close the tube ends neatly, not just woven in.
- Stuffing is not used in this pattern — the wire core is what gives the rope its shape, so the tube stays soft and slightly flattened, which is intentional and helps it coil smoothly.
🪡 Complete Pattern
❄️ Snowflake Motif (Make 1)
What it’s for: the focal point of the ornament, sitting above the icicle rope. Yarn: ice blue for Round 1, white for Rounds 2–3. Quantity: 1.
Round 1 (ice blue): MR, ch 2 (does not count as a stitch), 12 dc into ring, join with sl st to top of first dc. Fasten off, leaving a short tail to weave in later. (12 dc)
Round 2 (join white in any dc): ch 1, sc in same st, *ch 5, skip 1 dc, sc in next dc; rep from * around, join with sl st to first sc. (6 ch-5 loops)
Round 3 — build the points into each loop: into each ch-5 loop, work (sc, hdc, 3 dc, picot, 3 dc, hdc, sc); rep this set into each of the 6 loops around; join with sl st to first sc, fasten off, leaving a 15 cm / 6 in tail.
✅ You should now have 6 identical lace points radiating from a solid ice-blue center — this is the finished snowflake shape before embellishment.
Finishing the snowflake:
- Weave in the Round 1 tail through the back of the center ring.
- Using the Round 3 tail (or a separate length of thread), tack one pearl bead to the tip of each of the 6 points — sew through the picot loop at the tip twice for security, then knot off on the wrong side.
- Sew one additional pearl bead to the very center of the snowflake, through the center ring, front side only, to anchor it visually.
- Using a short length of white yarn or thread, make a small hanging loop at the back of one point (the point that will sit at the top) by taking a few stitches through the top of that point and tying off — this is what the rope’s top wire loop will pass through during assembly.
🧊 Icicle Spiral Rope (Make 1)
What it’s for: the dangling, coiled section beneath the snowflake. Yarn: alternating white and ice blue in 4-round stripes throughout. Quantity: 1.
Round 1 (white): ch 4, join with sl st to form a ring, ch 1, 6 sc into the ring — do not join, place stitch marker in first st, work in continuous spiral from here on. (6 sc)
Round 2 (white): sc in each st around. (6)
After Round 2, feed the 30 cm / 12 in length of wire into the tube through the working opening so it runs alongside your working yarn for the rest of the piece. From here, each round is worked normally, simply crocheting around the wire sitting inside the tube.
Rounds 3–6 (white): sc in each st around, working over/around the internal wire. (6 sts each round)
Rounds 7–10 (ice blue): sc in each st around. (6)
Rounds 11–14 (white): sc in each st around. (6)
Rounds 15–18 (ice blue): sc in each st around. (6)
Rounds 19–22 (white): sc in each st around. (6)
Rounds 23–26 (ice blue): sc in each st around. (6)
🧵 Continue alternating 4 rounds white / 4 rounds ice blue in this way until the tube measures approximately 30 cm / 12 in, ending on a completed color block rather than mid-stripe.
Final round: sl st in next st to close, fasten off leaving a 15 cm / 6 in tail. Trim the internal wire so it sits about 1 cm / 0.4 in short of each tube end (it should not poke through the fabric).
Closing the ends: thread the starting tail onto a yarn needle, weave it through the front loops of the Round 1 stitches, pull gently closed like a drawstring, and knot off — repeat at the fasten-off end. This seals both ends of the tube around the wire so it can’t slip out.
✅ You now have a solid striped tube with a bendable wire core, ready to be shaped.
🎨 Styling / Assembly / Stability / Final Shaping
Coiling the rope: starting from the top end, wrap the tube around your pencil or dowel in a loose, even spiral, working your way down toward the bottom end — think of coiling a ribbon around a curling iron. Because of the internal wire, the tube will hold this shape once you slide the dowel back out. Leave the very bottom 3–4 cm / 1.5 in uncoiled and curl it into a small loose hook shape, like the curled tip of a real icicle.
Attaching the snowflake: take the top end of the coiled rope and bend a small open loop in the wire so it sits just above the top coil (this is easiest to do before you fully seal that end, so plan ahead, or gently reopen a few stitches at the top if needed). Pass this loop through the hanging loop you made on the back of the snowflake’s top point, then close the wire loop with your pliers so the two pieces are securely linked but can still pivot slightly.
Adding the charms: open 3–4 jump rings with your pliers (twist sideways, don’t pull straight apart, or the ring will distort). Thread one charm onto each ring, then hook each ring through a stitch gap between coils at staggered points down the spiral — space them so they don’t all cluster on one side, which will make the finished piece hang crooked.
Stability/structure: because the wire core does the structural work here, there’s no stuffing to settle or shift over time. Check that the top hanging loop is firmly closed with no gap a hook could slip out of — this is the one point that carries the full weight of the ornament.
Recommended assembly order:
- Complete and embellish the snowflake fully (beads and hanging loop) before starting the rope.
- Complete the striped rope tube and insert/trim the wire.
- Coil the rope around the dowel and remove the dowel.
- Shape the top wire loop and link it to the snowflake’s hanging loop.
- Seal both tube ends if not already done.
- Attach charms last, once the coil shape is set, so you can space them evenly around the finished spiral.
Final Shaping / Finishing Checklist
- ✅ All 6 pearl beads are securely tacked at the snowflake points, with no loose threads
- ✅ Center pearl bead is sewn flat and centered
- ✅ Snowflake hanging loop is at the back of the top point, invisible from the front
- ✅ Internal wire is trimmed short of both tube ends and doesn’t poke through
- ✅ Both tube ends are drawn closed and knotted
- ✅ Coil spiral is even, with the bottom tip curled and no flat/uncoiled gaps
- ✅ Snowflake-to-rope wire loop is fully closed, no gap
- ✅ Charms are spaced around the spiral, not clustered
- ✅ All yarn tails woven in and trimmed
💡 Helpful Crochet Tips
- 💡 Work Round 1 of the snowflake a touch looser than feels natural — a tight center ring makes it hard to seat 12 dc evenly and the ring can pucker.
- 💡 Count your ch-5 loops before starting Round 3; if you don’t have exactly 6, the points won’t be symmetrical.
- 💡 When making the picot at each point tip, snug the slip stitch down firmly — a loose picot looks like a stray loop rather than a defined point.
- 💡 Feed the wire in after Round 2, not Round 1 — starting the wire too early makes the first few stitches nearly impossible to work through.
- 💡 Keep your stitch marker moving every round on the rope; on a 6-stitch spiral it’s very easy to lose track of round boundaries, especially at color changes.
- 💡 Coil the rope around the dowel while the tube is still slightly warm from handling — cold, stiff wire is more resistant to holding a new shape.
- 💡 If your coil relaxes after removing the dowel, mist it lightly with fabric stiffener and let it dry in the coiled position overnight.
- 💡 Open jump rings sideways with two pliers, never pulled apart — this keeps the ring round instead of oval, which matters for how the charms hang.
- 💡 Test-hang the finished ornament before trimming any tails — check it hangs straight, then trim.
🧼 Care Instructions
Spot-clean only — this ornament combines yarn, wire, and metal charms, so submerging it isn’t recommended. Wipe gently with a barely damp cloth if needed and let it air-dry fully before rehanging. Because the blue and white yarns are worked in solid stripes rather than mixed strands, colorfastness isn’t a major concern, but keep it out of direct sunlight for long-term storage to prevent the white sections from yellowing. Store flat or gently coiled in a box between seasons rather than compressed, so the wire-shaped spiral doesn’t get bent out of round.
Closing
This ornament rewards a little patience in two very different techniques — fine lace shaping on the snowflake, and wire-supported sculpting on the rope — and the payoff is a piece with genuine dimension hanging on the tree, not just another flat motif. Try it in silver-and-white for a more formal, elegant tree, or in red-and-white for a warmer, more traditional look. Made in a small batch, these also travel well as teacher gifts, hostess gifts, or stocking stuffers for the crafty person in your life. If you make one, I’d love to see how your color choices and charm placement turned out.
Share, Categorize & Discuss
📌 Share the Love: If this pattern is going on your tree this year, save this page and share a photo of your finished ornament — seeing how everyone’s color choices turn out is one of the best parts of putting a pattern out into the world.
Suggested categories: Christmas Ornaments · Crochet Motifs · Holiday Décor · Beginner-to-Intermediate Patterns
Suggested tags: crochet snowflake, crochet ornament pattern, amigurumi christmas, wire crochet, crochet icicle, beaded crochet, free crochet pattern, holiday crochet, crochet motif, DIY christmas ornament, crochet with wire, crochet gift tag, cotton yarn crochet, handmade ornament
❓ Join the conversation: What color combination are you picturing for your version — the icy blue-and-white shown here, or something warmer like red and gold?
You Might Also Like:
- Beaded Crochet Snowflake Garland
- Mini Crochet Gift Box Ornaments
- Crochet Icicle Drop Earrings
- Striped Crochet Candy Cane Ornament
- Lacy Crochet Star Tree Topper
🖨️ A printable, ad-free PDF version of this pattern can be made available through your site’s print/PDF plugin.
❓ FAQ
Can I make just the snowflake without the icicle rope? Yes — the snowflake motif is a complete ornament or gift-tag topper on its own. Just add a hanging loop to the back of any point after Round 3 and skip the rope entirely.
What yarn substitutes work if I don’t have a size 3/light-weight cotton? A DK-weight acrylic or cotton-acrylic blend will work with a similarly sized hook (roughly 2.5–3 mm); expect a slightly larger, softer-edged snowflake than the crisp lace look cotton gives.
Do I need a specific hook size? No — a C/2 (2.75 mm) is the starting recommendation, but the exact size matters less than matching it to your yarn so the lace rounds lie flat without curling or gapping.
Is the wire safe to leave inside the rope permanently? Yes, as long as it’s fully trimmed short of both tube ends and the ends are sewn closed, the wire stays contained and won’t work its way out with normal handling.
How do I make the icicle longer or shorter? Add or remove full 4-round color blocks from the rope before fastening off — keeping changes in blocks of 4 keeps the stripe pattern consistent.
Can I skip the pearl beads and charms? Absolutely — the crocheted lace and stripe pattern hold up visually without embellishment, and skipping small parts is the easiest way to make this safer around young children or pets.
Is this pattern beginner-friendly? Mostly — if you can already do a magic ring, single crochet, and a basic chain-picot, you have every stitch this pattern uses. The wire-shaping step is the only genuinely new skill for most beginners.