Holly & Stockings Filet Crochet Christmas Table Runner
Crochet Home Décor · Holiday Tablescape · Intermediate · Free Pattern
📖 B. Introduction
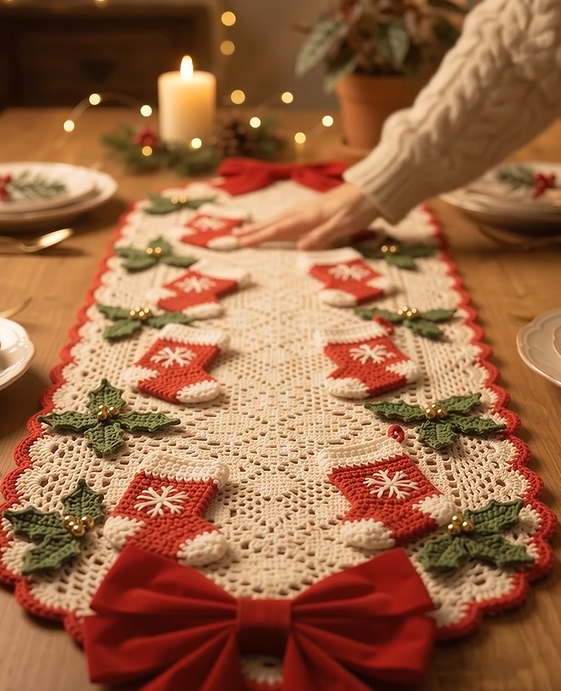
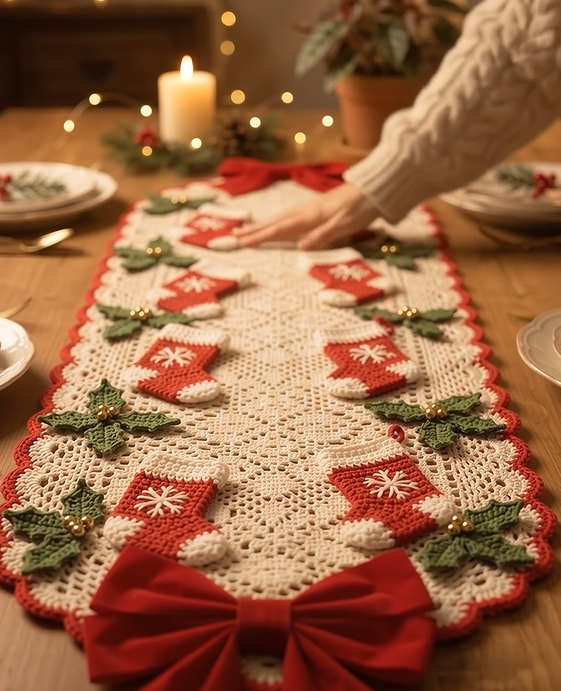
This crochet Christmas table runner turns a plain holiday table into the centerpiece itself — an elongated oval of open filet lace, edged in a scalloped crimson picot border, with tiny crocheted stockings and gold-berried holly dangling along both sides like ornaments caught mid-fall. It’s the kind of piece that gets photographed before dinner even starts.
What makes this design work as a table piece rather than just a doily is the layering: a lattice-pattern lace body in warm ecru, a saturated red edge that reads clearly from across the room, and dimensional appliqués that catch candlelight. The mini stockings — each with a contrast cuff and a hand-embroidered snowflake — give the runner a narrative, almost storybook quality that a plain lace edge never achieves on its own.
It suits a few very specific occasions well: as the anchor piece on a formal Christmas or Christmas Eve table, as a mantel or sideboard runner when it’s not dinner duty, as a standout handmade hostess gift, or as a higher-ticket item for a holiday craft fair or Etsy shop, where dimensional appliqué work tends to justify a premium price over a plain lace runner.
Personalize it freely: swap the red for deep emerald or a black-and-red buffalo-plaid palette for a more rustic look, shorten or lengthen the filet body by adding or removing lattice repeats to fit your table exactly, or substitute a crocheted bow (pattern notes included) for the velvet ribbon if you want the whole piece to be 100% yarn.
🔍 C. Main Pattern Overview
This runner is built in three modules, then assembled:
- Center Filet Panel — a tapered oval body worked in an open diamond-lattice filet stitch, finished with a scalloped picot border
- Mini Stocking Appliqués (Make 8) — small flat stockings with contrast cuffs and embroidered snowflakes
- Holly Leaf Clusters (Make 8) — three-point holly leaves with gold bobble berries
- Finishing — appliqué placement, blocking, and velvet ribbon bows at both ends
🎯 D. Skill Level
Intermediate. Nothing here is individually hard, but the runner asks you to combine several skills cleanly:
- Reading and charting a filet crochet lattice (blocks vs. spaces)
- Shell-and-picot edging worked around a curved perimeter
- Magic ring construction at a small scale (stockings, berries)
- Basic short-row shaping (the stocking heel)
- Surface embroidery (chain-stitch snowflakes)
- Neat hand-sewing of multiple small appliqués onto open lace without distorting it
A confident beginner who has done at least one filet project and one amigurumi-scale project before will be fine.
📏 E. Finished Size
- Approximate finished size: 90 cm long × 30 cm wide (35½ in × 12 in), plus ribbon tails
- Each mini stocking: approx. 5 cm tall (2 in)
- Each holly cluster: approx. 6 cm across (2½ in)
What changes the size:
- Yarn weight/hook size — moving up to Aran weight with a 4.5–5 mm hook will scale the whole runner up; down to a fingering weight with a 2.5 mm hook shrinks it into a table-topper or wide placemat size
- Number of lattice repeats — add or remove one full diamond repeat (see Panel, Row Group A) per 9 cm of length
- Tension — filet crochet is very tension-sensitive; a loose gauge will “melt” the diamond lattice into an oval blob rather than crisp diamonds
🧮 F. Gauge
For filet lace, exact gauge matching matters less than consistent tension — an uneven gauge shows immediately in an open mesh pattern, since there’s no fabric density to hide it in.
Approximate gauge: 5 filet spaces = 10 cm (4 in), and 4 filet rows = 10 cm (4 in), using a DK/light worsted weight mercerized cotton and a 3.5 mm (E/4) hook.
Block your swatch before trusting it — filet mesh relaxes and opens up significantly with blocking, more than almost any other crochet stitch.
🧶 G. Required Yarn Amounts
Using a DK-weight mercerized cotton (the traditional filet-crochet yarn — it has the stiffness to hold the mesh open):
| Color | Used for | Approx. amount |
|---|---|---|
| 🧵 Ecru/Cream (MC) | Filet panel body | 300 g / approx. 700 m |
| 🧵 Cream/White (CC1) | Stocking cuffs, toes, heels, snowflake embroidery | 25 g / approx. 60 m |
| 🧵 Red (CC2) | Border edging, stocking bodies | 90 g / approx. 210 m |
| 🧵 Green (CC3) | Holly leaves | 25 g / approx. 55 m |
| 🧵 Gold/Mustard (CC4) | Holly berries | 5 g / approx. 10 m |
Total: approximately 445 g. Buy 10–15% extra of the ecru and red if this is your first filet project — frogging is common while you find your tension.
🧰 H. Materials
- 3.5 mm (E/4) crochet hook — main panel and border
- 2.5 mm (C/2) crochet hook — mini stockings and holly clusters
- DK-weight mercerized cotton yarn in the five colors above
- Tapestry/yarn needle for weaving in ends and sewing appliqués
- Sewing needle and matching thread for attaching beads (if using)
- 16 small gold seed beads or gold embroidery thread for French-knot berries (optional alternative to crocheted berries)
- Stitch markers
- Blocking mat and rust-proof pins
- Scissors
- 1.5 m (60 in) of 4–6 cm wide red velvet ribbon, cut into two 75 cm lengths, for the end bows
⚠️ Safety note: if you use seed beads for the holly berries, secure each one with a double-backstitch and a small dot of fabric glue on the reverse. Loose beads are a choking hazard around small children and pets — the crocheted bobble-berry option avoids this entirely.
🔤 I. Abbreviations — US Terms
| Abbrev. | Meaning |
|---|---|
| ch | chain |
| sl st | slip stitch |
| sc | single crochet |
| hdc | half double crochet |
| dc | double crochet |
| dc2tog | double crochet 2 stitches together (decrease) |
| sp(s) | space(s) |
| blk(s) | block(s) |
| MR | magic ring |
| inc | increase |
| BLO | back loop only |
| FO | fasten off |
| RS / WS | right side / wrong side |
| rep | repeat |
📝 J. Notes Before You Begin
- The filet panel is worked flat, in rows, from one pointed end to the other. Chart rows read right-to-left on RS rows and left-to-right on WS rows, as is standard for filet crochet.
- The turning ch-3 counts as the first dc of a block throughout the panel.
- Carry color changes by dropping the old color and picking up the new one in the last yarn-over of the final stitch of the old color, as usual — don’t cut ecru until the whole panel is complete, since you’ll return to it for the border foundation round.
- This project has no stuffing — the runner lies flat, and the stockings are lightly padded only by their double-layer construction (front and back worked separately and joined), not by fiberfill.
- All appliqués are basted in place with a few pins or a contrasting thread before final sewing, so you can check spacing against your actual table before committing.
🪡 K. Complete Pattern
🪢 Center Filet Panel
Foundation and Row Group A (repeat) — the diamond lattice body
Ch 91 in MC.
Foundation Row (WS): Dc in 8th ch from hook (this counts as your first mesh space), *ch 2, skip 2 ch, dc in next ch; rep from * across. (30 sps)
Rows 1–4 (Lattice climb): Work in filet pattern, converting one space to a block every 3rd stitch to build a rising diagonal line, alternating direction every 4 rows to form the diamond seen in the reference photo. In practical terms: chart out a 10-space-wide diamond repeat (block outline, open center) and repeat it 3 times across the 30-space width for this runner length. Work 16 total rows of the repeat (4 diamonds tall along the runner’s length) — for a longer runner, work in additional full diamond-repeat pairs (each pair adds roughly 9 cm).
Stitch count check: every row of the panel body should measure exactly 30 spaces/blocks combined, selvage to selvage — recount after every row until this becomes automatic.
Point-Shaping Rows (both ends) — the tapered oval silhouette
Next 6 rows, each end: Dc2tog over the first 2 sps at the start of the row, work across in pattern, dc2tog over the last 2 sps at the end of the row. (Panel decreases by 1 sp on each side per row, for 6 rows total per end — 12 sps lost per end.)
Work these decrease rows at the beginning of the panel (before Row Group A) and again at the end (after your final diamond repeat), so both short ends taper to the same point. FO after the final 2-space point row, leaving a long tail for seaming later if needed.
🌸 Scalloped Picot Border
Join red (CC2) with a sl st in any point of the panel.
Round 1 (sc foundation): Sc evenly around the entire perimeter — both long lattice edges and both tapered points — working 3 sc into each pointed tip to turn the corner cleanly. Join with a sl st to first sc.
Round 2 (shell + picot scallop): *Skip 2 sc, (2 dc, ch 3, sl st in top of last dc made [picot], 2 dc, sl st) all in next sc — this forms one scalloped shell; skip 2 sc, sl st in next sc; rep from * evenly around, adjusting the skip count slightly at the points so the scallops sit evenly. Join, FO, weave in ends.
This is the wavy, picot-tipped red edge visible in the reference photo.
🧦 Mini Stocking Appliqués (Make 8)
Worked flat, front and back, then joined — this gives the stocking body enough structure to sit slightly proud of the runner surface without any stuffing.
Front and Back (make 2 identical pieces per stocking, in CC2 red, switching to CC1 cream at the cuff):
Row 1 (cuff, CC1): Ch 9. Hdc in 2nd ch from hook and each ch across. (8 hdc)
Row 2 (cuff, CC1): Ch 1, turn, hdc BLO in each st across. (8 hdc) — the BLO row creates the ribbed-look cuff seam.
Row 3 (join red): Ch 1, turn, sc in each st across, changing to CC2 in last st. (8 sc)
Rows 4–7 (leg, CC2): Ch 1, turn, sc across. (8 sc, unchanged)
Row 8 (heel shaping): Ch 1, turn, sc2tog, sc 4, sc2tog. (6 sc)
Row 9 (foot): Ch 1, turn, sc across, inc 1 st at toe end. (7 sc)
Row 10 (toe shaping): Ch 1, turn, sc2tog across to last st, sc 1. (4 sc) FO, leaving a long tail.
Joining: Hold front and back pieces WS together. Using the tail, whip-stitch around the entire outer edge, leaving the cuff top open (it will sit flat against the runner, so this edge doesn’t need finishing).
Snowflake embroidery (CC1, on stocking front only): Using chain stitch or straight stitch, work a simple 6-point star/snowflake centered on the leg — three straight lines crossing at a central point, each tipped with a tiny “V.” Keep it small (roughly 1.5 cm across) so it reads clearly against the red.
🎄 Holly Leaf Clusters (Make 8 clusters — 3 leaves + 3 berries each)
Holly Leaf (make 3 per cluster, CC3 green):
Ch 11.
Point 1: Sl st in 2nd ch from hook, ch 3, sl st in same ch (picot point made), sl st in next 2 ch.
Side indent: Ch 3, sl st in 2nd ch from hook, sl st in same ch, sl st in next 2 ch.
Point 2 (center, longest): Ch 4, sl st in 2nd ch from hook, sl st in same ch, sl st in next 3 ch.
Side indent: Repeat side-indent instructions above.
Point 3: Repeat Point 1 instructions above, then sl st down the remaining base chain back to start. FO, leaving a tail for sewing.
This zig-zag chain-and-picot technique produces the classic 3-point holly silhouette without any increases or decreases to track — just picots at each tip.
Berry (make 3 per cluster, CC4 gold):
MR, 5 sc in ring. Do not join — work in a continuous spiral. Sc dec around until only a small gold nub remains (2–3 sts), FO, leaving a short tail. Do not stuff; the tightened spiral itself creates a small solid bobble.
Bead alternative: skip the crocheted berry and instead sew 3 gold seed beads in a small triangle at the base of each leaf cluster (see safety note in Materials).
Assembling a cluster: Arrange 3 leaves fanned slightly outward from a common base point, tack together at that base with a few stitches, then sew the 3 berries into the gap where the leaf bases meet.
🎨 L. Styling / Assembly / Stability / Final Shaping
Recommended assembly order:
- Block the filet panel first, pinning it out to the full finished measurements before anything is sewn on — this is the single most important step for a crisp, lattice-true finish.
- Lay the panel flat on your actual table and dry-place the 8 stockings and 8 holly clusters, alternating them along both long edges, before sewing anything.
- Pin, then baste each appliqué with a contrasting scrap thread.
- Check the piece from a normal seated eye-level view (not just from directly above) — appliqué spacing that looks even from above can look uneven from the side.
- Whip-stitch each appliqué permanently in place through the back loops of the border round only, so your stitching doesn’t show through the open filet mesh on the front.
- Attach one velvet ribbon length at each pointed end, centered, tacked with a few small stitches through the ribbon’s center fold so it can still be re-tied.
Stability: because there’s no stuffing anywhere in this piece, “stability” here mainly means the panel lying flat rather than curling — a second light steam-block after all appliqués are sewn on will relax any pulling caused by the sewing tension.
✅ Final Shaping / Finishing Checklist
- ✅ Filet panel blocked flat to full finished measurement
- ✅ Both pointed ends taper symmetrically
- ✅ Scalloped border picots are evenly spaced with no flattened sections at the corners/points
- ✅ 8 stockings evenly alternated with 8 holly clusters along both edges
- ✅ Snowflake embroidery centered and consistent across all 8 stockings
- ✅ Berries seated in the visual center of each holly cluster
- ✅ All appliqué stitching invisible from the front
- ✅ All yarn tails woven in and trimmed
- ✅ Ribbon bows tied and trimmed to even tail lengths at both ends
💡 Helpful Crochet Tips
- 💡 Block the filet panel before deciding final appliqué spacing — an unblocked panel measures noticeably shorter and narrower, and you’ll misjudge your gaps.
- 💡 Use a stitch marker at the start of every filet row until the diamond repeat is memorized — losing your place in a lattice chart is the #1 cause of a lopsided diamond.
- 💡 Work the holly leaf picots snugly, not loosely — a loose picot reads as a rounded blob instead of a sharp holly point.
- 💡 Sew appliqués with the runner laid flat on a table, not held in your lap — gravity distorts open filet mesh more than you’d expect.
- 💡 If your gold yarn is thin, double it for the berries — a single strand often looks flat rather than bobbled.
- 💡 Steam-block (don’t wet-block) once appliqués are attached, since a full wet-block risks the embroidery thread bleeding into the white cuffs.
- 💡 Count spaces, not stitches, when checking your filet row width — miscounting individual dc’s is easy, miscounting whole spaces is much harder.
- 💡 If substituting an acrylic yarn for the cotton, expect the mesh to hold its open shape less crisply — cotton’s stiffness is doing real structural work here.
🧼 Care Instructions
Hand-wash only, in cool water with a gentle detergent — the mercerized cotton holds its shape well, but machine washing risks tangling the delicate holly picots and stocking appliqués. Lay flat on a towel to dry, gently reshaping the scalloped edge and stocking appliqués while damp. If beads were used for berries, avoid soaking directly and spot-clean around them instead. Store flat or loosely rolled (never folded sharply) in acid-free tissue, away from direct sunlight, to keep the red from fading unevenly against the cream.
Closing
This is a runner built to be looked at closely, not just glimpsed from across the room — the payoff for all those small stocking cuffs and holly picots is a table piece that guests actually pick up and examine. Once you’ve got the diamond lattice repeat memorized, it goes quickly, and it’s a genuinely satisfying one to have out year after year, or to give as the kind of gift that gets unwrapped and immediately put on display. Try a colorway swap for next year, or scale the whole thing down into a set of matching place settings — the pattern logic holds at any size.
Post-Article Engagement & Distribution
Share the love: Made your own version? Snap a photo of it on your actual holiday table and tag it — seeing this pattern styled in someone else’s home is genuinely the best part of writing it.
Suggested categories: Holiday Crochet · Home Décor · Filet Crochet · Table Linens
Suggested tags: crochet Christmas table runner, filet crochet pattern, crochet stocking appliqué, holly leaf crochet pattern, crochet holiday décor, free crochet pattern, crochet tablescape, mercerized cotton crochet, intermediate crochet pattern, crochet picot border, DIY Christmas table decor, crochet holiday gift
Comment invitation: What colorway would you try first for your table — the classic red-and-cream shown here, or something more unexpected like emerald and gold?
You might also like:
- Crochet Holly Leaf Coasters (set of 6)
- Filet Crochet Snowflake Doily
- Crochet Mini Stocking Ornament Garland
- Velvet-Bow Crochet Napkin Rings
- Crochet Poinsettia Table Centerpiece