Christmas Wreath Coasters Crochet Pattern
Free Pattern for a Set
Crochet Coaster Pattern · Christmas Home Décor · Beginner-Friendly · Cotton Yarn Scraps
📖 B. Introduction
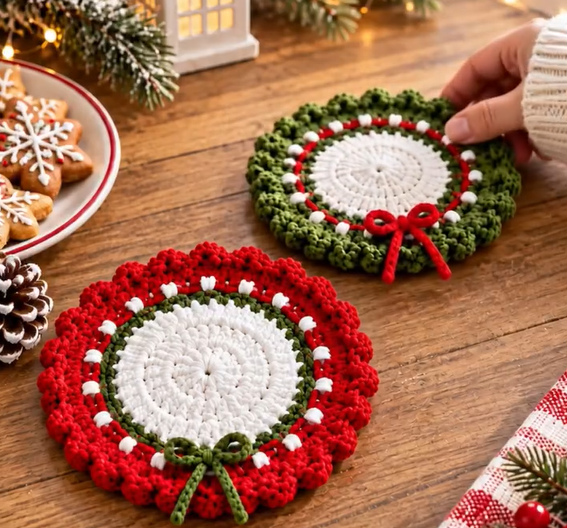
These Christmas wreath coasters are round, ruffle-edged crochet coasters that look like tiny holiday wreaths lying flat under your mug. A solid center is framed by a contrasting ring dotted with French-knot “berries”, then finished with a scalloped shell border and a small tied bow. Everything is worked in worsted-weight cotton, so the coasters are dense, absorbent, and sturdy enough to sit under a cup of cocoa all season.
This pattern rewards you for very little effort. Each coaster is nine rounds of single crochet, one round of shells, and a bow. That makes them a good first project for someone learning to crochet in the round, and a quick evening make for someone who has done it for years. A full set of four uses a few leftover balls of cotton and comes together in a weekend.
The look depends on three details. The crisp color blocking (red, white, and evergreen) reads instantly as Christmas. The ring of tiny knotted berries adds texture without an extra stitch pattern to memorize. The bow adds a finishing touch at the edge, sewn where the ring meets the ruffle. Together they make each coaster look like a small wreath rather than a plain disc.
These coasters work as hostess gifts, stocking stuffers, teacher gifts, cookie-swap favors, or craft-fair stock. Stack four in a ribbon-tied bundle with a tin of cocoa mix and you have a complete gift. The pattern includes three colorways, and you can swap in plaid-adjacent palettes, gold accents, or pastel “winter cottage” shades without changing a single stitch count.
Disclosure placeholder: This post may contain affiliate links. If you buy through them, we may earn a small commission at no extra cost to you. (Replace with your site’s official disclosure text.)
🔍 C. Main Pattern Overview
Each coaster is built in three stages:
- The disc (R1–R9): a flat circle worked in continuous rounds of single crochet. The first seven rounds use the center color. R8–R9 switch to the ring color.
- The berries and shell border (R10): 18 French-knot berries are embroidered on the ring, then a scalloped border of nine 5-dc shells is worked around the edge in the border color.
- The bow: a chain cord tied into a bow and sewn to the edge.
Three colorways are included so you can make a mixed set. Changing the color of any element does not change the stitch counts.
| Colorway | Center (R1–R7) | Ring (R8–R9) | Berries | Shell border (R10) | Bow |
|---|---|---|---|---|---|
| A · Snowy Wreath | White | Green | Red | Red | Green |
| B · Cranberry Pine | Red | Green | White | Green | White |
| C · Frosted Holly | White | Green | Red | White | Red |
A set of four can be A, B, C, plus a second A (the version used for the yarn estimates below).
📌 Email capture placeholder: Want a printable copy? Subscribe to get this pattern as a PDF plus our seasonal crochet round-ups. (Insert your form or plugin here.)
🎯 D. Skill Level
Beginner to Easy. The pattern uses only basic stitches. It does involve working in the round and changing colors, so complete beginners should take the first few rounds slowly.
Techniques used:
- Magic ring
- Single crochet increases
- Changing color mid-round
- Double crochet shells worked into a single stitch
- French knots (embroidery)
- Chain cord and simple bow knot
📏 E. Finished Size
Each coaster measures about 4.5 in (11.5 cm) across, including the shell border, and about 0.3 in (0.75 cm) thick. The disc alone (before the border) is about 3.5 in (9 cm).
Size varies with:
- Yarn weight. Worsted cotton gives the size above. DK cotton gives a coaster around 3.75 in (9.5 cm).
- Tension. Looser stitches make a larger, floppier coaster.
- Hook size. Going up or down a hook size changes the diameter by about ¼ in (6 mm).
🧮 F. Gauge
Gauge is not critical, but tight, even stitches matter. A loose disc will curl or ruffle instead of lying flat, and it will not protect your table.
With a 4.0 mm hook and worsted cotton, the disc through R6 (36 sts) should measure about 2.25 in (5.7 cm) across. If yours is noticeably bigger, drop down a hook size. If it is buckling, go up half a size or check that you worked every increase.
🧶 G. Required Yarn Amounts
Estimates are for one coaster and for a set of four (Colorways A, B, C, and a second A). All figures are approximate and depend on your tension.
| Color | Per coaster | Set of 4 |
|---|---|---|
| 🧵 Christmas Red | 3.5–10.5 yd | ~40 yd (37 m) |
| 🧵 Snow White | 3.5–18 yd | ~45 yd (41 m) |
| 🧵 Evergreen | 9–18 yd | ~55 yd (50 m) |
One 50 g ball of each color is enough for the whole set, with leftovers for a fifth coaster or gift tags. A single coaster uses roughly 30 yd (27 m) in total. No stuffing is needed.
🧰 H. Materials
- Yarn: 100% cotton, worsted weight (US weight 4), in Christmas Red, Snow White, and Evergreen. Cotton is recommended for absorbency and stiffness.
- Hook: 4.0 mm (US G/6). Use the size that gives you a firm fabric.
- Yarn needle (blunt tip) for weaving in ends and sewing on bows.
- Scissors
- Stitch marker (one per coaster; a scrap of contrasting yarn works)
- Embroidery needle or yarn needle for the French knots
- Blocking mat and pins (optional but helpful)
- Spray starch or fabric stiffener (optional, for extra-flat coasters)
⚠️ Safety note: This pattern uses no safety eyes, buttons, or beads, so there are no hard small parts. The bows are sewn, not glued, but if the coasters are for a young child, check that the bows are firmly attached.
🛍️ Supplies We Recommend: a 4.0 mm (G/6) crochet hook, 100% cotton worsted yarn in red, white, and green, a blunt yarn needle, and a few stitch markers. (Insert your affiliate links here.)
<!– AD SLOT: post-materials –>
🔤 I. Abbreviations — US Terms
| Abbreviation | Meaning |
|---|---|
| R | Round |
| MR | Magic ring |
| sc | Single crochet |
| inc | Increase: 2 sc in the same stitch |
| dc | Double crochet |
| sl st | Slip stitch |
| ch | Chain |
| sk | Skip |
| st(s) | Stitch(es) |
| FK | French knot |
| FO | Fasten off |
| ( ) x6 | Repeat the instructions inside the parentheses the stated number of times |
| (6) | Total stitch count at the end of the round |
📝 J. Notes Before You Begin
- R1–R9 are worked in a continuous spiral, not joined. Mark the first stitch of every round and move the marker up as you go.
- R10 is worked in joined rounds (with a slip stitch join). It is the only joined round.
- Color changes: on the last sc of R7, work the stitch until two loops remain, then pull the new color through. Carry the new color from there. Do not cut the old color until you have finished the round, so you can adjust the transition if needed.
- Keep the disc flat. If it begins to cup, you probably missed an increase. Count after each round using the numbers in parentheses.
- Do not stuff. These are flat coasters, not amigurumi.
- Leave 4–6 in (10–15 cm) tails whenever you fasten off to give yourself enough length for weaving in.
- Weave in ends on the wrong side by running the tail back through 2–3 inches of stitches in two directions before trimming.
🪡 K. Complete Pattern
Make 1 coaster per colorway. For a set of four, repeat the pattern four times, using the colorway table in Section C.
🎨 The Disc (R1–R9)
Purpose: the flat base of the coaster. Colors: center color for R1–R7, ring color for R8–R9. Quantity: make 1 per coaster.
Start with the center color.
R1: MR 6. (6)
R2: inc around. (12)
R3: (1 sc, inc) x6. (18)
R4: (2 sc, inc) x6. (24)
R5: (3 sc, inc) x6. (30)
R6: (4 sc, inc) x6. (36)
R7: (5 sc, inc) x6. Change to ring color on the last sc. (42)
R8: (6 sc, inc) x6. (48)
R9: (7 sc, inc) x6. (54)
Finishing the disc: After R9, sl st in the next st. FO the ring color, leaving a tail of about 4 in (10 cm). Weave in the tail on the wrong side.
💡 The increases fall in six evenly spaced wedges, so the circle stays flat. If you stack each round’s increases directly above the previous ones, the disc will look slightly hexagonal. Offset is built into the counts above: each round places the increase one stitch further along than the last.
🫐 The Berries (18 FK)
Purpose: the “berries” on the wreath ring. Color: berry color from the colorway table. Quantity: 18 French knots per coaster.
With the right side facing you, thread a yarn needle with the berry color and work as follows:
- Anchor the yarn on the wrong side with a small knot hidden inside the stitches.
- Bring the needle up through the first st of R9.
- Wrap the yarn twice around the needle, hold the wraps close to the fabric, and insert the needle back through the same spot (or one thread away).
- Pull the wraps snug and slide the needle to the wrong side.
- Repeat in every 3rd stitch of R9 around the disc.
You will place 18 French knots in total (54 sts ÷ 3 = 18). Fasten off on the wrong side and weave in the tail.
💡 Count around before you start: mark every third stitch with a pin. Uneven berries are the most noticeable flaw on this design.
🎀 The Shell Border (R10)
Purpose: the ruffled scalloped edge. Color: border color from the colorway table. Quantity: 9 shells.
Make a slip knot with the border color. With the right side facing, insert the hook into any stitch of R9 (this is your join stitch) and sl st to join.
R10: *sk 2 sts, 5 dc in the next st, sk 2 sts, sl st in the next st.* Repeat from * to * 9 times total. On the last repeat, sl st into the join stitch. (9 shells)
Check: each repeat uses 6 stitches of R9 (2 skipped, 1 for the shell, 2 skipped, 1 for the sl st), and 6 x 9 = 54, so the shells close the round exactly.
FO, leaving a 4-in (10 cm) tail. Weave in on the wrong side.
🎀 The Bow
Purpose: the decorative accent on the edge of each coaster. Color: bow color from the colorway table. Quantity: 1 per coaster.
Ch 32. FO, leaving 3-in (7.5 cm) tails on both ends.
Tie the chain into a bow knot with two loops of about 1 in (2.5 cm) each, leaving the two tails as streamers. Trim the tails to about ½ in (1.25 cm) if you prefer a shorter look.
Sew the center knot of the bow to the border of R9 (the ring) between two shells, so it overlaps slightly onto the ring. Make 2–3 small stitches through the knot and the coaster, then weave in the sewing tail on the wrong side.
🎨 L. Styling / Assembly / Stability / Final Shaping
Styling
Lay the coaster right side up with the bow at the bottom (six o’clock) if you photograph it. On a table, position the bow toward the front so it is visible under the mug.
Recommended assembly order
- Crochet the disc (R1–R9), changing color at R8.
- Weave in all tails from the disc.
- Embroider the 18 French knots.
- Join the border color and work R10.
- Weave in the border tails.
- Block the coaster flat (see below).
- Make the bow and sew it in place.
- Weave in the sewing tail and trim.
Stability and flatness
- Pin the finished coaster (before the bow) to a blocking mat. Mist with water, spread the shells into an even scallop, and let it dry completely.
- For a firmer coaster, spray lightly with fabric stiffener and let it dry flat.
- If the center domes up, press the pinned coaster under a heavy book once it is dry.
✅ Final Shaping Checklist
- ✅ Disc is flat with no cupping or ruffling
- ✅ Color change is clean and the ring is an even width
- ✅ 18 berries are evenly spaced and secure
- ✅ Nine shells are evenly spaced and open
- ✅ Bow is centered over a gap between shells and firmly sewn
- ✅ All ends are woven in on the wrong side
- ✅ Coaster sits flat on a table
💡 M. Helpful Crochet Tips
- 💡 Use cotton, not acrylic. Acrylic cannot absorb condensation and melts under a very hot mug.
- 💡 Go down a hook size if your disc curls. A snug fabric matters more here than on a toy.
- 💡 Check the count at R6 and R9. Those are the two rounds where a missing increase is easiest to catch and hardest to fix later.
- 💡 Swap the color on the last sc of R7, not the first sc of R8. This keeps the ring edge crisp instead of stair-stepped.
- 💡 Pull French knots snug, but not tight. Overtight knots pucker the ring. Loose ones flop.
- 💡 Pin the 9 shell centers before you start R10 if you want perfectly even scallops. Space them every 6 stitches.
- 💡 Give the bow a sewn base. Do not just tie it on. A few stitches through the center prevent it slipping down.
- 💡 Weave the border tail into the shell, not the disc, so no lump shows through the center.
- 💡 Block with a light mist, not a soak. Cotton dries slowly, and this is a small piece.
🧼 N. Care Instructions
- Wash: hand-wash or machine-wash gently in cold water, inside a mesh bag. Cotton shrinks slightly on the first wash, so use cold.
- Colorfastness: wash a new red or dark green swatch in cold water first. Deep reds can bleed onto white shells (Colorway C). Wash reds and whites separately until the water runs clear.
- Dry: lay flat and reshape the shells while damp. Avoid a hot dryer.
- Storage: keep flat or stacked in a dry place away from direct sunlight, which fades reds and greens.
- Use: they are not hot pads. Do not place a very hot pan or dish directly on them.
🎄 Closing Section
Once your first coaster is done, you will likely want to finish the whole set. They are small, quick, and satisfying, and each one comes out slightly different. Try one with a gold bow, a plaid-style border, or a winter-white and silver palette if you prefer a more modern look. Use the same pattern in a lighter DK cotton for a set of tiny ornaments.
Give them wrapped in a bundle, use them at your holiday table, or keep a stack by the kettle. We would love to see your version.
💬 Post-Article Engagement & Distribution Block
Share the Love: If you make this pattern, pin it, share it, and tag us in your photos so we can feature your coasters.
Suggested categories: Crochet Patterns · Christmas Crochet · Home Décor · Free Patterns
Suggested tags: crochet coasters, Christmas crochet, Christmas coasters, free crochet pattern, wreath coasters, holiday crochet, cotton coasters, beginner crochet, crochet gifts, scalloped edge, French knot, crochet decor, stash buster, hostess gift, quick crochet projects
Comment invitation: Which colorway will you make first, and are you adding a fourth color of your own?
You Might Also Like:
- Crochet Snowflake Coasters
- Amigurumi Christmas Tree Ornament
- Crochet Holly Leaf Garland
- Scalloped Mug Rug Pattern
- Crochet Christmas Bunting
A print-friendly or PDF version of this pattern can be offered through your site’s print plugin. <!– AD SLOT: pre-faq –>
❓ R. FAQ
What yarn is best for crochet coasters? 100% cotton in worsted weight is the best choice. It absorbs moisture, holds its shape, and withstands washing.
What hook size should I use? A 4.0 mm (US G/6) hook works with most worsted cottons. Go down to 3.5 mm if your work is loose.
How big are these Christmas crochet coasters? About 4.5 in (11.5 cm) across with the border, which fits most standard mugs and small glasses.
Can I use acrylic instead of cotton? You can, but the coasters will be less absorbent and will not protect against heat as well. Cotton is worth the small extra cost.
How do I stop my crochet coaster from curling? Check that you worked every increase, use a slightly smaller hook, and block the piece flat with pins.
Are these safe for children? There are no safety eyes or beads, but the bow is a small item. Sew it on firmly, or leave it off for very young children.
How long does one coaster take? Most people finish one in about 1 to 1.5 hours, including the bow.
Can I make them a different size? Yes. Add rounds using the same formula: R10 would be (8 sc, inc) x6 for 60 sts. For the shell border, keep repeats of 6 stitches and make sure your total is divisible by 6.
SEO PACKAGE
- SEO title: Christmas Wreath Coasters Crochet Pattern (Free)
- Meta description: Make festive Christmas wreath crochet coasters with this free, beginner-friendly pattern. Shell border, berries, and bows in red, white, and green.
- Focus keyword: Christmas crochet coasters
- Secondary keywords: free crochet coaster pattern, Christmas coasters crochet, crochet wreath coasters, holiday crochet coasters, scalloped crochet coasters, beginner crochet coasters, cotton crochet coasters, crochet Christmas gifts, quick Christmas crochet, French knot crochet coaster
- URL slug: christmas-wreath-crochet-coasters-pattern
- H2/H3 variants: How to Crochet a Christmas Coaster · Wreath Coaster Pattern Step by Step · Scalloped Shell Border Tutorial · Crochet Coasters for Beginners
- Internal-anchor-text phrases: Christmas crochet coasters · wreath coaster pattern · holiday coaster set · free crochet coaster pattern
- Image file names and alt text:
christmas-wreath-crochet-coasters-set.jpg: “Four red, white, and green crochet Christmas coasters with shell borders and bows on a wooden table”crochet-wreath-coaster-berries-closeup.jpg: “Close-up of French knot berries and a scalloped shell border on a crochet coaster”crochet-coaster-in-progress-flatlay.jpg: “Flat-lay of a red crochet coaster in progress with a hook, cotton yarn, and a finished coaster”
- Schema notes: Use HowTo or Article schema. Populate name, image, totalTime (about 1.5 hours per coaster), supply list (cotton yarn, hook 4.0 mm, yarn needle), and tool list.
- Pinterest title: Christmas Crochet Coasters: Free Wreath Pattern
- Pinterest description: Crochet a festive set of wreath coasters with shell borders, berries, and bows. Free, beginner-friendly pattern in red, white, and green cotton.
- Pinterest hashtags: #crochetcoasters #christmascrochet #freecrochetpattern #holidaycrochet #crochetgifts #wreathcoaster #cottoncrochet
- Pin image concepts: (1) Flat-lay of all three colorways with a bold text overlay. (2) A mug on a coaster with the caption “Free Christmas Coaster Pattern.” (3) A close-up of the ruffled edge and bow with a “Beginner-Friendly” banner.