Crochet Christmas Star Ornament with Poinsettia & Bow: Free Pattern
Crochet Pattern · Holiday Décor · Easy · Door & Tree Ornament
📖 B. Introduction
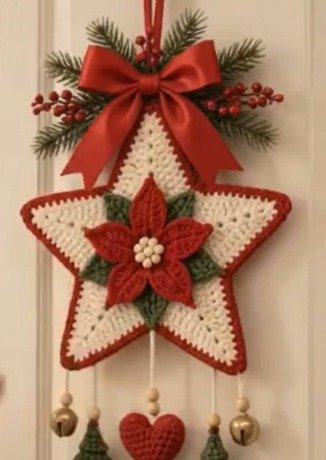
This crochet Christmas star ornament is a flat, five-pointed star in soft cream cotton. A crisp red edge frames it, and a hand-made red poinsettia sits at its center with a cluster of pearl beads in the middle. A satin-textured red bow crowns the top point. Hang it from a door, a wreath, a cabinet knob, or a tree branch, and it reads as a finished piece of holiday décor rather than a craft project.
The star is worked in simple single crochet. A magic ring grows into a pentagon, and the points are then worked outward in short turning rows that taper to a single stitch. You do not need granny clusters or colorwork charts. If you can make a magic ring, increase, decrease, and turn your work at the end of a row, you can make every part of this ornament.
It suits several uses:
- Gifting: it is flat enough to mail in a padded envelope.
- Doors and mantels: it works well in a group of three in different sizes.
- Craft fairs: it is quick to batch because the points are identical.
- Keepsakes: write a year and a name on the felt stiffener before sealing it between the layers.
The design details that make it recognizable are:
- the pointed star silhouette,
- the contrast between cream body and red border,
- the layered two-tier poinsettia with a pearl center, and
- the bow with two short tails.
Personalizing is easy. Try a white star with a navy border, or a gold-metallic thread border. Swap the poinsettia for a button flower or a tiny pine sprig. Scale the whole piece up with worsted yarn and a 4.5 mm hook.
Disclosure: This post may contain affiliate links. If you purchase through them, we may earn a small commission at no extra cost to you. [Placeholder: insert your site’s disclosure wording and policy link.]
<!– AD SLOT: post-introduction –>
🔍 C. Main Pattern Overview
The ornament has seven parts:
- Star panels (make 2): one front, one back, each worked as a pentagon core with five tapered points.
- Hanging cord: a chain loop in cream.
- Joining border (2 rounds, red): worked through both panels at once, with a felt stiffener sealed inside.
- Poinsettia: two tiers of petals, sewn together and finished with pearl beads.
- Leaves (make 3): green, flat, and tapered.
- Bow: a looped strip, a center wrap, and two tails.
- Final assembly: the poinsettia, leaves, and bow are sewn to the front.
Design choice: the star uses plain single crochet for a smooth, sturdy surface that takes the red border cleanly. Texture comes from the poinsettia and bow, not the star body.
📌 Email capture placeholder: Save this pattern for later. [Insert your subscribe / print / save-to-Pinterest prompt here.]
🎯 D. Skill Level
Easy. There is no shaping beyond basic increases and decreases, and no seaming beyond sewing on small pieces.
Techniques used:
- magic ring
- single crochet increase and decrease (including sc3tog)
- turning flat rows
- chain and slip stitch
- working a border through two layers
- sewing on small appliqués
- sewing on beads
📏 E. Finished Size
Star: approximately 6 in (15 cm) wide × 5.75 in (14.5 cm) tall, including the border. Hanging loop: approximately 4 in (10 cm).
Size changes with:
- Yarn weight and hook: worsted weight with a 4.5 mm hook gives a star around 8 in (20 cm).
- Tension: tight sc gives a stiffer, slightly smaller star.
- Stiffener thickness: thick felt adds firmness but not size.
- Blocking: pinning the panels flat adds up to ¼ in per side.
🧮 F. Gauge
Gauge is not critical, but it affects how stiff the star feels and how neatly the border sits. With DK cotton and a 3.5 mm hook, aim for about 20 sc and 22 rows = 4 in (10 cm) in single crochet. If your star cups instead of lying flat, go up a hook size. If the fabric is loose and holes show, go down a hook size.
Why it matters here: because the pentagon grows by 5 stitches per round, it may curl slightly at the edge. Blocking fixes this completely.
🧶 G. Required Yarn Amounts
| Color | Used For | Approximate Amount |
|---|---|---|
| 🧵 Cream | Both star panels, hanging cord | about 90 yd (82 m) |
| 🧵 Red | Border, bow, poinsettia | about 45 yd (41 m) |
| 🧵 Green | Leaves | about 10 yd (9 m) |
| Total | about 145 yd (132 m) |
Other materials: about 3 to 4 inches of felt for the stiffener, plus 7 small pearl beads.
These are estimates. Buy one skein of each color and you will have plenty left over.
🧰 H. Materials
- 🧵 DK / light worsted cotton yarn (weight 3) in cream, red, and green
- 3.5 mm (US E/4) crochet hook
- Yarn needle
- Scissors
- 2 stitch markers (to mark the first stitch of each round)
- Sewing needle and matching thread (for beads and the bow)
- 7 pearl beads, about 4 mm
- Stiff craft felt in white or cream, about 8 × 8 in (20 × 20 cm), cut into 2 star shapes
- Fabric glue or a few pins (optional, for positioning)
- Light fiberfill (optional, a small pinch if you want a softer star)
⚠️ Safety note: the pearl beads and any loose bead are choking hazards. If the ornament is for a home with small children or pets, replace the beads with French knots in cream or gold embroidery thread, and hang it well out of reach.
🛍️ Supplies We Recommend: a 3.5 mm (E/4) hook with an ergonomic handle, a spool of cotton DK yarn in cream, a skein of cotton DK in holiday red, a pack of stiff craft felt, and a small tube of seed pearl beads. [Insert your affiliate links here.]
<!– AD SLOT: post-materials –>
🔤 I. Abbreviations — US Terms
| Abbreviation | Meaning |
|---|---|
| ch | chain |
| sl st | slip stitch |
| st(s) | stitch(es) |
| MR | magic ring |
| sc | single crochet |
| hdc | half double crochet |
| dc | double crochet |
| inc | increase: 2 sc in the same stitch |
| sc2tog | single crochet 2 together (decrease) |
| sc3tog | single crochet 3 together (decrease) |
| R | round or row |
| RS / WS | right side / wrong side |
| FO | fasten off |
| x | repeat the instructions in parentheses as many times as indicated |
| ( ) at end of line | total stitch count for that round or row |
📝 J. Notes Before You Begin
- Pentagon core: worked in continuous rounds without joining. Place a stitch marker in the first stitch of each round and move it up as you go.
- Points: worked in turned rows. Ch 1 at the start of each row does not count as a stitch.
- Stitch counts: the number in parentheses at the end of each line is the total for that round or row. Check it before moving on.
- Where the increases land: in each core round, the increase falls at the end of the repeat, and each round the repeat gets one sc longer. The pairs of increase stitches become the star’s valleys. They shift position slightly each round, which is normal.
- Valleys: in R11, the pairs of increase stitches are the valley stitches. You will leave them unworked when you make the points and use them again in the border.
- Tails: leave about 6 in (15 cm) tails on pieces that will be sewn.
- Blocking: pin both star panels flat to a towel, spritz with water, and let them dry. This is the single biggest step toward a flat, crisp star.
🪡 K. Complete Pattern
⭐ Star Panel (Make 2)
Purpose: the front and back of the ornament. Both are identical.
Yarn: cream. Hook: 3.5 mm.
Pentagon core
R1: MR, 5 sc in ring. (5)
R2: inc around. (10)
R3: (1 sc, inc) x5. (15)
R4: (2 sc, inc) x5. (20)
R5: (3 sc, inc) x5. (25)
R6: (4 sc, inc) x5. (30)
R7: (5 sc, inc) x5. (35)
R8: (6 sc, inc) x5. (40)
R9: (7 sc, inc) x5. (45)
R10: (8 sc, inc) x5. (50)
R11: (9 sc, inc) x5. (55)
Sl st in the next st and FO. Weave in the MR tail.
You now have a pentagon with five groups of 9 sc (the edges) separated by five pairs of increase stitches (the valleys). Mark the first sc of each 9-sc group.
🔺 Points (Make 5 per panel)
Each point is worked on one 9-sc group. The stitches in the two valley stitches on either side are left unworked.
Row 1 (RS): join cream with a sl st in the first marked sc. Ch 1, sc in each of the 9 sc. (9)
Row 2: ch 1, turn. sc2tog, sc in next 5, sc2tog. (7)
Row 3: ch 1, turn. sc in each st across. (7)
Row 4: ch 1, turn. sc2tog, sc in next 3, sc2tog. (5)
Row 5: ch 1, turn. sc in each st across. (5)
Row 6: ch 1, turn. sc2tog, sc in next 1, sc2tog. (3)
Row 7: ch 1, turn. sc in each st across. (3)
Row 8: ch 1, turn. sc3tog. (1)
FO and weave in the tail. Repeat on the other four 9-sc groups.
Check: each point has 8 rows, with 7 row-ends down each side and a single stitch at the tip. The border depends on this count.
Block both panels.
🔔 Hanging Cord
Yarn: cream.
Ch 40. FO, leaving 6 in (15 cm) tails at both ends.
Fold the chain in half so the two ends meet. This makes a loop about 4 in (10 cm) long.
🎀 Joining Border (Red, Both Panels)
Purpose: joins the two panels and seals the stiffener inside.
Yarn: red.
Before you start:
- Make the felt stiffener. Lay one panel on the felt, trace the outline, and cut about ½ in (1.3 cm) inside the line. You need 1 stiffener (or 2 layers if you want it stiffer).
- Hold the two panels with WS together and the points aligned.
- Slip the two ends of the hanging cord between the layers at the top point, with the loop outside the tip.
R1: join red with a sl st in the tip stitch of the top point, working through both layers. Ch 1.
[3 sc in tip stitch, 7 sc down the right side, 2 sc in the valley (1 sc in each valley stitch), 7 sc up the left side of the next point] x5. (95)
Insert the stiffener: work R1 until 7 sc remain unworked (the last stretch up the left side of the top point). Slide the felt star in between the layers and tuck any pinch of fiberfill if you want. Complete the last 7 sc. Join with a sl st to the first sc. (95)
R2: ch 1. [sc in the 1st of the 3 tip sc, 3 sc in the 2nd tip sc, sc in the 3rd tip sc, sc in next 7, sc2tog over the 2 valley sts, sc in next 7] x5. (100)
Sl st to join and FO. Weave in all ends.
Count check per repeat:
- R1 repeat: 3 + 7 + 2 + 7 = 19, and 19 × 5 = 95 ✅
- R2 repeat: 1 + 3 + 1 + 7 + 1 + 7 = 20, and 20 × 5 = 100 ✅
💐 Poinsettia
Purpose: the focal flower at the center of the star.
Yarn: red.
Outer layer (Make 1)
MR. Make 6 petals:
Petal: ch 7. Starting in the 2nd ch from hook, work: sl st, sc, hdc, dc, dc, dc (6 sts). Sl st into the MR.
After all 6 petals, pull the MR tight, FO, leaving a tail.
Inner layer (Make 1)
MR. Make 5 petals:
Petal: ch 5. Starting in the 2nd ch from hook, work: sl st, sc, hdc, dc (4 sts). Sl st into the MR.
After all 5 petals, pull the MR tight, FO, leaving a tail.
Finish: center the inner layer on the outer layer, offsetting the petals so they fall between each other. Sew them together through the center. Sew the 7 pearl beads in a small cluster at the center. Hide the thread inside the petals.
(Safe alternative: embroider 7 French knots in cream or gold thread.)
🍃 Leaves (Make 3)
Yarn: green.
Ch 7. Starting in the 2nd ch from hook, work: sl st, sc, hdc, dc, hdc, sc (6 sts). FO, leaving a 4 in tail.
Design choice: the leaves are one-sided for speed. They curl slightly, which looks natural tucked behind the petals.
🎀 Bow
Purpose: sits on the top point, hiding the cord join.
Yarn: red.
Bow strip (Make 1)
Row 1: ch 15. Sc in the 2nd ch from hook and in each ch across. (14)
Rows 2–8: ch 1, turn. Sc in each st across. (14)
FO, leaving a long tail.
Center wrap (Make 1)
Row 1: ch 5. Sc in the 2nd ch from hook and in each ch across. (4)
Rows 2–9: ch 1, turn. Sc in each st across. (4)
FO, leaving a long tail.
Tails (Make 2)
Row 1: ch 7. Sc in the 2nd ch from hook and in each ch across. (6)
Rows 2–5: ch 1, turn. Sc in each st across. (6)
Row 6: ch 1, turn. sc2tog, sc in next 2, sc2tog. (4)
Row 7: ch 1, turn. sc2tog, sc2tog. (2)
FO, leaving a tail.
Bow assembly:
- Fold the strip in half so the short ends meet in the middle. Pinch the center.
- Wrap the center wrap around the pinched middle and sew the ends together at the back.
- Sew the two tails behind the knot so they angle slightly apart.
🎨 L. Styling / Assembly / Stability / Final Shaping
Styling: orient the star with one point straight up. The poinsettia sits at the center (over the MR spot of the front panel), the leaves peek out from behind it, and the bow sits at the top point.
Recommended assembly order:
- Make both star panels, block them, and make the hanging cord.
- Cut the felt stiffener to size.
- Work the joining border R1 (inserting the cord ends at the top and the stiffener near the end), then R2.
- Make the poinsettia (both layers), leaves, and bow.
- Pin the leaves in a fan behind where the poinsettia will sit, then sew them down.
- Sew the poinsettia over the leaves at the center of the front panel.
- Sew the bow to the top point, just below where the cord emerges.
- Weave in any remaining ends.
Head-to-body alignment equivalent (symmetry check): hold the finished star at arm’s length. The five points should look evenly spaced. If one looks stretched, re-block it.
Stability: because the star is flat and hangs from a cord, the stiffener does the work. If the star sags or the points droop, add a second felt layer.
Final shaping checklist:
- ✅ All five points are crisp and evenly sized
- ✅ The border lies flat with no puckers at the valleys
- ✅ The poinsettia is centered and the petals are offset
- ✅ The leaves are visible from the front
- ✅ The bow is centered at the top with the tails angled out
- ✅ The hanging cord is firmly secured between the layers
- ✅ All ends are woven in
- ✅ Beads are securely sewn (or replaced with French knots)
💡 M. Helpful Crochet Tips
💡 Block before joining. Pin each panel flat and spritz it with water. The pentagon core grows by 5 stitches per round, so it can curl slightly without blocking.
💡 Mark your valleys. After R11, place a marker in each pair of increase stitches. You will need to find them again for the border.
💡 Count the point rows. Each point must have exactly 8 rows. The border’s 7-sc sides depend on it.
💡 Use a sc3tog at the very tip. It makes a sharper point than two separate decreases.
💡 Cut the felt smaller than the star. About ½ in inside the outline keeps it from showing at the border.
💡 Slip the cord ends in early. Place them before you begin R1 so they are locked in by the border stitches.
💡 Press the beads down on a flat surface while sewing. Pearl beads sit better when the flower is supported.
💡 Make the bow strip the same width as your star’s points. If your gauge runs loose, add one row to the strip to keep the bow proportional.
💡 Stitch the petals in a spiral. Offsetting each layer makes the poinsettia look fuller.
💡 Batch the points. If you are making several stars, work all the points of one color at once.
🧼 N. Care Instructions
- Spot clean only. The felt stiffener will warp if soaked. Dab with a damp cloth and mild soap.
- Do not machine wash.
- Dry flat if damp.
- Store flat in tissue paper, away from direct sunlight, which can fade red cotton.
- Keep light and dark colors separate when storing, since red can bleed onto cream if the ornament gets wet.
- Check the beads yearly for loose threads.
Closing Section
A finished star like this feels like it belongs on a door the moment you hang it. Make one in the classic cream and red, then try a gold border or a white poinsettia. Hang a trio at different heights, or tuck one into a gift as a keepsake. When you finish yours, share a photo. I would love to see how you made it your own.
Post-Article Engagement & Distribution Block
Share the Love: If you enjoyed this pattern, save it to Pinterest, share it with a crochet friend, and tag your finished star so we can see it.
Suggested categories: Crochet Patterns · Christmas Crochet · Crochet Ornaments · Free Patterns
Suggested tags: crochet star ornament, Christmas crochet, free crochet pattern, poinsettia crochet, crochet door hanger, holiday crochet, easy crochet ornament, crochet Christmas decor, crochet bow, cotton yarn ornament, handmade Christmas gift, crochet star pattern
Comment invitation: Which border color would you choose for your star, and what would you put at the center in place of the poinsettia?
You Might Also Like:
- Crochet Snowflake Ornament with Beaded Center
- Crochet Poinsettia Coaster Set
- Crochet Christmas Wreath Door Hanger
- Mini Crochet Christmas Tree Ornament
- Crochet Candy Cane Ornament
Printable/PDF note: A print-friendly version of this pattern can be offered through your site’s print plugin. [Insert your plugin or download link.] <!– AD SLOT: pre-faq –>
❓ R. FAQ
How big is this crochet star ornament?
About 6 in (15 cm) wide and 5.75 in (14.5 cm) tall with DK cotton and a 3.5 mm hook.
Can I use worsted weight yarn instead of DK?
Yes. Use a 4.0 to 4.5 mm hook and expect a larger star, around 8 in (20 cm). The stitch counts stay the same.
What hook size should I use?
A 3.5 mm (US E/4) hook with DK cotton. Go up or down half a millimeter if your fabric curls or looks loose.
Is it safe for kids?
The pearl beads are a choking hazard. Replace them with French knots, and hang the ornament out of reach of small children.
How do I make the star lie flat?
Block both panels before joining. Pin them to a towel, spritz with water, and let dry.
Do I need the felt stiffener?
It is optional, but it keeps the star crisp and stops the points from drooping.
Can I make it without a poinsettia?
Yes. A button, a small pompom, or a tiny pine sprig also works at the center.
What yarn works best?
Cotton gives the crispest edges and holds blocking well. Acrylic works but will be softer.