Christmas Crochet Coasters Pattern: Santa, Snowman, Christmas Tree & Gingerbread Man (Free 4-Coaster Set)
Crochet Pattern · Christmas Home Décor · Holiday Gift · Easy / Confident Beginner
📖 Introduction
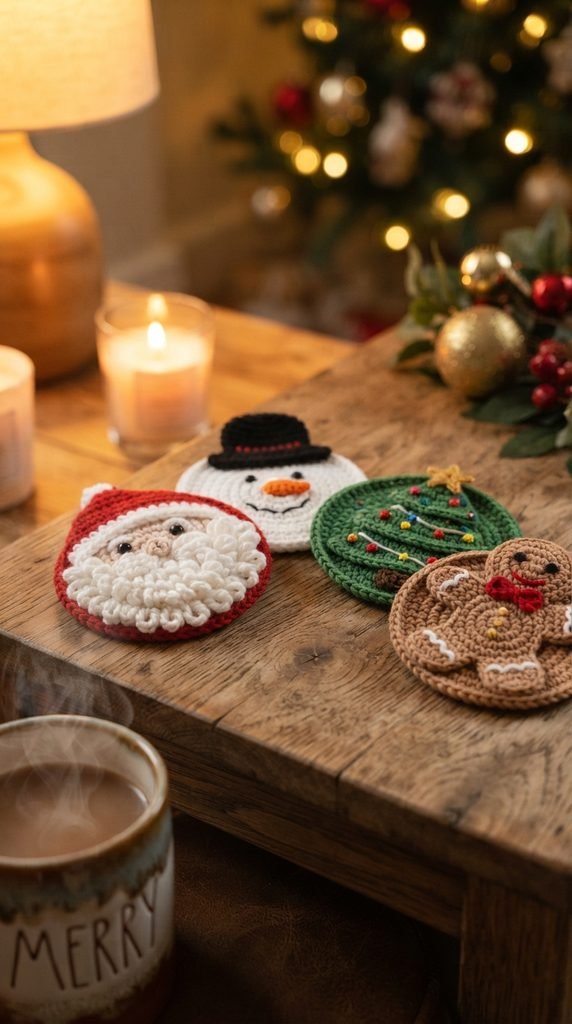
This Christmas crochet coasters set turns four classic holiday characters into flat, sturdy cotton coasters: a red-suited Santa with a pom-pom hat, a round white snowman in a black top hat, a layered moss-green Christmas tree with a golden star and bobble ornaments, and a caramel-brown gingerbread man with white icing details and a red bow tie. Each one is worked mostly in single crochet, so the fabric is dense enough to hold a mug and the shapes stay crisp.
Why make this set instead of another round of plain granny-square coasters? Because the four shapes give you a complete tablescape in one afternoon-and-evening project, and every piece teaches something useful without becoming difficult: spiral discs for the snowman and heads, flat triangles and trapezoids for the tree and hat, simple color changes for Santa’s belt and sleeves, and a handful of embroidered details that make each character feel finished.
The set works for several purposes. Four coasters in a small basket make a quick hostess gift. A single character is a nice add-on to a gift card or a mug. The set looks right on a coffee table, a mantel, a tea tray, or a holiday buffet, and it is a realistic craft-fair item because each piece uses only about 15–40 yards of yarn.
The details you will notice first are the ones that make each coaster recognizable: Santa’s black belt with a mustard buckle, the snowman’s tilted carrot nose and row of coal buttons, the tree’s three stacked tiers dotted with red, mustard, purple and dusty-blue ornaments with a white embroidered garland, and the gingerbread man’s wavy icing cuffs, X buttons and little red smile.
Personalizing is easy. Swap the tree’s ornament colors for a pastel or all-red palette, work the gingerbread man in dark chocolate brown, give the snowman a striped scarf, or use thicker yarn and a larger hook to turn any coaster into a wall hanging or a tree ornament. Because the pieces are modular, you can also crochet only the characters you like and make a mixed set of six or eight.
🔍 Main Pattern Overview
This set contains four coasters. Every coaster is made from separate flat pieces (except the snowman’s disc, which is a single spiral circle) that are layered and sewn together, then embroidered. Nothing is stuffed.
| Coaster | Pieces | Main technique |
|---|---|---|
| 🎅 Santa | Body, 2 boots, 2 arms, head, face patch, hat, hat trim, pom | Flat rows, color changes, sewing |
| ⛄ Snowman | Disc, hat, carrot nose | Spiral disc, flat rows, embroidery |
| 🎄 Tree | 3 tiers, trunk, star, 9 mini ornaments | Edge increases, small motifs |
| 🍪 Gingerbread man | Head, body, 4 limbs, bow tie | Spiral disc, flat rows, embroidery |
Design notes: Every stitch count, shape and assembly step in this pattern is my own original construction. I chose proportions, sizes and the placement of every embroidered detail myself, and I note where those are design decisions you can adjust.
Work order suggestion: Snowman first (the simplest), then the gingerbread man, then the tree, and Santa last because he has the most pieces.
🎯 Skill Level
Easy, suitable for a confident beginner. Everything is worked in single crochet, with a few increases and decreases. The challenge is not the stitches but the number of small pieces and the neat sewing at the end.
Techniques used:
- Magic ring (MR)
- Single crochet in spiral rounds and in turned rows
- Increasing at both edges of a row to shape a triangle
- Single crochet two together (sc2tog)
- Changing colors at the end of a row
- Half double crochet in the carrot and star
- Whipstitch sewing of overlapping pieces
- Embroidery: French knots, backstitch, straight stitches, simple satin stitch
📏 Finished Size
With worsted-weight cotton and a 4.0 mm hook, the finished coasters measure approximately:
| Coaster | Approx. size (W × H) |
|---|---|
| 🎅 Santa | 4.5 × 5.5 in (11.5 × 14 cm) |
| ⛄ Snowman (disc 4 in / 10 cm wide, plus hat) | 4 × 4.75 in (10 × 12 cm) |
| 🎄 Tree (with trunk and star) | 4 × 5 in (10 × 12.5 cm) |
| 🍪 Gingerbread man | 4.75 × 4.75 in (12 × 12 cm) |
These sizes are estimates. The finished size changes with:
- Yarn weight and fiber: Cotton is firm and does not stretch. Acrylic or blended yarn will come out slightly larger and floppier.
- Hook size and tension: Tighter tension makes smaller, stiffer pieces.
- Overlap amounts: The more you overlap pieces when sewing, the smaller the finished figure.
- Embroidery pull: Pulling embroidery tight can cup the fabric slightly.
🧮 Gauge
Gauge is not critical for a coaster, but it determines whether the pieces fit together as described. In single crochet with a 4.0 mm hook, I get approximately 17 sc × 19 rows = 4 in (10 cm).
Because the fabric must be dense enough to hold a drink and to prevent the sewn layers from showing gaps, tight, consistent tension matters more than matching the number exactly. If your single crochet fabric looks lacy or you can see light through it, drop down a hook size. If you cannot push the hook through the stitches, go up by half a size. If your gauge is different, your pieces will be a different size but the proportions and the stitch counts stay the same.
🧶 Required Yarn Amounts
All amounts are approximate and include a generous allowance for tails. The estimates assume worsted-weight cotton. One small ball (about 50 g / 80–100 yd) of each main color is enough for the whole set, and small scraps cover the accent colors.
| 🧵 Color | Used for | Approx. yards |
|---|---|---|
| Red | Santa body, sleeves, hat; gingerbread bow tie; 3 tree ornaments | 20 |
| Black | Santa belt, boots, mittens; snowman hat | 18 |
| White | Santa head and hat trim and pom; snowman disc | 35 |
| Peach | Santa face patch | 6 |
| Moss Green | Tree tiers | 20 |
| Chocolate Brown | Tree trunk | 3 |
| Caramel Brown | Gingerbread man | 16 |
| Mustard Yellow | Tree star, 2 tree ornaments, Santa’s buckle | 6 |
| Orange | Snowman carrot | 2 |
| Purple | 2 tree ornaments | 2 |
| Dusty Blue | 2 tree ornaments | 2 |
Total for the whole set: approximately 130–150 yd (120–137 m) of worsted-weight cotton.
Embroidery floss (6-strand), small amounts: black, white, pink and red.
Stuffing: none needed.
🧰 Materials
- Worsted-weight cotton yarn (weight category 4) in the 11 colors above
- 4.0 mm (US G/6) crochet hook
- Embroidery floss in black, white, pink and red (or fingering-weight scrap yarn)
- Blunt yarn needle for sewing pieces together
- Sharp embroidery needle with an eye large enough for 2–3 strands of floss
- Stitch markers (2) to mark the start of spiral rounds
- Sewing pins (or small clips) for positioning pieces
- Scissors
- Optional: craft felt, in a matching or neutral color, for backing (see section L)
- Optional: fabric glue for attaching the backing
⚠️ Safety note: These coasters have small embroidered knots and sewn-on pieces. They are home décor, not toys. Do not give them to children under 3, and check that knots and seams are secure before gifting.
🛍️ Supplies We Recommend : a 4.0 mm (US G/6) hook with an ergonomic handle, a set of worsted-weight cotton in holiday colors, 6-strand embroidery floss in basic colors, a pack of sewing pins with large heads, and a sheet of craft felt for backing.
🔤 Abbreviations — US Terms
| Abbreviation | Meaning |
|---|---|
| ch | chain |
| FO | fasten off |
| hdc | half double crochet |
| inc | increase: 2 sc in the same stitch |
| MR | magic ring |
| R | round (spiral rounds) |
| sc | single crochet |
| sc2tog | single crochet two together (decrease) |
| sl st | slip stitch |
| st(s) | stitch(es) |
Special term used in this pattern:
Edge-inc row: ch 1, turn, 2 sc in the first st, sc in each st across to the last st, 2 sc in the last st. This adds 2 stitches per row and shapes the sides of the tree tiers.
📝 Notes Before You Begin
- Spiral rounds: The snowman disc, the Santa head and face patch, the Santa pom and the gingerbread head are worked in continuous spiral rounds with no joining and no turning chain. Place a stitch marker in the first stitch of each round and move it up as you work.
- Flat rows: All other pieces are worked in turned rows. Each row begins with ch 1 (which does not count as a stitch) and you turn your work. Work the first stitch into the stitch at the base of the chain.
- Foundation chains: Row 1 always begins with sc in the 2nd ch from the hook and in each ch across. The stitch count given at the end of each Row 1 is the number of sc, not the number of chains.
- Counting: The number in parentheses at the end of a round or row is the stitch count for that round or row. Check it often, especially on the tree tiers.
- Increases: “(1 sc, inc) x6” means repeat the bracket six times.
- Color changes: Work the last sc of the old color until two loops remain, then pull the new color through to finish the stitch. Drop the old color to the back, and weave the ends in later.
- Sewing tails: Leave a tail of about 8 in (20 cm) on any piece that will be sewn on. Cut a shorter tail (4 in / 10 cm) on pieces that will be embroidered or covered.
- Embroider first: Embroider faces and details on each piece before you sew it to another piece. It is much easier to work on a flat, loose piece.
- Positions are my design choices: Where I give a position for an eye, button or ornament, it is a suggestion. Pin first, step back, and adjust until you like it.
🪡 Complete Pattern
🎅 Coaster 1: Santa
Colors: Red, Black, White, Peach, Mustard Yellow, plus black, pink and red floss.
🧍 Body (make 1)
Santa’s red coat with a black belt.
Start with Red, ch 15.
- Row 1: sc in the 2nd ch from hook and in each ch across. (14)
- Rows 2–3: ch 1, turn, sc in each st across. (14) On the last st of Row 3, change to Black.
- Rows 4–5 (belt): ch 1, turn, sc in each st across. (14) On the last st of Row 5, change to Red.
- Rows 6–8: ch 1, turn, sc in each st across. (14)
FO, leaving a 6 in (15 cm) tail. Weave in the color-change ends.
Buckle: With Mustard Yellow, embroider a small square over the center 2 stitches of the belt (Rows 4–5) using satin stitch or four straight stitches arranged in a square. Leave the center of the square open to look like a buckle.
👞 Boots (make 2)
Start with Black, ch 6.
- Row 1: sc in the 2nd ch from hook and in each ch across. (5)
- Rows 2–3: ch 1, turn, sc in each st across. (5)
FO, leaving a 6 in (15 cm) tail.
💪 Arms (make 2)
Black mitten at the end, red sleeve at the body end.
Start with Black, ch 5.
- Row 1: sc in the 2nd ch from hook and in each ch across. (4)
- Row 2: ch 1, turn, sc in each st across. (4) On the last st, change to Red.
- Rows 3–5: ch 1, turn, sc in each st across. (4)
FO, leaving a 6 in (15 cm) tail. The Row 5 edge (red) is the end you will sew to the body.
🧠 Head (make 1)
White, because this disc becomes Santa’s beard and the base for his face.
With White:
- R1: MR 6. (6)
- R2: inc around. (12)
- R3: (1 sc, inc) x6. (18)
- R4: (2 sc, inc) x6. (24)
- R5: (3 sc, inc) x6. (30)
sl st in the next st, FO, leaving a 6 in (15 cm) tail. Weave in the MR tail.
🙂 Face Patch (make 1)
With Peach:
- R1: MR 6. (6)
- R2: inc around. (12)
- R3: (1 sc, inc) x6. (18)
sl st in the next st, FO, leaving a 6 in (15 cm) tail.
Embroidery on the face patch:
- Eyes: Two black French knots (2 wraps) in R2 of the patch, about 4 stitches apart, positioned just above the center.
- Nose: One pink French knot (3 wraps) at the center of the patch, one round below the eyes.
- Cheeks: Two short pink straight stitches on each side of the nose, just under the eyes.
🎓 Hat (make 1)
Red triangle that folds to one side.
Start with Red, ch 11.
- Row 1: sc in the 2nd ch from hook and in each ch across. (10)
- Row 2: ch 1, turn, sc2tog, sc in the next 6 sts, sc2tog. (8)
- Row 3: ch 1, turn, sc2tog, sc in the next 4 sts, sc2tog. (6)
- Row 4: ch 1, turn, sc2tog, sc in the next 2 sts, sc2tog. (4)
- Row 5: ch 1, turn, sc2tog twice. (2)
- Row 6: ch 1, turn, sc2tog. (1)
FO, leaving a 4 in (10 cm) tail. The Row 1 edge (10 sts) is the base of the hat.
🎀 Hat Trim (make 1)
With White, ch 11.
- Row 1: sc in the 2nd ch from hook and in each ch across. (10)
- Row 2: ch 1, turn, sc in each st across. (10)
FO, leaving a 10 in (25 cm) tail.
🔔 Pom (make 1)
With White:
- R1: MR 6. (6)
- R2: inc around. (12)
sl st in the next st, FO, leaving a 4 in (10 cm) tail. Optional: instead of a crocheted disc, attach a small white yarn pom-pom.
Santa assembly: see section L.
⛄ Coaster 2: Snowman
Colors: White, Black, Orange, plus black floss.
⚪ Disc (make 1)
The snowman’s face and body in one circle.
With White:
- R1: MR 6. (6)
- R2: inc around. (12)
- R3: (1 sc, inc) x6. (18)
- R4: (2 sc, inc) x6. (24)
- R5: (3 sc, inc) x6. (30)
- R6: (4 sc, inc) x6. (36)
- R7: (5 sc, inc) x6. (42)
- R8: (6 sc, inc) x6. (48)
- R9: (7 sc, inc) x6. (54)
sl st in the next st, FO, weave in ends. The disc should measure approximately 4 in (10 cm) across and lie flat. If it curls like a bowl, see the tips in section M.
🎩 Hat (make 1)
Black top hat: narrow crown, wider brim.
Start with Black, ch 7.
- Row 1: sc in the 2nd ch from hook and in each ch across. (6)
- Rows 2–5: ch 1, turn, sc in each st across. (6)
- Row 6 (brim begins): ch 1, turn, inc in each st across. (12)
- Rows 7–8: ch 1, turn, sc in each st across. (12)
FO, leaving a 10 in (25 cm) tail. The crown is Rows 1–5 and the brim is Rows 6–8.
🥕 Carrot Nose (make 1)
With Orange, ch 4.
- Row 1: sl st in the 2nd ch from hook, sc in the next ch, hdc in the last ch. (3)
FO, leaving a 6 in (15 cm) tail. The hdc end is the wide base that you sew to the face.
Embroidery on the disc (design choices; pin and adjust):
- Eyes: Two black French knots (3 wraps), about 1 in (2.5 cm) apart, in the upper half of the disc, around R4–R5, on either side of the vertical center line.
- Nose: Sew the carrot between and slightly below the eyes, with the pointed end angled to one side.
- Smile: Five small black stitches or French knots (2 wraps) curved in an arc below the nose, around R6–R7.
- Buttons: Three black French knots (3 wraps) stacked vertically below the smile, in the lower half of the disc, evenly spaced.
Snowman assembly: see section L.
🎄 Coaster 3: Christmas Tree
Colors: Moss Green, Chocolate Brown, Mustard Yellow, Red, Purple, Dusty Blue, plus white floss.
All three tiers are worked from the narrow top edge to the wide bottom edge. The tiers are overlapped when assembled, so only the lower part of each tier shows.
🌲 Top Tier (make 1)
Start with Moss Green, ch 4.
- Row 1: sc in the 2nd ch from hook and in each ch across. (3)
- Row 2: edge-inc row. (5)
- Row 3: ch 1, turn, sc in each st across. (5)
- Row 4: edge-inc row. (7)
- Row 5: ch 1, turn, sc in each st across. (7)
- Row 6: edge-inc row. (9)
- Row 7: ch 1, turn, sc in each st across. (9)
FO, leaving a 6 in (15 cm) tail.
🌲 Middle Tier (make 1)
Start with Moss Green, ch 6.
- Row 1: sc in the 2nd ch from hook and in each ch across. (5)
- Row 2: edge-inc row. (7)
- Row 3: ch 1, turn, sc in each st across. (7)
- Row 4: edge-inc row. (9)
- Row 5: ch 1, turn, sc in each st across. (9)
- Row 6: edge-inc row. (11)
- Row 7: ch 1, turn, sc in each st across. (11)
- Row 8: edge-inc row. (13)
- Row 9: ch 1, turn, sc in each st across. (13)
FO, leaving a 6 in (15 cm) tail.
🌲 Bottom Tier (make 1)
Start with Moss Green, ch 10.
- Row 1: sc in the 2nd ch from hook and in each ch across. (9)
- Row 2: edge-inc row. (11)
- Row 3: ch 1, turn, sc in each st across. (11)
- Row 4: edge-inc row. (13)
- Row 5: ch 1, turn, sc in each st across. (13)
- Row 6: edge-inc row. (15)
- Row 7: ch 1, turn, sc in each st across. (15)
- Row 8: edge-inc row. (17)
- Row 9: ch 1, turn, sc in each st across. (17)
FO, leaving a 6 in (15 cm) tail.
🪵 Trunk (make 1)
Start with Chocolate Brown, ch 5.
- Row 1: sc in the 2nd ch from hook and in each ch across. (4)
- Rows 2–4: ch 1, turn, sc in each st across. (4)
FO, leaving a 6 in (15 cm) tail.
⭐ Star (make 1)
With Mustard Yellow, MR.
Ch 4, sl st in the 2nd ch from hook, sc in the next ch, hdc in the next ch, sl st into the ring. Repeat from * 4 more times for 5 points total. Pull the MR tight to close the center and FO, leaving a 6 in (15 cm) tail. Each point has 3 stitches.
🔔 Mini Ornaments (make 9)
Make 3 in Red, 2 in Mustard Yellow, 2 in Purple and 2 in Dusty Blue.
- R1: MR 6, sl st to the first sc to join. (6)
FO, leaving a 6 in (15 cm) tail on each. Use the tail to sew the ornament to the tree.
Tree embroidery: Before assembly, embroider a white floss garland: a long, loose zigzag of backstitch or running stitch that crosses each tier from the upper left to the lower right and back, ending near the edges. Aim for slight waves rather than perfectly straight lines.
Tree assembly: see section L.
🍪 Coaster 4: Gingerbread Man
Colors: Caramel Brown, Red, plus black, white and red floss.
🧠 Head (make 1)
With Caramel Brown:
- R1: MR 6. (6)
- R2: inc around. (12)
- R3: (1 sc, inc) x6. (18)
- R4: (2 sc, inc) x6. (24)
- R5: (3 sc, inc) x6. (30)
sl st in the next st, FO, leaving a 6 in (15 cm) tail.
Face embroidery:
- Eyes: Two black French knots (2 wraps) in R4, about 6 stitches apart.
- Smile: A curved red backstitch of about 5 stitches, centered below the eyes, around R3.
- Optional icing: A wavy white backstitch line near the top edge of the head.
🧍 Body (make 1)
Start with Caramel Brown, ch 11.
- Row 1: sc in the 2nd ch from hook and in each ch across. (10)
- Rows 2–7: ch 1, turn, sc in each st across. (10)
FO, leaving a 6 in (15 cm) tail.
Body embroidery: Two white X buttons, one above the other, centered on the body. Each X covers about 2 stitches wide and 2 rows tall, using two crossing straight stitches.
💪 Limbs: Arms and Legs (make 4 identical pieces)
Start with Caramel Brown, ch 5.
- Row 1: sc in the 2nd ch from hook and in each ch across. (4)
- Rows 2–6: ch 1, turn, sc in each st across. (4)
- Row 7: ch 1, turn, sc2tog twice. (2)
FO, leaving a 6 in (15 cm) tail. The Row 7 edge is the rounded hand or foot, and the Row 1 edge is sewn to the body.
Icing on limbs: On each limb, embroider a wavy white backstitch line across Row 5 (the row just before the narrowing) to make icing cuffs on the wrists and ankles.
🎀 Bow Tie (make 1)
Start with Red, ch 9.
- Row 1: sc in the 2nd ch from hook and in each ch across. (8)
- Rows 2–3: ch 1, turn, sc in each st across. (8)
FO, leaving a 10 in (25 cm) tail. Pinch the rectangle in the middle and wrap the tail around the center 3–4 times to form a bow. Secure with a few stitches, but do not cut the tail yet.
Gingerbread assembly: see section L.
🎨 Styling / Assembly / Stability / Final Shaping
General Assembly Principles
- Layering, not butting: Because these are coasters, pieces overlap and are whipstitched through both layers instead of being seamed edge to edge. Overlapping hides gaps and creates a thicker, more stable surface.
- Pin before you sew: Lay all pieces out on a flat surface, pin them, then step back and check proportions and symmetry before stitching anything.
- Sew flat: Keep the pieces lying flat while you sew. Tight sewing stitches will pucker the fabric.
- Weave in ends: Weave in every tail between the layers so nothing is visible from the front.
- Shape and flatten: After assembly, steam lightly (hold the iron above the fabric) or dampen and pin the coaster flat to a board until dry.
🎅 Santa Assembly
- Boots: Lay the body flat with Row 8 at the bottom. Overlap one boot under the bottom edge of the body, aligned with the left edge (covering sts 1–5), and the other under the right edge (covering sts 10–14), leaving a gap of 4 stitches between the boots. Whipstitch each boot to the body along the overlap.
- Arms: Sew the red end (Row 5 edge) of each arm to the side of the body, starting about 2 rows below the top edge. Angle each arm outward and slightly downward, with the black mitten pointing away from the body. Check that both arms match.
- Head: Center the head on the body so its bottom edge overlaps the top 2 rows of the body. Whipstitch around the lower half of the head only.
- Face patch: Pin the embroidered peach face patch centered on the head, in the upper half, leaving a band of white beard visible below it. Sew around the edge with Peach yarn or a matching thread.
- Hat trim: Curve the trim across the head so it just overlaps the top edge of the face patch. Sew the lower long edge down using the tail.
- Hat: Sew the 10-stitch base of the Red hat to the top edge of the trim. Fold the tip to one side and tack it down with a few stitches.
- Pom: Sew the pom to the tip of the hat, covering the tack stitches.
⛄ Snowman Assembly
- Hat: Pin the hat at the top of the disc, centered, with the brim overlapping the disc by about 2 rounds (about 0.4 in / 1 cm). Whipstitch along the bottom edge of the brim and along the top edge where it meets the disc.
- Carrot: Sew the carrot to the face, angling it to one side as shown on the pinned layout.
- Embroidery: If you have not already, complete the eyes, smile and buttons.
🎄 Tree Assembly
- Bottom tier: Lay the Bottom Tier flat with the wide edge (Row 9) at the bottom.
- Trunk: Slide the trunk under the bottom edge so that about 1 row is hidden under the tier and 3 rows show. Sew it in place.
- Middle tier: Place the Middle Tier so its bottom edge sits about 1 in (2.5 cm) above the bottom edge of the Bottom Tier. Sew along the bottom edge of the Middle Tier (this is the visible lower edge of the layer).
- Top tier: Place the Top Tier so its bottom edge sits about 1 in (2.5 cm) above the bottom edge of the Middle Tier. Sew along its bottom edge.
- Star: Sew the star to the tip of the Top Tier, with one point facing straight up.
- Ornaments: Pin the 9 ornaments in a loose, balanced pattern across the tiers, mixing colors and keeping them away from the very edges. Sew each one down using its tail.
🍪 Gingerbread Assembly
- Legs: Lay the body flat with Row 7 at the bottom. Overlap the Row 1 edges of two limbs under the bottom edge, one covering sts 1–4 and the other covering sts 7–10, leaving a gap of 2 stitches. Angle them slightly outward. Whipstitch to the body.
- Arms: Sew the Row 1 edges of the other two limbs to the sides of the body, about 1 row below the top. Angle them outward and slightly upward.
- Head: Center the head over the top of the body, overlapping the first 2 rows of the body. Whipstitch around the lower half of the head.
- Bow tie: Sew the finished bow at the neck where the head meets the body, covering the join. Use the tail to attach it, then weave in the end.
Stability and Backing
For a drink to sit securely, the surface should be flat and the pieces should not shift:
- Optional felt backing: Trace the finished coaster on paper, cut the shape out of felt about 1/8 in (3 mm) smaller than the outline, and attach it with fabric glue or small whipstitches. This is especially useful for Santa, the tree and the gingerbread man, which have many overlapping pieces.
- Check the surface: Press a mug down in the center. If anything wobbles, add a few extra reinforcing stitches where pieces overlap.
✅ Final Shaping Checklist
- ✅ Faces are centered and the eyes are level.
- ✅ Santa’s arms and boots are symmetrical and the hat tip is secured.
- ✅ The snowman’s hat sits straight and the buttons are evenly spaced.
- ✅ Tree tiers are centered on each other and the ornaments look balanced.
- ✅ Gingerbread limbs are angled evenly and the bow covers the head-body join.
- ✅ All color-change ends and sewing tails are woven in out of sight.
- ✅ French knots are tight and secure.
- ✅ Each coaster lies flat on a table without curling.
- ✅ Backing, if used, is attached and does not show from the front.
💡 Helpful Crochet Tips
- 💡 Keep your tension tight on the discs. The snowman disc, the Santa head and the gingerbread head should be firm. If a disc cups upward like a bowl, your stitches are too tight or the round has too few stitches; go up half a hook size for just that piece. If it ruffles, you have too many stitches; re-check your counts.
- 💡 Count the tree tiers every two rows. A single missed edge increase makes a tier lopsided and it will not stack neatly. After each edge-inc row, count the stitches against the number in parentheses.
- 💡 Match your tier overlaps by measuring. Use a ruler to place each tree tier about 1 in (2.5 cm) above the one below it. Eyeballing leads to a crooked tree.
- 💡 Change colors on Santa’s body in the last stitch. Pulling the new color through on the final stitch of the previous row gives a clean belt line without a jog.
- 💡 Weave in color-change tails along the belt row. Weaving them into the same-color stitches keeps the red from showing through the black.
- 💡 Embroider before you assemble. Faces, icing and buttons are much easier to work on a single flat piece. Pin the pieces together first, mark the positions, then take them apart again.
- 💡 Use the pin-and-step-back trick for faces. Place a pin where each eye goes, step back a few feet, and check that the face looks right. A French knot that is one stitch off can change the whole expression.
- 💡 Anchor French knots firmly. Knot the floss on the back, take the final stitch through the fabric, and tie a small knot between the layers. Loose knots are the first thing to come undone on a coaster that gets handled.
- 💡 Block lightly. Steam-pressing the finished coaster flat smooths the overlaps. Do not press hard on embroidery, which flattens the knots.
- 💡 Work a test piece first. The snowman disc and the Santa head are the fastest pieces and tell you right away whether your hook size and yarn are working.
🧼 Care Instructions
- Cleaning: Spot-clean spills promptly with cool water and a drop of mild soap. For a full wash, hand-wash in cool water and gently squeeze out the water. Do not wring or twist.
- Colorfastness: Dark cottons such as red and black can bleed onto white or light pieces. Test by dabbing a damp white cloth on a hidden spot. When in doubt, wash the white and dark coasters separately and never soak them together.
- Drying: Reshape the coaster and lay it flat to air dry on a towel. Do not tumble dry, which can shrink cotton and distort the layers.
- Felt backing: If you used felt, avoid soaking the coaster, because the felt may shrink or the glue may loosen. Spot-clean only.
- Heat and use: These are for mugs, glasses and cups. Do not use them under hot pots, pans or baking dishes.
- Storage: Store flat or in a basket, away from direct sunlight, which can fade the red and black.
🎄 Closing
You now have a full holiday cast ready to hold the cocoa. Place Santa and the snowman by the tea tray, set the gingerbread man next to a plate of cookies, and let the tree take pride of place on the coffee table. Wrapped together with a ribbon, the set becomes a ready-made gift for a neighbor, a teacher or anyone who loves a handmade Christmas.
Do not feel locked into the colors. A pastel palette, an all-red-and-white scheme or a glittery metallic floss for the garland can turn this set into something entirely your own. If you make a set, I would love to see it.
💌 Post-Article Engagement & Distribution Block
Share the Love
Made your set? Save this pattern to your Pinterest board, share a photo of your finished coasters, and tag the pattern so other crocheters can see your colorway.
Suggested Categories
- Crochet Patterns
- Christmas Crochet
- Home Décor
- Crochet Gift Ideas
Suggested Tags
crochet coasters, Christmas crochet, Christmas coasters, crochet Santa, crochet snowman, crochet gingerbread man, crochet Christmas tree, holiday crochet patterns, free crochet pattern, beginner crochet, cotton crochet, crochet gift ideas, handmade Christmas décor, crochet home décor
Comment Invitation
Which ornament colors did you choose for your tree, and did you keep the classic red, mustard, purple and blue or go with your own palette?
You Might Also Like
- Crochet Christmas Ornament Set: Mini Santa, Snowman and Gingerbread
- Crochet Snowflake Coasters: Six Easy Winter Designs
- Crochet Holiday Mug Rugs: Quick Seasonal Gifts
- Crochet Christmas Garland Pattern: Tree, Star and Bell Shapes
- Amigurumi Gingerbread Man Pattern
Printable / PDF
A print-friendly version of this pattern can be offered through a print plugin or PDF download tool; no link is included here. <!– AD SLOT: pre-faq –>
❓ FAQ
How big are these Christmas crochet coasters? Each coaster is roughly 4 to 5.5 inches (10 to 14 cm) in its largest dimension when made with worsted-weight cotton and a 4.0 mm hook. Santa is the tallest and the snowman is the most compact.
What yarn is best for crochet coasters? Worsted-weight 100% cotton is the best choice. It is absorbent, firm and washable, and it holds the shape of flat pieces better than acrylic. Acrylic works for decorative coasters but absorbs less moisture.
What hook size should I use? A 4.0 mm (US G/6) hook gives a dense fabric with worsted cotton. If your stitches look loose or you can see through the fabric, try a 3.5 mm hook. Size down rather than up for coasters.
Can I wash crochet coasters? Yes. Cotton coasters can be hand-washed in cool water with mild soap and air-dried flat. Test dark colors for bleeding before washing them alongside white pieces, and avoid soaking coasters with felt backing.
Can beginners make this pattern? Yes, if you are comfortable with single crochet and increasing in a circle. The stitches are simple but there are many small pieces, so take your time with the assembly. The snowman is the best one to start with.
How do I make crochet coasters lie flat? Keep your tension consistent, check your stitch count at the end of each disc round, and block the finished coaster with steam. If a disc still cups, try half a hook size larger for that piece.
Are these coasters safe for children? These are home décor, not toys. The embroidered knots and sewn-on pieces can come loose, so they are not suitable for children under 3.
Can I make the coasters bigger? Yes. Use a bulkier yarn with a larger hook for a larger version. For a bigger disc, keep adding rounds with the same pattern: R10 is (8 sc, inc) x6 (60).