Crochet Poinsettia Star Ornament Pattern: A Free Christmas Wall Hanging with Jingle Bells
Christmas Crochet Pattern · Wall Hanging & Door Decor · Easy-to-Intermediate
📖 B. Introduction
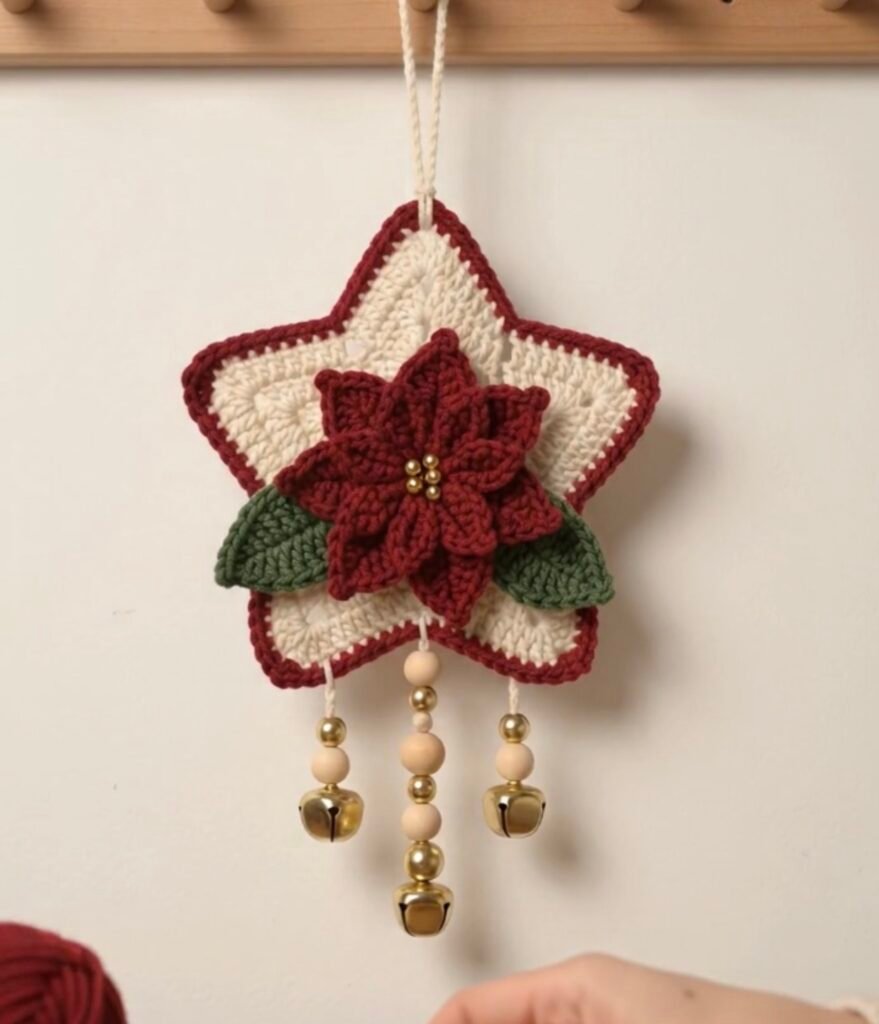
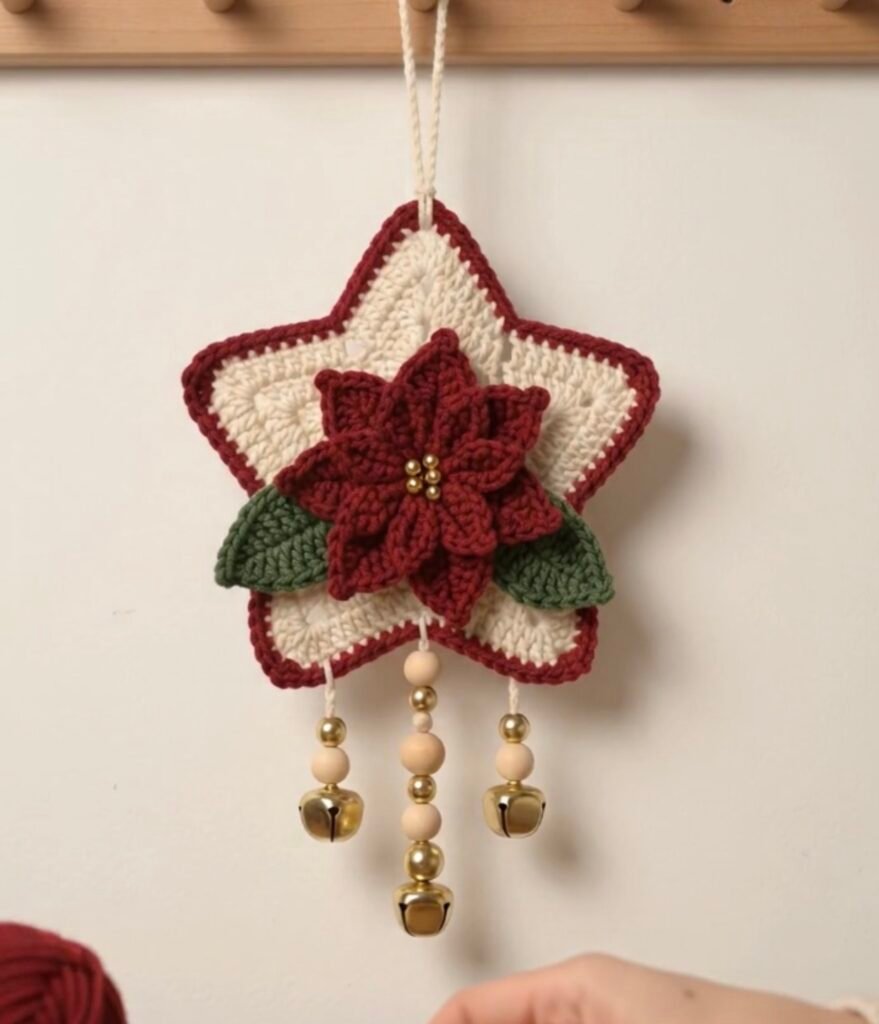
This crochet poinsettia star is a chubby five-point wall hanging in creamy cotton with a cranberry border. A layered red poinsettia sits at its center, with a gold-bead heart and two deep green leaves tucked underneath. Three beaded strands hang from the lower edge, each ending in a gold jingle bell. It is a small piece, about 6 in (15 cm) across the star, but it fills a door or wall with texture, color, and a soft chime.
Most Christmas crochet is either a flat ornament or a small amigurumi. This pattern gives you a structured, dimensional decoration instead. The star is dense hdc worked in the round from a magic ring, so it hangs flat without stiffeners. The poinsettia is built from separate pointed petals in two sizes, so it ruffles and overlaps like a real bract. The wooden and gold beads and the bells add the finishing touch.
The pattern works as a gift for a host, teacher, or new homeowner. It also suits a front door, a bedroom doorknob, a mantel hook, a craft-fair table, or the first piece in a family heirloom set that you add to each year. The distinctive details are the contrast between the matte cream star and the glossy gold beads, the double-layer red flower, and the center strand that hangs longer than the two sides.
Personalizing it is easy. Swap Cranberry for a deep teal or blush pink for a non-traditional holiday. Use all-cream petals for a winter-white version. Choose silver beads and bells for a cooler look, or make the star in a lightweight cotton for a smaller ornament.
🔍 C. Main Pattern Overview
This is a five-part project, made in this order:
- 🌟 Star Base (Cream): 9 rounds of hdc worked from a magic ring, with points shaped by 3-in-1 increases and valleys shaped by decreases.
- 🎀 Border (Cranberry): 2 rounds of sc around the star.
- 🔖 Hanging Cord (Cream): a slip-stitch cord folded into a loop.
- 🍃 Leaves (Forest Green): 2 chain-based leaves.
- 🌺 Poinsettia (Cranberry): 8 large petals, 6 small petals, and a center disc, sewn into a two-layer flower with gold beads.
- 🔔 Bead-and-Bell Strands: 3 hanging strands in wooden and gold beads with jingle bells.
🎯 D. Skill Level
Easy to Intermediate. The stitches are basic, but the star shaping and flower assembly need attention.
Techniques used:
- Magic ring
- Working in joined rounds with a turning-chain-free start
- 3-in-1 point increases and hdc2tog valley decreases
- Single crochet border with corner shaping
- Working around a foundation chain (leaf and petal construction)
- Slip-stitch cord
- Basic sewing and bead attachment
📏 E. Finished Size
| Part | Approximate Size |
|---|---|
| Star, point to point (width) | 6.25 in (16 cm) |
| Star, top point to bottom valley (height) | 6 in (15 cm) |
| Poinsettia diameter | 3.5 in (9 cm) |
| Each leaf, length | 2.5 in (6.5 cm) |
| Hanging loop height | 6 in (15 cm) |
| Overall hanging length (loop top to center bell) | about 15 in (38 cm) |
Size changes with yarn weight, hook size, tension, and how tightly you crochet the star. A thicker yarn on a 4.0 mm hook gives a larger but floppier star. Bead and bell sizes also change the strand length.
🧮 F. Gauge
Exact gauge is not critical for a decorative piece. Dense, even tension matters more, because a firm fabric keeps the points crisp. Aim for about 16 hdc and 12 rows = 4 in (10 cm) in a flat swatch with a 3.5 mm hook.
Checkpoint: after R5 the star should measure about 2.75 in (7 cm) across the widest points. If it measures much wider, go down a hook size. If it measures much narrower, go up.
🧶 G. Required Yarn Amounts
Estimates are approximate and based on worsted-weight (4) cotton.
| Color | Used For | Approx. Yardage |
|---|---|---|
| 🧵 Cream | Star, hanging cord, bead strands | 105 yd (96 m) |
| 🧵 Cranberry Red | Border, petals, center disc | 110 yd (100 m) |
| 🧵 Forest Green | 2 leaves | 20 yd (18 m) |
| Total | about 235 yd (215 m) |
You will also need a little sewing thread for attaching the gold flower beads.
🧰 H. Materials
- Worsted weight (4) cotton or cotton blend in Cream, Cranberry Red, and Forest Green
- 3.5 mm (E/4) crochet hook, or the size needed for a firm fabric
- 7 gold beads, 6 mm (flower center)
- 4 gold beads, 8 mm
- 1 gold bead, 10 mm
- 1 wooden bead, 16 mm
- 3 wooden beads, 12 mm
- 1 gold jingle bell, 22 mm (center strand)
- 2 gold jingle bells, 18 mm (side strands)
- Yarn needle
- Sewing needle and matching thread
- Stitch marker
- Pins
- Scissors
- Optional: spray starch or fabric stiffener
⚠️ Safety note: this is a decorative piece with small beads and bells. Keep it out of reach of babies and small children, and never use it as a toy.
🔤 I. Abbreviations — US Terms
| Abbreviation | Meaning |
|---|---|
| ch | chain |
| dc | double crochet |
| hdc | half double crochet |
| hdc2tog | half double crochet 2 together (decrease) |
| MR | magic ring |
| PC | point center (the middle stitch of a 3-stitch point group) |
| R | round |
| rep | repeat |
| sc | single crochet |
| sc2tog | single crochet 2 together (decrease) |
| sl st | slip stitch |
| st(s) | stitch(es) |
| x | times |
| ( ) | stitch count at the end of the round |
📝 J. Notes Before You Begin
- Joined rounds. Every round is joined with a sl st to the first stitch of the round. The ch 2 at the start of a hdc round does not count as a stitch. The first hdc of the round goes into the same stitch as the join.
- Point structure. Each of the five points is built from a 3-stitch group created by working 3 hdc into one stitch. In the next round, work 3 hdc into the middle stitch of that group. This is the PC.
- Valleys. On even-numbered rounds (R4, R6, R8) a hdc2tog is worked at the center of each valley, which pulls the star into its pointed shape.
- Stitch marker. Use a marker in the first stitch of each round, or in the PC of one chosen point, to keep your place.
- Tension. Crochet tightly. A loose star flops. A firm star holds its points.
- Blocking. Star blocking is optional but recommended. Pin the points out gently, spray lightly with water or starch, and let dry.
- Design choices. Round counts, petal numbers, and bead sizes are original design decisions based on the overall look of the reference, not measurements taken from it.
🪡 K. Complete Pattern
🌟 Star Base (Make 1) — Cream
Purpose: the main five-point body of the wall hanging. Yarn: Cream. Start with a magic ring.
R1: Ch 2, MR, 10 hdc in the ring. Join with sl st to first hdc. (10)
R2: Ch 2, 3 hdc in the same st as the join, hdc in next st. (3 hdc in next st, hdc in next st) x4. Join. (20)
You now have five 3-stitch point groups, each followed by a single valley stitch.
R3: Ch 2, (hdc in next st, 3 hdc in next st, hdc in next 2 sts) x5. Join. (30)
R4: Ch 2, (hdc in next st, 3 hdc in next st, hdc in next st, hdc in next st, hdc2tog) x5. Join. (35)
R5: Ch 2, (hdc in next st, 3 hdc in next st, hdc in next 5 sts) x5. Join. (45)
R6: Ch 2, (hdc in next st, 3 hdc in next st, hdc in next st, hdc in next 2 sts, hdc2tog, hdc in next 2 sts) x5. Join. (50)
R7: Ch 2, (hdc in next st, 3 hdc in next st, hdc in next 8 sts) x5. Join. (60)
R8: Ch 2, (hdc in next st, 3 hdc in next st, hdc in next st, hdc in next 3 sts, hdc2tog, hdc in next 4 sts) x5. Join. (65)
R9: Ch 2, (hdc in next st, 3 hdc in next st, hdc in next 11 sts) x5. Join. (75)
Do not fasten off. Change to Cranberry for the border, or fasten off and rejoin.
Shaping note: if the piece cups at the points, your tension is too tight at the 3-hdc groups. Work those groups a touch looser, or block firmly.
🎀 Star Border (Make 1) — Cranberry Red
Purpose: the contrasting frame that defines the star. Yarn: Cranberry Red.
R10: Join Cranberry in the PC of any point (the middle stitch of a 3-hdc group). Ch 1, 3 sc in the same st, sc in next 6 sts, sc2tog, sc in next 6 sts. (3 sc in next st, sc in next 6 sts, sc2tog, sc in next 6 sts) x4. Join. (80)
R11: Ch 1, (sc in next st, 3 sc in next st, sc in next st, sc in next 6 sts, sc2tog, sc in next 5 sts) x5. Join with sl st. Fasten off and weave in the tail. (85)
🔖 Hanging Cord (Make 1) — Cream
Purpose: the loop the star hangs from.
R1: Ch 91, sl st in 2nd ch from hook and in each ch across. (90)
Fasten off, leaving a 6 in (15 cm) tail at each end.
Attaching: Fold the cord in half. Pass both ends through the top PC stitch of the star from front to back, between the border stitches. Tie an overhand knot on the back, then use the tails and a yarn needle to sew the knot flat.
🍃 Leaves (Make 2) — Forest Green
Purpose: two green leaves tucked behind the flower. Worked around a foundation chain.
R1: Ch 13. Starting in the 2nd ch from the hook: sl st, sc, hdc in next 2 sts, dc in next 3 sts, hdc in next 2 sts, sc, sl st (11 sts across the chain). 3 sc in the last ch (the tip). Working along the bottom of the foundation chain: sl st, sc, hdc in next 2, dc in next 3, hdc in next 2, sc, sl st (11 sts). Join to first st. (25)
Fasten off, leaving a 10 in (25 cm) tail for sewing.
🌺 Poinsettia (Make 1) — Cranberry Red
Purpose: the focal flower. Two layers of pointed petals around a gold-beaded center.
Large Petals (Make 8):
R1: Ch 9. Starting in the 2nd ch from hook: sc, hdc, dc in next 3 sts, hdc, sc (7 sts). 3 sc in the last ch (the tip). Working along the bottom of the foundation chain: sc, hdc, dc in next 3 sts, hdc, sc (7 sts). Join with sl st to first sc. (17)
Fasten off, leaving an 8 in (20 cm) tail.
Small Petals (Make 6):
R1: Ch 7. Starting in the 2nd ch from hook: sc, hdc, dc, hdc, sc (5 sts). 3 sc in the last ch (the tip). Working along the bottom of the foundation chain: sc, hdc, dc, hdc, sc (5 sts). Join with sl st to first sc. (13)
Fasten off, leaving an 8 in (20 cm) tail.
Center Disc (Make 1):
R1: Ch 1, MR, 6 sc in the ring. Join. (6)
R2: 2 sc in each st around. Join. (12)
Fasten off, leaving a 10 in (25 cm) tail.
Assembling the flower:
- Lay the 8 large petals in a wheel with the tips pointing outward and the bases overlapping about ¼ in (6 mm). Sew through the base of each petal to the next, in sequence, to form a ring.
- Place the 6 small petals on top, centered over the gaps between large petals as evenly as you can. Pin in place and sew through the bases.
- Sew the center disc over the joined bases to hide all the bulk.
- With sewing thread, attach the 7 gold 6 mm beads to the center: one in the middle and six around it, as a tight cluster.
🔔 Bead-and-Bell Strands (Make 3)
Purpose: the three beaded strands that hang from the lower edge. Use a single strand of Cream (split the plies if your yarn is too thick for the bead holes).
Side Strands (Make 2): Cut 7 in (18 cm) of Cream. Thread on, in order from top to bottom: 1 gold 8 mm bead, 1 wooden 12 mm bead. Finish with an 18 mm jingle bell. Knot securely under the bell.
Center Strand (Make 1): Cut 11 in (28 cm) of Cream. Thread on, in order from top to bottom: 1 gold 8 mm bead, 1 wooden 16 mm bead, 1 gold 8 mm bead, 1 wooden 12 mm bead, 1 gold 10 mm bead. Finish with a 22 mm jingle bell. Knot securely under the bell.
Attaching the strands: Tie the top of each strand to the border of the star. The two side strands go to the PC of the two lower points. The center strand goes to the bottom valley, centered between them. Pull the knot to the back, then secure it with a few stitches and weave in the tail.
🎨 L. Styling / Assembly / Stability / Final Shaping
Recommended Assembly Order
- Make the star and border (R1–R11).
- Make the hanging cord and attach it to the top point.
- Make the leaves.
- Make the petals and the center disc.
- Assemble and sew the flower, then add the gold beads.
- Pin the two leaves behind the flower, angled toward the lower left and lower right, tips pointing outward. Sew them to the star.
- Center the flower slightly below the middle of the star and sew it in place all around the edge of the petals.
- Make the three bead strands and attach them to the lower border.
- Block the star flat if needed.
Styling Notes
Place the flower so it sits on the center of the star, not touching the border. The leaves should peek out from beneath the flower on both lower sides. This forms a triangle of color that points the eye toward the beaded strands.
Stability & Balance
Because the flower and strands are lightweight, no inserts are needed. The hanging cord is stitched through the top point and knotted, which holds the weight of the bells comfortably. If the piece leans forward, sew a few small stitches from the back of the flower base to the star to anchor it.
Final Shaping Checklist
- ✅ Points are crisp and evenly sized
- ✅ Border sits flat with no ruffling
- ✅ Flower is centered and secure
- ✅ Leaves are symmetrical
- ✅ Beads are sewn on tightly
- ✅ All knots are secure and hidden
- ✅ Strands hang straight and evenly
- ✅ All yarn ends are woven in
💡 M. Helpful Crochet Tips
- 💡 Count the point groups. After every round, check that you have exactly five 3-stitch point groups. A wrong count here ruins the star shape.
- 💡 Place the marker in a PC. It makes finding your next 3-in-1 increase much faster.
- 💡 Keep hdc2tog even. Work each valley decrease in the center of the valley so the star stays symmetrical.
- 💡 Block lightly. A gentle block with the points pinned out sharpens the star without stretching it.
- 💡 Leave long tails on petals. You will use them to sew the flower together, so you will not need extra yarn.
- 💡 Pin before sewing. Layered petals shift easily. Pin each layer first.
- 💡 Sew beads with doubled thread. Gold beads can catch and fray single thread, so double it and knot well.
- 💡 Test bead holes first. Check that your yarn fits through every bead before you start the strands.
- 💡 Match leaf tails. Weave the leaf tails into the leaf itself before sewing, so the stitching on the back stays neat.
- 💡 Use a bead to hide knots. The top bead of each strand can cover the knot where the strand attaches.
🧼 N. Care Instructions
Spot-clean gently with a damp cloth and mild soap. Do not machine wash, because the beads and bells can snag and the star may lose its shape. Air-dry flat and re-pin the points if needed. Store flat or hung in a dry place away from direct sunlight, which can fade the Cranberry and Forest Green. Keep dark and light yarns separate when damp to avoid color transfer.
Closing
Once you hang this star, the real payoff is the small details: the glint of gold against the cream, the layered flower, and the soft jingle when someone opens the door. It looks far more intricate than it is, and every part can be changed. Try a navy and silver winter version, a pastel spring flower, or a larger star in chunky yarn. It makes a thoughtful handmade gift, and a set of three in different colors looks wonderful on a mantel. Make yours, hang it where you will see it every day, and share how it turns out.
Post-Article Engagement & Distribution Block
Share the Love: If you enjoyed this pattern, save it to Pinterest, share it with a crochet friend, and tag your finished star so I can see it!
Suggested Categories: Christmas Crochet · Crochet Home Décor · Crochet Ornaments · Free Crochet Patterns
Suggested Tags: crochet star ornament, crochet poinsettia, Christmas crochet pattern, crochet wall hanging, crochet jingle bell ornament, handmade Christmas decor, crochet flower pattern, cotton crochet decor, crochet door hanger, crochet Christmas gift, beaded crochet ornament, holiday crochet, crochet star pattern, crochet gift idea
Comment Invitation: Which colorway would you try first: the classic red and cream, or something unexpected like teal or blush pink?
You Might Also Like:
- Crochet Snowflake Ornament Pattern
- Crochet Holly Wreath Wall Hanging
- Crochet Mini Stocking Ornament
- Crochet Christmas Tree Garland
- Crochet Bell Ornament with Bow
Printable/PDF note: A print-friendly or PDF version of this pattern can be offered with a print plugin. <!– Insert plugin or download link here. –><!– AD SLOT: pre-faq –>
❓ R. FAQ
What yarn is best for a crochet poinsettia star?
A worsted-weight cotton or cotton blend gives the firmest, crispest result. Acrylic works but is softer and may need blocking or starch.
How do I make the star hold its shape?
Crochet tightly with a hook one or two sizes smaller than the yarn label suggests, then block with the points pinned out. A little spray starch adds stiffness.
Can I make this smaller?
Yes. Stop the star at R7 and use the small petal for both flower layers. Use finer yarn and a smaller hook for an ornament-size version.
How do I attach the flower so it stays put?
Sew all around the outer edge of the petals as well as through the center. This keeps the flower from tilting forward.
Are the beads and bells safe for children?
No. This is a decorative piece with small parts. Keep it out of reach of babies and small children.
What if my yarn won’t fit through the bead holes?
Split the yarn into a single ply, or use a thin cotton cord. Always test one bead before you start.
Can I use different colors?
Yes. Keep strong contrast between the star, border, and flower so the design stays readable.