Crochet Baby Clog Booties — Free Button-Strap Pattern
Crochet Pattern · Baby Booties · Beginner-Friendly to Intermediate 🧸
📖 Introduction
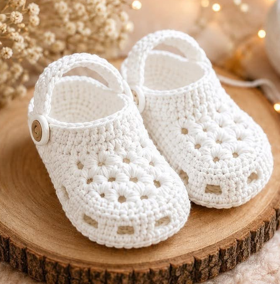
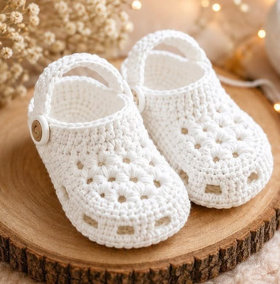
These crochet baby clog booties combine a sturdy, flat-soled clog silhouette with an airy, open-lattice upper and a single wooden button strap — the kind of bootie that looks as good sitting on a nursery shelf as it does on a newborn’s feet. Worked in smooth cotton yarn, the design pairs a dense, textured “shell” panel across the toe with a breathable mesh lower body, so the finished shoe reads as delicate and polished rather than bulky, while still holding its shape enough to stand upright on its own.
What makes this pattern worth adding to your queue is the contrast it strikes: most amigurumi-style baby shoes are either fully solid (warm, but visually plain) or fully lace (pretty, but flimsy). This one is built in layers — a solid sc sole and heel cup for structure, a raised shell round across the front for texture and visual weight, and an open square-mesh band around the sides for lightness and stretch over a baby’s foot. A single crocheted strap with a button closure finishes the shoe like a miniature clog, making it easy to get on and off without fighting tiny wiggling feet.
These booties work well as a baby shower gift, a coming-home-outfit accessory, a keepsake to box alongside a hospital photo, or seasonal nursery décor propped on a wood slice or shelf, the way they’re styled in cream and ivory tones here. Because the shape is simple and the palette is neutral, they also sell well as a small-batch craft-fair or handmade-shop item.
The design in cream cotton with a natural wood button reads as classic and gender-neutral, but it takes color changes easily — try blush and cream for a soft nursery palette, sage and oat for a gender-neutral woodland theme, or a solid saturated color with a contrasting button for a bolder look. Swap the button for a wooden heart or a mismatched pair of buttons for extra charm, or lengthen the strap slightly for a chunkier “mary jane” style closure.
Sizing is controlled almost entirely by sole length and rows worked on the upper — the Finished Size and Notes sections below walk through exactly what to adjust for newborn through 6–9 month sizing, so you can crochet the same pattern across a full baby shower gift set.
Affiliate Disclosure: This post may contain affiliate links. If you make a purchase through one of these links, we may earn a small commission at no extra cost to you. Thank you for supporting this site.
🔍 C. Main Pattern Overview
This is an original design created for this tutorial, inspired visually by a cream cotton baby clog silhouette: a rounded, flat oval sole; a solid heel cup; an open square-lattice band around the sides and instep; a raised shell-stitch panel across the toe/vamp; and a narrow crocheted button strap crossing the top of the foot. Every stitch count, round sequence, and construction method below is original and has not been copied or reverse-engineered from any existing designer’s pattern — the reference photo was used only to guide the overall silhouette, proportion, and color palette.
📌 Want to save this for later? Pin this pattern or save the printable version below so it’s ready next time you sit down to crochet.
🎯 D. Skill Level
Intermediate. Beginners with prior amigurumi or basic garment experience can complete this pattern, but it assumes comfort with the following:
- Working in continuous spiral rounds without joining
- Reading and executing an increase sequence with changing stitch counts
- Combining stitch heights (sc, hdc, dc, tr) within the same round
- Basic chain-space mesh work (ch-1/ch-2 spaces)
- Simple shaping via short rows for the heel cup
- Seaming/sewing a separate strap piece and attaching a button
📏 E. Finished Size
| Size | Sole Length | Sole Width |
|---|---|---|
| Newborn (0–3 months) | approx. 9.5 cm (3.75 in) | approx. 4.5 cm (1.75 in) |
| 3–6 months | approx. 10.5 cm (4.25 in) | approx. 5 cm (2 in) |
| 6–9 months | approx. 11.5 cm (4.5 in) | approx. 5.5 cm (2.25 in) |
The pattern below is written for the Newborn (0–3 months) size, with sizing notes for the two larger sizes.
What changes the size:
- Sole rounds: adding one extra plain round to the sole after shaping lengthens and widens it proportionally for the next size up.
- Hook size and yarn weight: moving up to a 3 mm hook with a light DK-weight yarn will scale the whole shoe up roughly half a size without changing the stitch counts.
- Tension: tighter tension shrinks the finished shoe; looser tension enlarges it — always check your sole against a well-fitting baby shoe or a printed foot outline before continuing to the upper.
- Row count on the upper: two extra rounds on the heel cup before starting the lattice band will raise the ankle line for a more secure, higher-sided bootie.
🧮 F. Gauge
Exact gauge is less important here than consistent, firm tension, since these are structural, wearable pieces rather than a garment that must match precise finished measurements. A dense fabric prevents little toes from poking through the stitches.
Approximate gauge: 18 sc x 20 rows = 10 cm (4 in) square, worked with a 2.5 mm hook and size 3 cotton yarn. Crochet a small swatch first — if your sole comes out noticeably larger or smaller than the measurements above, adjust your hook size up or down before continuing.
🧶 G. Required Yarn Amounts
| Yarn | Approximate Amount |
|---|---|
| Main Color (MC) — shown in cream/ivory | approx. 35–40 g (for both booties) |
| Contrast strap/button-loop color (optional) | approx. 3–5 g, or use MC |
| Total project estimate | approx. 40–45 g of size 3 (light DK) cotton yarn |
🧰 H. Materials
- 2.5 mm (US B/1–C/2) crochet hook
- Size 3 (light/DK weight) cotton yarn in your main color
- Small amount of contrast yarn for the strap, if desired
- Yarn needle for weaving in ends and seaming
- Stitch marker (to track the start of each round)
- Scissors
- 2 small buttons, approx. 1–1.5 cm (0.5 in) diameter
- Straight pins, for holding the strap in place before sewing
⚠️ Safety note: Buttons are a choking hazard for babies who mouth their hands and feet. Sew buttons on very securely with doubled thread, and if these are intended for a baby who will actually wear them (rather than for décor or photography only), consider using safety-backed buttons, or crochet a small button substitute (a tight French knot or a crocheted circle) instead of a hard plastic or wooden button.
🔤 I. Abbreviations — US Terms
| Abbreviation | Meaning |
|---|---|
| ch | chain |
| sl st | slip stitch |
| sc | single crochet |
| hdc | half double crochet |
| dc | double crochet |
| tr | treble/triple crochet |
| inc | increase (2 sc in same stitch, unless otherwise noted) |
| dec | decrease (invisible or standard sc2tog) |
| sk | skip |
| st(s) | stitch(es) |
| rnd(s) | round(s) |
| rep | repeat |
| BLO | back loop only |
| FO | fasten off |
| ( ) | repeat instructions inside parentheses the stated number of times |
| [ ] | total stitch count at end of round |
📝 J. Notes Before You Begin
- The sole and lower body are worked in continuous spiral rounds — do not join or chain up unless a step says otherwise. Use a stitch marker in the first stitch of each round and move it up as you go.
- Stitch counts in brackets refer to the total stitches at the end of that round, after any increases or decreases.
- Both booties are identical in construction; there is no separate “left” and “right” foot, though the button strap can be angled slightly toward either side for a mirrored pair if you prefer.
- Color changes (if used for the strap or button loop) should be made in the last pull-through of the previous stitch so the new color is ready to work the next stitch cleanly.
- Leave a long tail (approx. 30 cm/12 in) when fastening off the sole, heel cup, and strap pieces — these tails will be used for seaming rather than woven in immediately.
💌 Want the printable, ad-free PDF version of this pattern? Save your email below and we’ll send it straight to your inbox.
🪡 K. Complete Pattern
🪡 Sole (Make 2)
Worked in continuous rounds. Do not join unless stated.
With MC, ch 11.
Rnd 1: Sc in 2nd ch from hook and in next 8 ch (9 sc), 3 sc in last ch, rotate to work into the underside loops of the foundation chain, sc in next 8 ch (9 sc), 2 sc in last st. [23]
Rnd 2: Sc 9 (across first straight side, no change), inc in each of next 3 sts (rounded toe end), sc 9 (across second straight side, no change), inc in each of next 2 sts (rounded heel end). [28]
Rnd 3: Sc 9, (sc 1, inc) 3 times, sc 9, (sc 1, inc) 2 times. [33]
Rnd 4: Working in BLO around, sc in each st. [33] (Working this round in back loops only creates a crisp fold line between the sole and the upper wall.)
FO, leaving a long tail if this is the second sole made (for seaming), or simply weave in if setting aside.
🧵 Sizing note: For 3–6 months, add one more increase round before Rnd 4, repeating the Rnd 3 pattern with one fewer plain stitch between increases. For 6–9 months, add two extra increase rounds.
🪡 Heel Cup & Lower Body Wall (worked directly onto Sole)
Rejoin MC in the back loop of any stitch along the heel end of the sole (opposite the pointed toe end), or continue directly if still attached.
Rnd 5: Sc in each st around, working into the back loops left free from Rnd 4. [33]
Rnd 6: Sc in each st around, this time through both loops, to firm up the wall. [33]
Rnd 7 (Heel build-up, worked in short rows over the back third of the round only): Identify the back 11 stitches of the round (centered on the heel end). Working back and forth in rows over these 11 stitches only:
- Row 1: Sc across 11 sts, ch 1, turn.
- Row 2: Sc across 11 sts, ch 1, turn.
- Row 3: Sc across 11 sts, do not turn.
FO the heel-cup working yarn, leaving a short tail to weave in. This raises the back of the bootie into a rounded heel cup while the front stays lower, ready for the open lattice and shell front.
🪡 Lattice Sides (worked around the remaining front two-thirds of the bootie)
Rejoin MC at the right-hand edge of the heel cup (where the short rows ended).
Rnd 8: *Sc in next st, ch 2, sk 1 st; rep from * around the front 22 stitches, then sc evenly across the top edge of the heel cup (11 sts) to close the round. [approx. 33 sts/spaces total]
Rnd 9: *Sc in the ch-2 space from the round below, ch 2; rep from * around the lattice section, sc in each st across the heel-cup top. This creates the small open squares visible around the sides of the bootie.
Rnd 10: Repeat Rnd 9 once more, to build a two-row-deep lattice band. 🧵 For a taller bootie (or 6–9 month size), repeat Rnd 9 a third time here.
🎀 Shell Vamp Panel (Front Toe Section)
This is the raised, textured panel across the front instep, worked as a separate strip and sewn into place over the open toe of the lattice section, leaving the oval toe opening for the foot.
With MC, ch 13.
Row 1: Dc in 4th ch from hook (counts as first dc-shell base), *sk 1 ch, 5 dc in next ch, sk 1 ch, sl st in next ch; rep from * across. FO, leaving a long tail.
This creates a scalloped strip of fan/shell clusters — the same raised texture visible across the front of the reference bootie. Pin the strip along the top front edge of the lattice band, centered over the instep, and sew in place using the long tail and a yarn needle, easing it slightly to follow the curve of the toe opening. The two short ends of the strip should meet the sides of the lattice band at the point where the open toe begins.
🎀 Button Strap (Make 2)
With MC (or contrast color), ch 4.
Row 1: Sc in 2nd ch from hook and in each ch across. [3]
Rows 2–14: Ch 1, turn, sc in each st across. [3]
Row 15 (buttonhole row): Ch 1, turn, sc 1, ch 2, sk 2, sc 1. [buttonhole formed]
Row 16: Ch 1, turn, sc 1, sc 2 in the ch-2 space, sc 1. [4]
FO, leaving a long tail.
Sew one end of the strap securely to one side of the heel cup, just above the lattice band, so the strap crosses over the top of the foot at the instep. The buttonhole end should reach comfortably to the opposite side of the bootie without stretching.
🎨 L. Styling / Assembly / Stability / Final Shaping
- Attach the shell vamp panel first, before the strap — it’s easier to center accurately while the top of the bootie is still fully open.
- Attach the strap next. Pin it dry-fitted across the top of the foot opening before sewing, and try it against a similarly-sized real shoe or a foot tracing to check the strap isn’t too short to close comfortably over a chunky baby foot or ankle.
- Sew the button to the outer side of the bootie, opposite the strap’s sewn end, lining it up with the buttonhole when the strap is closed.
- Symmetry check: lay both finished booties sole-to-sole, heel-to-heel. The heel cups, lattice bands, and shell panels should sit at matching heights on both shoes.
- Stability: because the sole is worked flat and the heel cup is built with short rows rather than stuffed, these booties naturally sit upright without any wire or cardboard insert. If your sole seems to cup or dish rather than lying flat, block it gently by pinning it flat and steam-pressing on a wool/cotton-safe setting, then letting it cool fully before continuing the upper.
✅ Final Shaping / Finishing Checklist
- ✅ Sole lies flat with no cupping or twisting
- ✅ Heel cup rises evenly on both booties
- ✅ Shell vamp panel is centered over the toe opening on both shoes
- ✅ Lattice squares are even in size and count around both sides
- ✅ Strap length matches on both booties
- ✅ Button is sewn on very securely, with no loose thread
- ✅ Buttonhole closes snugly around the button without gapping
- ✅ All tails woven in and trimmed close
💡 M. Helpful Crochet Tips
- 💡 Work the sole in a firmer tension than you might use for amigurumi — a loose sole will splay under a baby’s weight even though the shoe isn’t meant for walking yet.
- 💡 Count your lattice ch-2 spaces at the end of every round on Rnds 8–10; it’s easy to drift a stitch off and end up with an uneven number of squares between the two booties.
- 💡 Block the shell vamp strip lightly before sewing it on — cotton shells relax and open up beautifully with a light steam, making the texture pop more than it will straight off the hook.
- 💡 Use a removable stitch marker (not a safety pin) at the round start; safety pins can snag fine cotton fibers.
- 💡 When sewing the strap, catch only the back loops of the heel-cup stitches so your seam stays invisible from the right side.
- 💡 If your buttonhole feels loose, work it one stitch shorter (ch 1 instead of ch 2) — cotton yarn has less stretch than wool and needs a snugger buttonhole.
- 💡 Photograph or note your row counts for the first bootie before starting the second — with several texture changes in this pattern, it’s easy to lose track of exactly where you added the extra lattice round.
- 💡 If gifting, tuck a small paper tag inside noting the fiber content and care instructions below — cotton baby items often get handed down.
🧼 N. Care Instructions
Hand-wash these booties in cool water with a gentle, fragrance-free detergent to protect both the cotton fibers and the button. Avoid the washing machine, which can felt cotton stitches tight and warp the sole’s flat shape. Reshape gently while damp — smooth the sole flat and press the lattice band evenly — then air-dry flat, away from direct sunlight or a heat vent, since prolonged sun exposure can yellow cream and white cotton over time. If the button is a natural wood button, avoid soaking it directly; spot-clean around it instead. Store finished booties flat or lightly stuffed with tissue paper in a drawer rather than compressed in a box, to help the shell texture hold its shape between wears.
Closing
However you style this pair — sitting on a wood slice with dried baby’s breath and fairy lights the way they’re pictured here, tucked into a gift box, or laced onto a newborn for a hospital photo — this bootie earns its keep by looking far more intricate than it actually is to make. The shell-and-lattice combination is forgiving of small tension differences between crocheters, which makes it a good pattern to batch for a full baby shower gift set in a few different sizes and colorways. Try a blush strap with a cream body for a girl’s set, a deeper oat or sage for gender-neutral gifting, or keep it classic in white cotton with a natural wood button the way the sample pair is finished. However you make yours, we’d love to see it — tag your finished booties so we can share your version.
Post-Article Engagement & Distribution
Share the Love: If you made a pair (or three!), snap a photo and tag us — we genuinely love seeing which colorways and button choices you picked for your version.
Suggested Categories: Baby & Kids · Amigurumi & Wearables · Free Patterns
Suggested Tags: crochet baby shoes, crochet baby booties, baby clog pattern, button strap booties, cotton yarn baby shoes, newborn crochet gift, beginner crochet booties, baby shower gift idea, handmade baby shoes, crochet shell stitch, crochet mesh pattern, easy baby bootie pattern
Join the conversation: What colorway are you planning for your first pair — do you tend to crochet baby gifts in neutrals, or do you go bold?
You Might Also Like:
- Crochet Baby Mary Jane Booties
- Crochet Newborn Headband & Bootie Set
- Crochet Ribbed Baby Ankle Boots
- Crochet Baby Sandals with Flower Appliqué
- Crochet Toddler House Slippers
Printable Version: A print-friendly, ad-free PDF of this pattern can be made available through your site’s print plugin for readers who’d rather work from paper than a screen.
❓ R. FAQ
What size baby do these booties fit? The pattern as written fits a newborn to approximately 3 months, with a finished sole length of about 9.5 cm (3.75 in). Sizing notes throughout the pattern show how to adjust the sole and upper for 3–6 month and 6–9 month sizes.
Can I substitute a different yarn weight? Yes — moving to a DK or light worsted weight with a slightly larger hook (around 3–3.5 mm) will scale the whole shoe up. Just crochet a small gauge swatch first, since substituting yarn without adjusting hook size can throw off the fit noticeably in a project this small.
What hook size should I use? A 2.5 mm hook paired with size 3 (light DK) cotton yarn gives the dense, firm fabric shown in the sample. If your stitches feel loose or the sole looks floppy, size down to a 2.25 mm hook.
Are these safe for a baby to actually wear? They’re designed primarily as a gift, keepsake, or photography prop rather than an everyday walking shoe, since the flat crochet sole offers no real traction or arch support. If you do want a baby to wear them, sew the button on very securely (or substitute a crocheted button loop) and always supervise wear, removing them if a baby begins chewing on the strap or button.
How difficult is the shell vamp panel to attach? It’s the most fiddly part of the pattern, but it’s a straightforward sewing step rather than a technical stitch — pin it in place first, check that it’s centered and symmetrical on both booties side by side, and only then sew it down.
Can I skip the button strap? Yes — you can omit Rnds 15–16 of the strap (the buttonhole shaping) and instead crochet a plain strap, then sew both ends down permanently for a slip-on clog rather than a closing strap.
My lattice squares came out uneven between the two booties — what went wrong? This almost always comes from drifting a stitch during the chain-2 mesh rounds. Count your ch-2 spaces at the end of every round and compare against the stitch count given; catching a drift early is much easier than un-picking mesh rounds later.
What’s the best way to personalize this pattern? Swap the main color, use a contrast color for just the strap and shell panel, or replace the button with a small crocheted flower or bow for a more decorative finish.