Koi Scale Crochet Coin Pouch: A Fish-Shaped Drawstring Bag with Crocodile Stitch Scales
Crochet Pattern · Crocodile Stitch · Pouches & Small Bags · Gift-Ready Makes
📖 Introduction
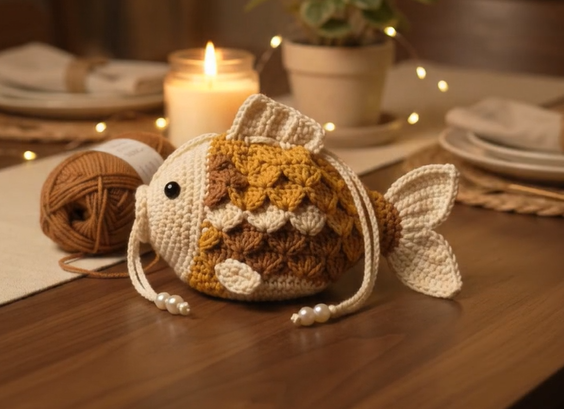
This koi scale crochet coin pouch is a small drawstring bag shaped like a plump golden fish. The body is covered in overlapping crocodile stitch scales in mustard, caramel and cream. Pull the doubled drawstring and the cream “mouth” gathers into a soft ruffle. Lay it on its side and a ribbed tail, a dorsal fin and a shiny black eye turn it from a pouch into a character.
Most coin purse patterns are flat: two panels, a zipper, done. This one has depth. The crocodile stitch creates real three-dimensional scales that catch the light and stand up from the fabric. That makes it feel closer to a small sculpture than a purse. It’s also practical: the drawstring opening is wide enough for coins, earbuds, lip balm, a key, or rolled-up cash for a gift.
It fits a lot of occasions. Tuck money inside as a Lunar New Year or birthday gift, where the koi’s association with luck and abundance adds meaning. Give it as a handmade stocking stuffer, or make several for a craft-fair table where the fish silhouette stops people. It also works as a desk tidy for paper clips and SD cards.
The details that make it read as a koi rather than a generic fish are specific. The scales change color every tier, so bands of mustard, caramel and cream wrap around the body. A clean cream “face” section separates the scales from the ruffled mouth. The fins are worked in back-loop ribbing, so each has fine parallel ridges like real fin rays. Faux pearl beads weight the drawstring ends so they hang neatly.
You can easily change it:
- Colorways: swap in white, red and black for a classic kohaku-style koi, or use ocean blues for a mermaid-scale version.
- Tiers: add or remove scale tiers to change the length.
- Pouch-only version: skip the tail and fins for a plain crocodile stitch drawstring pouch that stands upright.
🛍️ Affiliate disclosure: This post may contain affiliate links. If you buy through them, this site may earn a small commission at no extra cost to you. Recommendations are based on what works for the project.
🔍 Main Pattern Overview
The pouch is worked in one piece from the bottom up. The base becomes the fish’s tail end and the drawstring opening becomes its mouth.
- Base (Cream): a flat circle in continuous rounds of single crochet, finished with a back-loop round that gives the pouch a crisp bottom edge.
- Scale section (5 tiers): each tier is two joined rounds. The first is a V-stitch mesh round and the second is a crocodile stitch scale round. The scales offset automatically from tier to tier. The color sequence is Mustard, Caramel, Cream, Mustard, Caramel.
- Face section (Cream): single crochet rounds that hold the safety eyes.
- Eyelet round and ruffled mouth (Cream): a round of openings for the drawstring, then a two-round scalloped ruffle.
- Separate pieces:
- a ribbed dorsal fin shaped with short rows
- a two-lobe tail fin
- two leaf-shaped pectoral fins
- two slip-stitch drawstring cords
- Finishing: sew on the tail, fins and eyes, thread the cords, and add the pearl beads.
No stuffing is used. This is a working pouch, and its contents give it shape.
📌 Save this pattern: Pin it or bookmark it now so you can find your place round by round. [Email opt-in / print-friendly version placeholder]
🎯 Skill Level
Intermediate. Nothing here is advanced, but crocodile stitch worked in the round takes a little practice. You work stitches around the posts of other stitches, and you need to keep track of which V gets a scale and which gets a slip stitch. If you’ve done amigurumi and basic double crochet, you can do this. Plan to work the first tier slowly.
Techniques used:
- Magic ring and continuous single crochet rounds
- Back-loop-only (BLO) rounds and ribbing
- V-stitch mesh rounds
- Crocodile stitch scales worked in the round
- Joined rounds and clean color changes
- Short-row shaping (dorsal fin)
- Eyelet round for a drawstring
- Safety eye insertion and sewing on flat appendages
📏 Finished Size
Measured with worsted-weight cotton and a 4.0 mm hook:
| Measurement | Metric | Imperial |
|---|---|---|
| Base diameter | approx. 8.5 cm | approx. 3.3 in |
| Body diameter at the scales | approx. 9.5 cm | approx. 3.75 in |
| Length, base to mouth (drawstring open) | approx. 15 cm | approx. 6 in |
| Length including tail | approx. 19–20 cm | approx. 7.5–8 in |
| Height lying on its side, including dorsal fin | approx. 13 cm | approx. 5 in |
What changes the size:
- Yarn weight: DK gives a pouch about 20% smaller. Chunky gives a noticeably larger bag, but the scales become heavy.
- Hook size: going up one hook size loosens the mesh rounds, and the scales can gap.
- Tension on the scale rounds: relaxed scale rounds flare outward and make the body wider.
- Number of tiers: each tier adds about 1.8 cm (0.7 in) of length.
🧮 Gauge
Base and face sections: 18 sc × 20 rounds = 10 cm (4 in) in single crochet with a 4.0 mm hook.
Scale tiers: each completed tier (mesh round plus scale round) adds approximately 1.8 cm (0.7 in) of height.
Exact gauge isn’t critical for a pouch. What matters is consistent tension. The single crochet sections should be firm enough that coins can’t slip through the fabric. The scale rounds should be relaxed enough that the scales curve instead of cupping. If your base circle is much wider than 8.5 cm, go down half a hook size.
🧶 Required Yarn Amounts
Use worsted weight (US #4) yarn in 100% cotton or a cotton blend.
| Color | Used for | Approx. amount |
|---|---|---|
| 🧵 Cream | Base, Tier 3, face, eyelets, ruffle, all fins, drawstrings | 80 m (88 yd) / 45 g |
| 🧵 Mustard | Tiers 1 and 4 | 30 m (33 yd) / 17 g |
| 🧵 Caramel | Tiers 2 and 5 | 30 m (33 yd) / 17 g |
| Total | approx. 140 m (154 yd) / 80 g |
⚠️ Crocodile stitch uses much more yarn than the fabric’s size suggests. Each scale contains 10 double crochets. Buy one full 50 g ball of each color, not partial scraps.
🧰 Materials
- 🧵 Worsted weight cotton or cotton-blend yarn in Cream, Mustard and Caramel. Amounts are in the table above.
- 🪝 US G/6 (4.0 mm) crochet hook.
- ⚫ 2 black safety eyes, 9 mm, with washers. Embroidered eyes work too (see FAQ).
- ⚪ 12 faux pearl beads, 8 mm, with holes at least 2 mm wide so a doubled yarn tail fits through.
- 📍 Stitch markers (at least 2).
- 🪡 Yarn needle (blunt tip, large eye).
- 📌 Sewing pins, for positioning the fins before sewing.
- ✂️ Scissors.
- ➕ Optional: a 7.5 cm (3 in) circle of plastic canvas, to stiffen the base if you want the pouch-only version to stand upright.
- ➕ Optional: a cotton fabric lining, if you’ll carry very small coins or loose items.
⚠️ Safety note: Safety eyes and pearl beads are small parts and a choking hazard. This pouch is an accessory, not a toy, and isn’t suitable for children under 3.
🛍️ Supplies We Recommend
- A worsted cotton yarn with good stitch definition, so the scale edges stay crisp. [affiliate link placeholder]
- An ergonomic 4.0 mm hook, since crocodile rounds involve a lot of repeated post work. [affiliate link placeholder]
- A mixed pack of 8 mm faux pearls with large holes. [affiliate link placeholder]
- 9 mm black safety eyes with locking washers. [affiliate link placeholder]
<!– AD SLOT: post-materials –>
🔤 Abbreviations — US Terms
| Abbreviation | Meaning |
|---|---|
| BLO | back loop only |
| ch | chain |
| dc | double crochet |
| hdc | half double crochet |
| inc | increase: 2 sc in the same stitch |
| MR | magic ring |
| R | round |
| sc | single crochet |
| sk | skip |
| sl st | slip stitch |
| sp | space |
| st(s) | stitch(es) |
| V | V-pair: 2 dc worked in the same stitch (see Notes) |
| ( ) x6 | repeat the instructions in parentheses the number of times stated |
| (48) | stitch count at the end of the round |
📝 Notes Before You Begin
- Two kinds of rounds:
- The base (R1–R10) is worked in continuous spiral rounds. Move a stitch marker up to the first stitch of each round.
- From R11 onward, every round is joined with a sl st.
- In joined rounds, ch 3 counts as a dc and ch 1 does not count as a stitch.
- V-pair (V): two dc worked into the same stitch. They make two posts standing side by side, and each scale is built around one V.
- Anchor: each scale round ends up with 12 sl sts, one between every pair of scales. In the next mesh round, V-pairs are worked into these sl sts. The pattern calls them “anchors.”
- “Center of the scale”: the gap at the top of a finished scale, between the two dc posts it was built around. Work into this gap from behind the scale’s top edge, so the scale itself stays free.
- How the scales stagger: every scale round works a scale on the 1st, 3rd, 5th… V and a sl st in the 2nd, 4th, 6th… V. Each mesh round starts at an anchor, so the new scales land between the old ones automatically. You never have to count an offset.
- Color changes: fasten off the old color at the end of each scale round, then join the new color with a sl st in the last anchor. The next tier’s scales cover these joins well, but weave each tail into the mesh on the inside of the pouch.
- Top line: the join of R21 becomes the fish’s top (dorsal) line. Eye and fin positions are counted from it.
- Sewing tails: leave a 30 cm (12 in) tail on every fin piece for sewing.
- Stuffing: none. This is a working pouch.
🪡 Complete Pattern
🐟 Pouch Body
The body is one continuous piece worked from the base (tail end) to the mouth.
⚪ Base (Cream)
Start: magic ring. Work continuous rounds.
R1: MR 6. (6)
R2: inc around. (12)
R3: (1 sc, inc) x6. (18)
R4: (2 sc, inc) x6. (24)
R5: (3 sc, inc) x6. (30)
R6: (4 sc, inc) x6. (36)
R7: (5 sc, inc) x6. (42)
R8: (6 sc, inc) x6. (48)
R9: BLO sc around. (48)
R10: sc around. (48)
Sl st in the next st to smooth the step, and fasten off Cream.
💡 R9’s back-loop round folds the fabric up into a wall. It gives a clean base edge and helps the pouch sit flat.
🟡 Tier 1 (Mustard)
R11 (mesh): Join Mustard with a sl st in any st of R10.
- Ch 3 (counts as dc), dc in the same st, ch 1, sk next st.
- 2 dc in next st, ch 1, sk next st 23 times.
- Sl st to the top of the ch-3.
(24 V’s)
R12 (scales):
- Turn the work slightly so the first V lies sideways in front of you.
- Working around the post of the first dc of the V (the ch-3), work 5 dc from the top of the post down toward the base.
- Ch 1.
- Working around the post of the second dc of the same V, work 5 dc from the bottom up toward the top. The first scale is complete.
- Sl st in the center of the next V, between its two dc. This is the first anchor.
- Work a scale over the next V as in steps 2–4, then sl st in the center of the next V 11 times.
(12 scales). The round ends with a sl st in the center of the 24th V. Fasten off Mustard.
🟤 Tier 2 (Caramel)
R13 (mesh): Join Caramel with a sl st in the last anchor of R12.
- Ch 3 (counts as dc), dc in the same st, ch 1, 2 dc in the center of the next scale, ch 1.
- 2 dc in next anchor, ch 1, 2 dc in the center of next scale, ch 1 11 times.
- Sl st to the top of the ch-3.
(24 V’s)
R14 (scales): Work exactly as R12. (12 scales). Fasten off Caramel.
✅ Check: the Caramel scales should sit between the Mustard scales, like bricks in a wall.
⚪ Tier 3 (Cream)
R15 (mesh): Join Cream in the last anchor of R14. Work as R13. (24 V’s)
R16 (scales): Work as R12. (12 scales). Fasten off Cream.
🟡 Tier 4 (Mustard)
R17 (mesh): Join Mustard in the last anchor of R16. Work as R13. (24 V’s)
R18 (scales): Work as R12. (12 scales). Fasten off Mustard.
🟤 Tier 5 (Caramel)
R19 (mesh): Join Caramel in the last anchor of R18. Work as R13. (24 V’s)
R20 (scales): Work as R12. (12 scales). Fasten off Caramel.
🧠 Face Section (Cream)
R21 (transition): Join Cream with a sl st in the last anchor of R20.
- Ch 1, 2 sc in the same st, 2 sc in the center of the next scale.
- 2 sc in next anchor, 2 sc in the center of next scale 11 times.
- Sl st to the first sc.
(48). Place a marker at this join: it’s your top line.
R22–R26: Ch 1, sc in each st around, sl st to the first sc. (48). Work 5 rounds.
👁️ Eye placement (can be done now or at the end): Count from the top line. Insert one safety eye between R23 and R24 at st 12, and the other at st 36, so the eyes sit on opposite sides. Attach the washers from inside the pouch.
🔗 Eyelet Round (Cream)
R27: Ch 3 (counts as dc), dc in next st, ch 2, sk 2 sts. Dc in next 2 sts, ch 2, sk 2 sts 11 times. Sl st to the top of the ch-3.
(24 dc and 12 ch-2 sp). Number the ch-2 spaces 1 to 12 from the top line. These are the eyelets.
R28: Ch 1, sc in each dc and 2 sc in each ch-2 sp around, sl st to the first sc. (48)
🎀 Ruffled Mouth (Cream)
R29:
- Ch 3 (counts as dc), 2 dc in next st.
- Dc in next st, 2 dc in next st 23 times.
- Sl st to the top of the ch-3.
(72)
R30: Ch 1, sc in next st, sk 1, 5 dc in next st, sk 1 18 times, sl st to the first sc.
(18 scallops). Fasten off and weave in all remaining body ends on the inside.
🐠 Dorsal Fin (Cream, Make 1)
This is the ribbed fin that runs along the fish’s back, tallest at the front and tapering toward the tail. It’s worked flat in rows.
Start: ch 8.
Row 1: sc in 2nd ch from hook and across. (7)
Row 2: ch 1, turn, BLO sc across. (7)
Rows 3–10: repeat Row 2. (7)
Row 11: ch 1, turn, BLO sc in next 5 sts; leave remaining 2 sts unworked. (5)
Row 12: ch 1, turn, BLO sc across. (5)
Row 13: ch 1, turn, BLO sc in next 3 sts; leave remaining 2 sts unworked. (3)
Row 14: ch 1, turn, BLO sc across. (3)
Which edge is which:
- Row 1 begins at the end of the chain farthest from the slip knot. That end is the fin’s bottom edge.
- Odd rows travel from the bottom edge to the top, and even rows travel back down.
- Rows 11 and 13 stop short of the top, which creates the stepped taper.
Edging: Don’t turn. Sl st evenly up the short edge of Row 14, along the stepped top edge, and down the short edge of Row 1, stopping at the bottom edge. Fasten off, leaving a 30 cm tail.
📐 The bottom edge (the row ends) is the sewing edge. The ribs stand vertically once it’s attached.
🐟 Tail Fin (Cream, Make 2 lobes)
Start: ch 11.
Row 1: sc in 2nd ch from hook and across. (10)
Rows 2–8: ch 1, turn, BLO sc across. (10)
Fasten off, leaving a 30 cm tail on one lobe only. On the other lobe, weave in the ends.
Shaping:
- Choose one short end of each lobe to be its base.
- Thread the yarn needle with a 20 cm piece of Cream. Weave it through the 8 row ends along that base and pull tight so the lobe fans out, about 1.5 cm wide at the base.
- Knot the gathering yarn.
- Hold the two lobes base to base at a slight V angle. Sew the bases together with the long tail, then keep that tail for attaching the tail to the body.
🍃 Pectoral Fins (Cream, Make 2)
These are small leaf-shaped side fins.
Start: ch 7.
Round 1:
- Sc in 2nd ch from hook, hdc in next ch, dc in next 2 ch, hdc in next ch, 3 sc in last ch.
- Rotate to work along the underside of the chain: hdc in next ch, dc in next 2 ch, hdc in next ch, sc in last ch.
- Sl st to the first sc.
(13). Fasten off, leaving a 25 cm tail.
🔗 Drawstring Cords (Cream, Make 2)
Start: leave a 15 cm (6 in) starting tail, then ch 95.
Row 1: sl st in the back bump of the 2nd ch from hook and in each ch across. (94)
Fasten off, leaving a 15 cm tail. Each cord measures approximately 45 cm (17.75 in).
🎨 Styling / Assembly / Stability / Final Shaping
Recommended Assembly Order
- Finish the body through R30 and weave in all ends on the inside.
- Insert both safety eyes (R23/R24, sts 12 and 36 from the top line) if you haven’t already.
- Tail: Pin the joined tail at the center of the base, covering R1–R2, with the lobes pointing away from the body. Keep the lobes on a horizontal plane, level with the eyes, so the tail doesn’t point up or down when the fish lies on its side. Sew firmly around the gathered bases.
- Dorsal fin:
- Lay the pouch on its side with the eyes horizontal.
- Pin the fin’s bottom edge along the top line from about R15 to R21. Row 1 (the tall end) goes toward the face and Row 14 (the short end) toward the tail.
- Sew with small whipstitches through the scale-round anchors and the face stitches, keeping the fin upright.
- Pectoral fins: Pin one fin on each side at the R20/R21 junction, at st 16 and st 32 from the top line (just below and behind each eye). Angle the tips back toward the tail. Sew only the narrow end so the rounded end lifts slightly.
- Drawstrings:
- Cord A: start from the outside at eyelet 4. Weave in and out through eyelets 4, 5, 6… 12, 1, 2 and 3. Both ends come out on the outside, between eyelets 3 and 4.
- Cord B: start from the outside at eyelet 10. Weave through eyelets 10, 11, 12, 1… 9. Both ends come out on the opposite side, between eyelets 9 and 10.
- Pearls: Thread 3 pearls onto each cord-end tail. Tie an overhand knot tight against the last pearl. Weave the remaining tail back up into the cord and trim.
Styling Notes
- 🐟 Fish pose: close the drawstrings about halfway so the ruffle puckers into a mouth. Lay the fish on one side and drape the pearl ends forward, in front of the face.
- 👜 Pouch pose: pull both cords fully closed and stand the pouch on its base. It stands best in the pouch-only version (see FAQ), because the tail keeps the finished fish resting on its side.
- ✨ Scale lift: once finished, run a fingertip under each scale’s bottom edge to lift it slightly. This gives the texture more depth in photos.
Stability
- The pouch rests on its side on the tail and the curve of the scales. Filling it with coins or small items gives it weight and keeps it from rolling.
- For a firmer shape, cut a 7.5 cm plastic canvas circle and tuck it inside against the base.
- Sew the tail with several passes through R1–R3 and one stitch through the base’s center ring. It’s the piece most likely to be pulled.
✅ Final Finishing Checklist
- ✅ Eyes are level with each other and sit on exact opposite sides of the face.
- ✅ The tail lobes line up with the eye line when the fish lies on its side.
- ✅ The dorsal fin stands upright along the top line, tall end toward the face.
- ✅ The pectoral fins sit just behind and below each eye and match each other.
- ✅ Every tier’s scales sit between the scales of the previous tier.
- ✅ No mesh holes show between scales, and no color-change tails are visible outside.
- ✅ Both cords slide smoothly, and pulling both ends closes the mouth evenly.
- ✅ The pearl knots are tight and the tails are hidden inside the cords.
💡 Helpful Crochet Tips
- 💡 Test your tension on Tier 1. If the Mustard scales cup forward like spoons, your scale dc are too tight. Relax your grip on the scale round only and keep the mesh round firm.
- 💡 Count V’s, not stitches, in the mesh rounds. Twenty-four V’s is the only number that matters. Place a marker in every 6th V on your first mesh round and the scale round becomes easy to track.
- 💡 Keep the scale posts in order. Always work down the first post, then up the second. Reversing them on one scale makes it twist and point sideways.
- 💡 Work into the center of the scale from behind. Fold each finished scale down toward the base before placing the next mesh V. This keeps the new V-pair from catching the scale’s top stitches and flattening it.
- 💡 Hide color joins at an anchor. Joining exactly at the last sl st of each scale round tucks the new color’s ch-3 under the next tier of scales, where it’s invisible.
- 💡 Place the eyes before closing anything. The pouch is open at the mouth, so you can place the eyes at any stage. Test-fit them before pressing the washers, because they can’t be moved afterwards.
- 💡 Pin the dorsal fin with the fish lying down. Pinning it with the pouch upright almost always tilts the fin once the fish is laid on its side.
- 💡 Match the pearl weight on both cords. Three pearls per end balances the cords. Uneven bead counts make one side of the mouth close faster than the other.
- 💡 For a kohaku-style koi: replace Mustard with red and Caramel with white, and add a few black scales in Tier 3.
🧼 Care Instructions
- Spot clean first. For most marks, dab with a damp cloth and a little mild soap.
- Hand wash when needed: cool water, gentle soap, no wringing. Press the water out in a towel.
- Remove pearls or protect them. Many faux pearls have a coating that dulls or peels in water. Loosen the knots and slide them off, or wrap each cord end in plastic before washing.
- Check for dye bleeding. Mustard and caramel dyes can bleed onto cream. Before the first wash, dab a hidden spot with a damp white cloth. If color transfers, wash in cold water with a color-catcher sheet.
- Dry flat and reshape. Lift each scale gently with your fingertips while the pouch is damp so the tiers dry in place.
- Safety eyes tolerate hand washing but not machine drying or ironing.
- Store away from direct sunlight to prevent the mustard fading.
🎉 Your Finished Koi Pouch
When the last pearl is knotted, you have something that works as a pouch and looks like a small sculpture: five tiers of scales, a fin you can run your thumb along, and a mouth that opens and closes. It holds its shape better than a flat purse, and its color bands look good on a bookshelf or a nightstand.
Try it in more than one color scheme. Red and white makes a classic koi, pastels make a spring version, and deep blue and silver makes an ocean-scale pouch. Tuck a folded note or a coin inside and it becomes a gift for Lunar New Year, a graduation, or a friend who needs a bit of luck. When yours is finished, photograph it both ways, on its side and standing up, and share it. Seeing how other makers color their koi is the best part of publishing this pattern.
📌 Share the Love
Made your koi pouch? Save this pattern to your crochet board, share it with a crochet friend, and tag your finished fish so others can see your colorway.
Suggested categories: Crochet Bags & Pouches · Crocodile Stitch Patterns · Gift Crochet Patterns · Animal-Inspired Crochet
Suggested tags: crochet coin pouch, koi fish crochet, crocodile stitch, crochet drawstring pouch, crochet fish pattern, fish scale crochet, crochet gift idea, lunar new year crochet, crochet coin purse, amigurumi fish, crochet small bag, cotton yarn project, intermediate crochet pattern
Tell us in the comments: Which colorway would you choose for your koi: classic red-and-white kohaku, golden like this one, or something else entirely? And what are you planning to keep inside it?
You might also like:
- Crocodile Stitch Mermaid Tail Pencil Pouch
- Goldfish Amigurumi Keychain
- Pearl-Trim Drawstring Gift Bag for Small Presents
- Dragon Scale Crochet Fingerless Mitts
- Lucky Cat Crochet Coin Purse
📄 A print-friendly/PDF version of this pattern can be offered through a print plugin.
<!– AD SLOT: pre-faq –>
❓ FAQ
How big is the koi scale coin pouch?
With worsted cotton and a 4.0 mm hook, the body is about 15 cm (6 in) long and 9.5 cm (3.75 in) across at the scales. The tail adds about 5 cm (2 in). It holds a good handful of coins, earbuds, or a folded banknote gift.
Is crocodile stitch hard to do in the round?
It’s slower than it is difficult. The only new move is working 5 dc around each post of a V. This pattern alternates “scale, sl st” on every round and starts each mesh round at an anchor, so the staggering happens on its own. Most people are comfortable by the end of the second tier.
Can I use acrylic yarn instead of cotton?
Yes. Acrylic makes a softer, lighter pouch with slightly rounder scales. Cotton gives crisper scale edges and a sturdier pouch that holds coins without stretching, which is why it’s recommended here.
How do I make the pouch stand upright like a regular drawstring bag?
Make the pouch-only version: skip the tail, dorsal fin and pectoral fins, and tuck a 7.5 cm plastic canvas circle into the base. You get a crocodile stitch drawstring pouch that stands on its own. You can keep the eyes or leave them off.
Can I embroider the eyes instead of using safety eyes?
Yes, and it’s the better choice if the pouch will be near young children. Use black yarn or embroidery thread to make a small satin-stitch oval covering about 2 sts × 2 rounds in the same position (R23/R24, sts 12 and 36). Add a single white straight stitch as a highlight.
How do I make it longer or shorter?
Add or remove full tiers (a mesh round plus a scale round) between R11 and R20. Each tier changes the length by about 1.8 cm (0.7 in). The stitch count stays at 24 V’s and 12 scales, so nothing else in the pattern changes.
Why are my scales pointing sideways instead of down?
Usually the posts were worked in the wrong order, or the scale was worked around only one post. Every scale must go down the first dc of its V and up the second, with a ch 1 between them at the bottom.