Crochet Spiral Christmas Tree Pattern — Free Amigurumi Holiday Décor
Amigurumi Pattern · Christmas Décor · Easy-to-Intermediate · Tabletop Tree
📖 B. Introduction
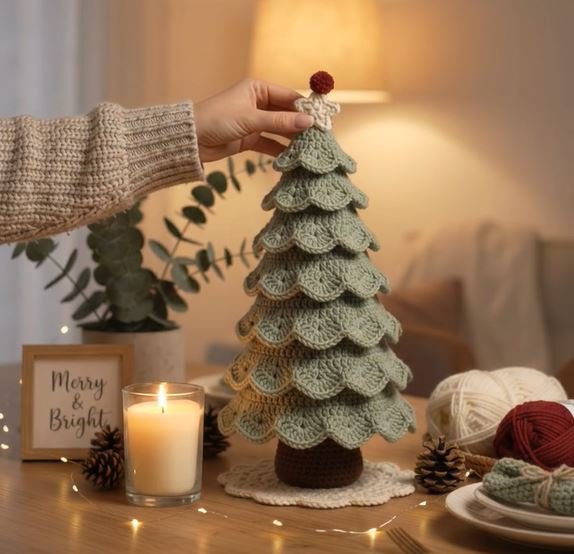
This crochet spiral Christmas tree is a stuffed, tabletop-sized evergreen wrapped from base to tip in a ruffled, layered spiral. Worked in Olive Green with a Walnut Brown pot and a tiny star on top, it stands about 10 inches (25 cm) tall and looks right at home between a candle and a string of fairy lights.
The appeal is the silhouette. Instead of stacked, separate tiers, the ruffle winds continuously around a slim cone, so each turn overlaps the one below and the whole tree reads as one flowing, swirled shape. It is a far more sculptural centerpiece than a typical flat crochet ornament, yet it is built from nothing harder than single crochet and increases.
It suits a mantel, a dining table, an entryway console, or a shelf, and a small group in different greens makes a “forest” display. It also makes a thoughtful handmade gift, a host present, a craft-fair item, or a keepsake you pull out every December. Because it is stuffed and weighted, it stays upright without a stand.
The details that make it recognizable: a tapered cone with a subtly textured surface, a wavy ruffle strip that is deepest at the base and narrows toward the tip, a rounded brown pot, and a flat little crochet star. In this pattern the ruffle is made as one long tapered strip and sewn on in a spiral, which gives you full control over how the layers overlap.
Personalize it freely: try forest, sage, or emerald green, add a white “snow” edging, pick a gold star, work it in a thinner yarn for a miniature version, or tuck tiny beads in among the ruffles as ornaments. Everything below is original design work, and the finished size and stitch counts were designed to be consistent from start to finish.
🔍 C. Main Pattern Overview
You will make four parts: the pot (Walnut Brown), the cone (Olive Green), the spiral ruffle strip (Olive Green), and two stars (Olive Green). Everything is crocheted in a size 3.5 mm hook with worsted-weight yarn at a tight amigurumi tension.
The construction in brief:
- Crochet the pot in the round, stuff it, and weight it.
- Crochet the cone from the tip down, stuffing as you go.
- Crochet one long flat ruffle strip that is deep at one end and shallow at the other.
- Sew the strip around the cone in a rising spiral.
- Make two stars, sew them together, and attach them to the tip.
- Sew the cone to the pot.
Expect about 4–6 hours total for an experienced crocheter, mostly the long ruffle strip and the sewing.
📌 Save it for later: [Email capture placeholder: “Print this pattern or subscribe to get new holiday patterns in your inbox.”]
🎯 D. Skill Level
Easy to intermediate. The stitches are basic, but the project asks for tight tension, careful stuffing, and patient hand-sewing of a long strip.
Techniques used:
- Magic ring and working in continuous rounds
- Single crochet, increases, half double crochet, slip stitch
- Working in the back loop only to form a pot edge
- Working flat rows with a foundation chain
- Short-row-style tapering (stopping rows early)
- Whip stitch and mattress-style seaming
- Firm stuffing and weighting for stability
📏 E. Finished Size
- Height (pot to star tip): approximately 10 in (25 cm)
- Pot: approximately 2.7 in (7 cm) wide, 1.7 in (4.5 cm) tall
- Cone only: approximately 7 in (18 cm) tall
- Width at the widest ruffle: approximately 6–6.5 in (15–16.5 cm)
- Star: approximately 1.3 in (3.3 cm) across
Size will change with yarn weight, hook size, your tension, and how firmly you stuff. A thinner yarn with a smaller hook gives a miniature tree; a bulkier yarn with a larger hook gives a taller one and will use more yarn.
🧮 F. Gauge
Gauge is not critical for amigurumi. A dense, even fabric matters more than hitting an exact swatch, because it keeps stuffing from showing and helps the ruffle hold its shape.
For reference, the designer’s gauge was approximately 5 sc = 1 in (2.5 cm) and 5.5 rounds = 1 in with a 3.5 mm hook and worsted yarn. If your fabric is looser, drop one hook size.
🧶 G. Required Yarn Amounts
All amounts are approximate and based on worsted-weight yarn.
| Color | Used for | Approximate amount |
|---|---|---|
| 🧵 Olive Green | Cone, ruffle strip, 2 stars | 270 yd (250 m) |
| 🧵 Walnut Brown | Pot | 55 yd (50 m) |
| Polyester fiberfill | Cone and pot | About 2 oz (60 g) |
Total yarn: approximately 325 yd (300 m). Buy a little extra Olive Green, since the strip is long and tails add up.
🧰 H. Materials
- 3.5 mm (US E/4) crochet hook
- Worsted-weight yarn in Olive Green and Walnut Brown (see amounts above)
- Polyester fiberfill
- Yarn needle
- Scissors
- Stitch markers (at least 2)
- Sewing pins
- Optional: a small pouch of poly pellets or a bag of dry rice sealed inside a fabric or nylon pouch, for weighting the pot
- Optional: a 1/4 in (6 mm) wooden dowel, about 8 in (20 cm) long, trimmed to fit, for an extra-sturdy core
⚠️ Safety note: This is a decorative piece, not a toy. If you use pellets or a dowel, keep them fully enclosed, and keep the finished tree away from small children and pets.
🛍️ Supplies We Recommend: a 3.5 mm hook with an ergonomic handle, two skeins of worsted yarn in green and brown, and a bag of polyester fiberfill. [Placeholder: insert your affiliate links here.]
<!– AD SLOT: post-materials –>
🔤 I. Abbreviations — US Terms
| Abbreviation | Meaning |
|---|---|
| R | Round |
| MR | Magic ring |
| ch | Chain |
| sc | Single crochet |
| hdc | Half double crochet |
| sl st | Slip stitch |
| inc | Increase (2 sc in the same stitch) |
| BLO | Back loop only |
| st(s) | Stitch(es) |
| ( ) x6 | Repeat the instructions in parentheses the stated number of times |
| (6) | Total stitch count at the end of the round or row |
📝 J. Notes Before You Begin
- Rounds are worked in a continuous spiral (no joining) unless a step says otherwise. Use a stitch marker in the first stitch of each round and move it up as you go.
- Row format: Rounds are written as R1, R2, and so on. The ruffle strip is flat and uses “Row 1, Row 2.”
- Tension: Crochet tightly. Gaps will show the fiberfill and make the cone floppy.
- Stuffing: Stuff firmly in small pieces as you go. The cone must be dense enough to hold the weight of the ruffle.
- Sewing tails: Leave a long tail (about 12 in / 30 cm) on the cone, the ruffle strip, and each star.
- Design choices: The number of ruffle turns, the taper steps, and the round counts are original design decisions that were chosen for a balanced, readable spiral. If your tree comes out shorter or taller than stated, simply add or remove plain rounds in the cone and adjust the spiral spacing when sewing.
- Color names: “Olive Green” and “Walnut Brown” are used throughout. Substitute any two colors.
🪡 K. Complete Pattern
🔔 Pot (Make 1)
Purpose: the weighted base that keeps the tree upright. Yarn: Walnut Brown.
R1: MR 6. (6) R2: inc around. (12) R3: (1 sc, inc) x6. (18) R4: (2 sc, inc) x6. (24) R5: (3 sc, inc) x6. (30) R6: (4 sc, inc) x6. (36) R7: (5 sc, inc) x6. (42) R8: BLO, sc around. (42) R9–R16: sc around. (42) 8 rounds
Sl st in the next stitch and fasten off, leaving a 12 in (30 cm) tail for sewing. Stuff the pot: place the weighted pouch at the bottom, if using, then fill the rest firmly with fiberfill so the top is slightly domed. The BLO in R8 creates a defined edge where the base meets the sides.
🎄 Cone (Make 1)
Purpose: the stuffed core of the tree. Yarn: Olive Green. Worked from the tip down.
R1: MR 6. (6) R2: inc around. (12) R3–R7: sc around. (12) 5 rounds R8: (1 sc, inc) x6. (18) R9–R13: sc around. (18) 5 rounds R14: (2 sc, inc) x6. (24) R15–R19: sc around. (24) 5 rounds R20: (3 sc, inc) x6. (30) R21–R25: sc around. (30) 5 rounds R26: (4 sc, inc) x6. (36) R27–R31: sc around. (36) 5 rounds R32: (5 sc, inc) x6. (42) R33–R38: sc around. (42) 6 rounds
Sl st in the next stitch and fasten off, leaving a 12 in (30 cm) tail. Stuff firmly as you work, and top up again before finishing. If you are using the dowel, hold it in the center of the cone while you stuff around it.
💡 Pro tip: Increase rounds are spaced every sixth round, so the cone tapers gently. This is what lets the spiral overlap evenly.
🌲 Spiral Ruffle Strip (Make 1)
Purpose: the layered ruffle that wraps the cone. Yarn: Olive Green. Worked flat.
Think of the strip as having a wide end (W), which goes at the bottom of the tree, and a narrow end (N), which goes at the top. Row 1 starts at W and ends at N. Rows 3, 5, and 7 start at W; rows 2, 4, 6, and 8 start at the other end and finish at W.
Foundation: ch 161. Row 1: sc in 2nd ch from hook and in each ch across. (160) Row 2: ch 1, turn. (1 sc, inc) x80. (240) Row 3: ch 1, turn. Sc in first 200 sts; turn, leaving the last 40 sts unworked. (200) Row 4: ch 1, turn. Sc in each st across. (200) Row 5: ch 1, turn. Sc in first 160 sts; turn, leaving the last 40 sts unworked. (160) Row 6: ch 1, turn. Sc in each st across. (160) Row 7: ch 1, turn. Sc in first 120 sts; turn, leaving the last 40 sts unworked. (120) Row 8: ch 1, turn. Sc in each st across. (120)
Fasten off and leave a long tail (about 24 in / 60 cm) at W. Weave in the other tail.
⚠️ Check: Row 2 is the ruffle row. Row 1 has 160 sts and Row 2 has 240, which is what makes the outer edge wavy. All later rows keep that wavy edge, so don’t skip the increase row.
The strip should look like a wedge: eight rows deep at the W end and only two rows deep at the N end.
⭐ Star (Make 2)
Purpose: the topper. Yarn: Olive Green.
R1: MR 10 sc, sl st to first sc to join. (10)
Points (work 5 times around, using all 10 stitches): ch 4. Starting in the 2nd ch from hook: sl st, sc in next ch, hdc in next ch. Then sl st in each of the next 2 sts of R1.
Repeat for a total of 5 points. Sl st in the first st, fasten off, and weave in the ends. Make a second star the same way.
Hold the two stars with wrong sides together and whip stitch around the edge, stuffing lightly with fiberfill before closing.
🎨 L. Styling / Assembly / Stability / Final Shaping
🎀 Recommended Assembly Order
- Stuff the pot and weight it, if using a pouch.
- Stuff the cone, adding the dowel if desired.
- Sew the cone to the pot.
- Pin the ruffle strip to the cone in a spiral.
- Sew the strip down.
- Sew the two stars together, then attach to the tip.
🔔 Cone to Pot
Press the cone’s open edge (42 sts) against the top of the pot (42 sts). Line up the stitch markers, pin, and whip stitch all the way around with the cone tail. If using the dowel, press its end into the fiberfill in the pot before you close the seam. Check the tree stands straight before moving on.
🌲 Attaching the Spiral
- Place the W end (wide end) of the strip near the bottom of the cone, just above the pot seam. Make sure the ruffle edge faces down and outward.
- Pin the foundation-chain edge of the strip around the cone, rising steadily about 6 rounds per full turn. Over the whole strip you should get roughly six turns, finishing near the top.
- Whip stitch along the foundation-chain edge with the long tail, catching the cone’s stitches every 2–3 stitches.
- If your strip finishes a little short or long, ease the spacing between turns slightly rather than stretching the strip.
- Let the ruffled edge flare out and droop slightly. The turns should overlap, hiding the sewn line.
⭐ Star
Sew the stars’ center to the tip of the cone with several firm stitches. Angle one point slightly upward for a natural look.
Stability
- Weighting the pot is the most effective way to keep the tree from tipping.
- A firmly stuffed cone and the optional dowel help prevent leaning.
- Test the balance on a flat table. If it leans, add a little more weight to the pot’s low side.
Final Shaping Checklist
- ✅ Cone is stuffed firmly with no lumps
- ✅ Cone is centered and straight on the pot
- ✅ Spiral turns are evenly spaced
- ✅ Ruffles overlap and hide the seam
- ✅ Star is centered and secure
- ✅ All ends are woven in
- ✅ Tree stands without leaning
💡 M. Helpful Crochet Tips
- 💡 Count the strip. With 160 and 240 stitches, it is easy to lose count. Place a stitch marker every 40 stitches in Rows 1 and 2.
- 💡 Wind your yarn early. The strip uses a lot of Olive Green, so start with a fresh skein and avoid joining mid-strip.
- 💡 Keep the increase row even. Spread the increases consistently so the ruffle waves evenly instead of bunching.
- 💡 Stuff the tip first. The narrow tip is difficult to stuff once it is closed in. Use small pieces and a chopstick.
- 💡 Use pins generously. Pin the whole spiral before you sew a single stitch, then step back and check spacing.
- 💡 Sew with a matching tail. Use Olive Green and stitch inside the ruffle’s shadow so the seam disappears.
- 💡 Tweak the taper. If you want a more dramatic ruffle at the base, add two more rows at W only, but keep the stopping points consistent.
- 💡 Make a mini tree. Use fingering-weight yarn and a 2.5 mm hook for a smaller version, and keep all stitch counts the same.
- 💡 Dress it up. Add a few tiny beads or sequins sewn to the ruffles after assembly for a sparkling look.
🧼 N. Care Instructions
Spot clean with a damp cloth and mild soap. If the tree is made of washable acrylic, you can hand wash it, but a weighted pot with pellets or a dowel should never be submerged. Air dry fully away from heat. Store in a cool, dry place away from direct sunlight, and keep it in a box or bag to protect the ruffles from crushing. Dark green and brown yarns can bleed when wet, so test for colorfastness first.
Closing
A handmade tree like this becomes part of a family’s holiday routine. Set it on the table in the first week of December, light a candle beside it, and let the ruffled spiral catch the glow. Make one in classic green, another in white or sage for a frosted look, and add a gold star for a bit of sparkle. It will keep its shape year after year with gentle care, and it makes a gift people actually keep.
When you finish your version, I would love to see it.
Post-Article Engagement & Distribution
Share the Love: If you enjoyed this pattern, please pin it, share it with a crochet friend, and tag your finished tree on social media.
Suggested categories: Amigurumi Patterns · Christmas Crochet · Home Décor · Free Patterns
Suggested tags: crochet Christmas tree, spiral tree pattern, amigurumi tree, free crochet pattern, holiday crochet, tabletop Christmas décor, crochet décor, Christmas amigurumi, ruffle tree, beginner amigurumi, handmade Christmas gift, stuffed crochet tree
Comment invitation: What color will you make your spiral tree in, and will you add ornaments or keep the ruffles plain?
You Might Also Like:
- Crochet Mini Pine Tree Ornament Pattern
- Crochet Candle Cozy Pattern
- Amigurumi Snowman Pattern
- Crochet Christmas Star Garland Pattern
- Crochet Gnome Pattern for the Holidays
Printable/PDF: A print-friendly or PDF version can be offered through a print plugin. [Placeholder: add your download link.] <!– AD SLOT: pre-faq –>
❓ R. FAQ
How tall is this crochet spiral Christmas tree? About 10 in (25 cm) with the star, using worsted yarn and a 3.5 mm hook.
What yarn should I use for a crochet Christmas tree? Worsted-weight cotton or acrylic works well. Choose a yarn with some body, since softer, drapier yarns can make the ruffle sag.
Can I make it a different size? Yes. Use thicker yarn and a larger hook for a bigger tree, or thinner yarn and a smaller hook for a mini tree. The stitch counts stay the same.
Do I need to weight the pot? It is recommended, especially for a tall tree. A small pouch of poly pellets or sealed rice makes it much more stable.
How do I keep the ruffle from looking messy? Keep your increases evenly spaced in Row 2 and pin the strip in place before sewing.
Is it suitable for beginners? It is beginner-friendly if you are comfortable with single crochet and increases. The most challenging part is the long strip and the sewing.
How long does it take to make? Around 4–6 hours, depending on your speed and experience.