Crochet Pine Tree Ornament — A Free Terraced Pine Pattern for Your Tree
Amigurumi Pattern · Holiday Décor · Beginner-Friendly
📖 Introduction
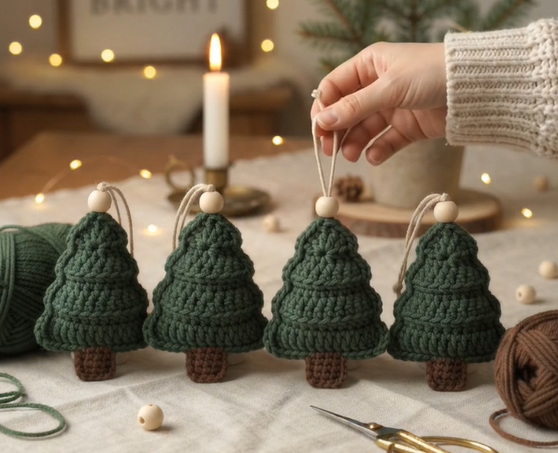
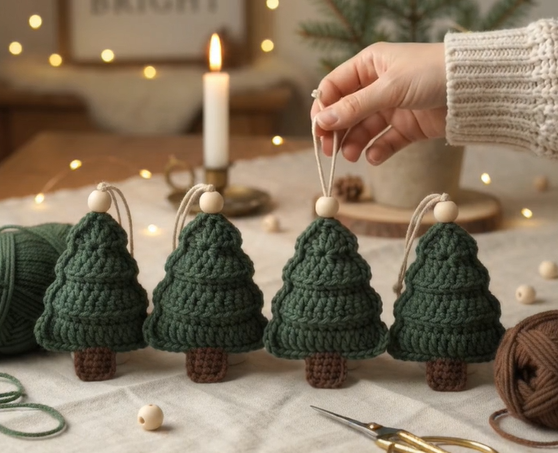
This crochet pine tree ornament turns a handful of stitches into a tiny forest — a stacked, terraced little conifer with a stitched bark trunk, a rounded point at the top, and a jute hanging loop finished with a natural wood bead. It’s the kind of piece that looks like it took an evening of careful carving, but it’s built entirely from single crochet worked in continuous rounds, with four stepped “flare” rounds doing all the work of the silhouette.
The appeal here is scale and repetition. A single tree is a sweet stocking stuffer or a place-card holder tucked among sprigs of real greenery, but this pattern earns its keep when you make a small stand of them — three, five, or a dozen — clustered on a mantel, strung along a garland, or bundled into a jar as a hostess gift. Because the shape is built from simple increase math rather than complicated shaping, a batch comes together quickly once you’ve made your first one and know the rhythm of the flare rounds.
Visually, the design leans on texture rather than embellishment. Each tier ends in a distinct horizontal ridge where the increase round sits, so the finished tree reads as a series of stacked branches even though it’s worked as one continuous piece with no seams between tiers. The trunk is a short, dense brown cylinder that gives the ornament a flat, stable base — these trees are sturdy enough to stand upright on a shelf, not just hang from a branch. A wooden bead and jute cord finish the top, echoing the natural, unbleached materials that make farmhouse and Scandinavian-style holiday styling feel current.
Personalizing the design is straightforward. Swap the forest-green main color for a frosted sage, a deep spruce blue-green, or even white for a “snow tree” version, and switch the jute for baker’s twine or narrow ribbon if you want a dressier finish. Working the whole pattern one hook size up in a bulky yarn scales the same terraced shape into a taller centerpiece tree; going down a hook size in a fine cotton produces a miniature version small enough for a charm bracelet or a dollhouse mantel.
Throughout this pattern, “tree” refers to the green cone body and “trunk” refers to the short brown base piece — the two are crocheted separately and sewn together at the end.
Affiliate Disclosure: This post may contain affiliate links. If you make a purchase through one of these links, this site may earn a small commission at no extra cost to you. Thank you for supporting the patterns and tutorials shared here.
🔍 C. Main Pattern Overview
You’ll crochet two pieces — the tiered tree body and the short trunk — both worked in continuous spiral rounds with basic single crochet and increases. The tree’s terraced look comes from four “flare rounds,” each spaced apart by plain rounds, so the piece steps gradually outward from a pointed tip to a wide base. Stuffing happens as you go rather than all at once at the end, which keeps the tiers from collapsing into each other. Once both pieces are complete, you sew the trunk to the base of the tree, then add a jute loop finished with a wooden bead through the top point.
📌 Want to save this for later? Tap your platform’s save or pin button now — the full round-by-round pattern is below.
🎯 D. Skill Level
Easy. This pattern is friendly to a confident beginner who has made at least one amigurumi-style project worked in continuous rounds, since there’s no written-out row counting or fitted shaping — just consistent increase rounds and a bit of sewing at the end.
Techniques used:
- Magic ring (adjustable ring) start
- Single crochet (sc) worked in continuous spiral rounds
- Standard increase (2 sc in one stitch)
- Reading and executing stitch counts at the end of each round
- Firm, progressive stuffing
- Whip-stitch seaming (attaching the trunk)
- Attaching a cord-and-bead hanging loop
📏 E. Finished Size
Approximately 7 cm tall × 5.5 cm wide at the base (2.75 in × 2.25 in), not including the hanging loop. With the jute loop attached, the total hang length is roughly 10 cm (4 in).
Size is easily adjusted:
- Yarn weight: Switching to a bulky-weight yarn with a larger hook produces a noticeably taller, chunkier tree; a fine sport-weight yarn with a smaller hook shrinks it toward miniature/charm size.
- Hook size relative to yarn: Using a smaller hook than usual for your yarn weight tightens the stitches and produces a denser, slightly smaller tree with crisper ridges.
- Stuffing density: Firmer stuffing rounds out the tiers and adds a little height and width; lighter stuffing gives a softer, slightly flatter silhouette.
- Number of flare rounds: Adding a fifth flare round (repeating the plain-round-then-flare sequence once more before the final base rounds) makes a taller, more dramatic tree.
🧮 F. Gauge
Exact gauge isn’t critical for this ornament — consistent, fairly tight tension matters more than matching a swatch measurement, since the goal is a firm little shape that holds its silhouette rather than a garment that needs to fit. As a reference point, this sample was worked at approximately 4 sc and 4 rounds = 2.5 cm (1 in) using a 3.5 mm (E/4) hook with worsted-weight yarn. If your stitches look loose enough to show stuffing through the fabric, drop down a hook size.
🧶 G. Required Yarn Amounts
🧵 Quantities below are approximate and generous — a single skein of each color will make several ornaments.
| Color | Approximate Amount (per tree) |
|---|---|
| Main color (forest/pine green) — tree body | ~12–15 g / 25–30 m |
| Contrast color (brown) — trunk | ~2–3 g / 4–6 m |
| Total per ornament | ~15–18 g / 30–36 m |
A single 100 g skein of worsted-weight green comfortably yields 6–8 trees, and one small skein or leftover ball of brown is enough for a dozen or more trunks.
🧰 H. Materials
- 3.5 mm (US E/4) or 3.75 mm (US F/5) crochet hook (adjust to achieve a fairly tight, firm fabric)
- Worsted-weight (medium, US #4) yarn in forest/pine green (main color)
- Small amount of worsted-weight yarn in brown (trunk)
- Polyester fiberfill stuffing
- Tapestry/yarn needle for sewing and weaving in ends
- Stitch marker (to track the start of each round)
- 1 wooden bead, approximately 8–10 mm, with a hole large enough for doubled cord
- Approximately 15 cm (6 in) of jute twine or cotton cord, per ornament
- Straight pins (optional, for holding the trunk in place while sewing)
- Sharp scissors
⚠️ Small parts note: The wooden bead and firmly-stuffed small pieces are not appropriate for young children or pets. If making these for a household with either, omit the loose bead and instead crochet or braid a closed loop, and check stuffing seams periodically for wear.
🛍️ Supplies We Recommend: a size E/4 (3.5mm) or F/5 (3.75mm) hook, a worsted-weight acrylic or cotton-blend yarn in a true forest green, a small ball of brown yarn for the trunk, and 8–10mm natural wood beads. (Site owner: insert affiliate links to specific products here.) <!– AD SLOT: post-materials –>
📌 Save this pattern before you scroll — you’ll want it handy at your hook.
🔤 I. Abbreviations — US Terms
| Abbreviation | Meaning |
|---|---|
| ch | chain |
| sc | single crochet |
| inc | increase (2 sc worked into the same stitch) |
| MR | magic ring |
| st(s) | stitch(es) |
| rnd(s) | round(s) |
| ( ) | repeat instructions inside parentheses the stated number of times |
| [ ] | total stitch count at the end of the round |
📝 J. Notes Before You Begin
- The entire tree and trunk are each worked in continuous spiral rounds — do not join or turn unless a step specifically says to. Place a stitch marker in the first stitch of each round and move it up as you go so you always know where a round begins and ends.
- Stuff the tree as you go, not all at once at the end. Add fiberfill in small pinches starting around Round 7, pushing it firmly into the point of the tree first, then topping up after each subsequent flare round. This keeps the terraced tiers from caving inward.
- When a round says “sc around,” work one single crochet into every stitch of the previous round with no increases or decreases.
- Fasten off means: cut the yarn, leaving a long tail (roughly 20–25 cm / 8–10 in) for the tree body and trunk, and pull the tail through the last loop to secure it.
- Color changes in this pattern happen only between the tree and the trunk, which are worked as two entirely separate pieces and sewn together — there are no color changes within a single piece.
🪡 K. Complete Pattern
🔔 Tree Body (Make 1)
Worked in continuous rounds in the main color (green). Do not join rounds unless noted.
R1: MR 6 sc into ring. (6)
R2: inc around. (12)
R3: sc around. (12)
R4: (sc, inc) x6. (18)   ← Tier 1 flare
R5: sc around. (18)
R6: sc around. (18)
R7: (2 sc, inc) x6. (24)   ← Tier 2 flare — begin stuffing lightly, starting at the point
R8: sc around. (24)
R9: sc around. (24)
R10: (3 sc, inc) x6. (30)   ← Tier 3 flare — add more stuffing
R11: sc around. (30)
R12: sc around. (30)
R13: (4 sc, inc) x6. (36)   ← Tier 4 flare (final, widest tier)
R14: sc around. (36)
R15: sc around. (36) — stuff firmly to the brim, then fasten off leaving a 20–25 cm tail.
💡 The four flare rounds (R4, R7, R10, R13) are what create the stepped, terraced silhouette — each one is worked one stitch-group wider than the last, so the increases land in a spiral rather than stacking directly on top of one another, giving a slightly organic, branch-like stagger rather than a perfectly symmetrical cone.
🪵 Trunk (Make 1)
Worked in continuous rounds in the contrast color (brown).
R1: MR 6 sc into ring. (6)
R2: sc around. (6)
R3: sc around. (6)
R4: sc around. (6) — fasten off leaving a 15–20 cm tail.
Stuff the trunk lightly — just enough to keep its cylindrical shape without making it rigid; it needs to sit flush against the base of the tree once sewn on.
🎨 L. Styling / Assembly / Stability / Final Shaping
Assembly order:
- Close the treetop, if needed. The magic ring at Round 1 should already be pulled snug; if there’s any gap at the very tip, take a small stitch through it with the fastening-off tail before moving on.
- Position the trunk. With the tree’s final round (R15) facing down, center the trunk’s open end (its Round 4 edge) against it. Pin in place if it helps you keep it centered while you sew.
- Sew the trunk to the tree. Using the trunk’s tail and a whip stitch, sew around the full circumference where the trunk meets the tree base, matching stitch-for-stitch as closely as possible. Weave in the tail through the trunk’s stuffing and trim.
- Check the stand. Set the ornament down on a flat surface. It should sit upright without tipping. If it leans, add a small amount of extra stuffing to the trunk through any gap before the seam is fully closed, or gently reshape the base tiers with your fingers.
- Attach the hanging loop. Fold the jute cord in half and thread the folded end through the wood bead, then tie an overhand knot close to the bead so it sits snugly at the loop’s base. Thread the two tail ends onto a tapestry needle and stitch through the very tip of the tree (Round 1), knotting securely on the inside before trimming the ends short, or tucking them down into the stuffing.
- Final shaping. With the tree fully assembled, gently roll each tier between your fingers to even out the stitch definition and make sure the ridge at each flare round reads clearly as a distinct step.
Stability notes: Because the base tier (Round 13–15) is the widest part of the tree and the trunk adds a flat footprint, these ornaments are stable enough to display standing up, not just hanging — firm stuffing in the trunk and the bottom two tiers is what makes that possible, so don’t skimp on fill in that area.
✅ Final Shaping Checklist
- ✅ Treetop point is closed with no visible gap
- ✅ All four flare-round ridges are visible and evenly spaced
- ✅ Trunk is centered and sewn flush with no gaps at the seam
- ✅ Tree stands upright unassisted on a flat surface
- ✅ Hanging loop is securely knotted at the wood bead
- ✅ All yarn tails are woven in and trimmed
- ✅ Stuffing is firm with no soft or collapsed sections
💡 M. Helpful Crochet Tips
- 💡 Stuff the point of the tree (Rounds 1–3) before you’ve even worked Round 4 — it’s much harder to push fiberfill up into a narrow tip once the tiers below it are already stuffed and closed off.
- 💡 Use a stitch marker religiously. Because there’s no join between rounds, it’s easy to lose track of where a flare round starts, and a flare round worked one stitch off will throw the whole stitch count out by the time you fasten off.
- 💡 If your flare rounds are making the tree flare too sharply and the tiers look “ruffled” rather than gently stepped, try adding one extra plain sc round between each flare round.
- 💡 Whip-stitch the trunk on with the working yarn doubled if your yarn is thin — it keeps the seam from stretching open under the weight of the stuffed tree.
- 💡 Steam-block the finished tree lightly (hold a steaming iron a few centimeters above the surface, never touching) to relax any curling at the tiers and help the ridges sit flatter and more defined.
- 💡 If you want a “frosted” look, work a single strand of white or ivory yarn held together with the green for just the last two flare rounds (R10–R15) before switching back to solid green — it mimics a light dusting of snow on the lower branches.
- 💡 Keep your fastening-off tails long (as instructed) even if it feels excessive — you’ll use every centimeter sewing the trunk on neatly.
- 💡 Batch the trunks. Since the trunk is only 4 rounds, crochet several in a row before switching back to green — it’s faster than alternating colors piece by piece.
🧼 N. Care Instructions
These ornaments are best treated as spot-clean, display-only pieces rather than washable textiles. Dust gently with a soft, dry brush or a low setting on a handheld vacuum brush attachment. If a small stain needs attention, dab — don’t soak — with a barely damp cloth and mild soap, then reshape the tiers by hand and let the piece air-dry fully before storing or displaying, since damp fiberfill can mildew if sealed away too soon. Because the trunk color is dark and the tree body is light, avoid soaking the two together to prevent any dye transfer at the seam. Store finished ornaments flat or upright in a box between seasons, out of direct sunlight, which can fade the green over time, and away from significant humidity, which can loosen the glue in some wood beads.
Closing
A little stand of these terraced pine trees does more for a mantel or a table runner than a single showpiece ornament ever could — there’s something about the repetition of the tiers, multiplied across four or five trees of slightly varying heights, that reads as an actual miniature forest rather than a single craft object. Keep a few in solid forest green for the classic look, work a couple in a frosted sage or icy blue-green for contrast, and let the wood beads and jute cord do the rest of the styling work. They pack flat for storage, they travel well as gifts, and once you’ve made the first one, a second and third come together fast. Make a set, give a few away, and keep the tallest one for yourself.
Share the Love
If you make a set of these, snap a photo of your little forest and tag it — seeing your color combinations and styling is one of the best parts of sharing a pattern.
Suggested categories: Amigurumi & Softies · Holiday & Seasonal · Home Décor · Ornaments & Garlands
Suggested tags: crochet Christmas tree, amigurumi pine tree, crochet ornament pattern, farmhouse Christmas décor, crochet pine tree, easy holiday crochet, jute and wood ornament, crochet tree ornament free pattern, beginner amigurumi Christmas, terraced crochet tree, crochet stocking stuffer, mini crochet tree, Scandinavian Christmas décor, crochet holiday gift
Join the conversation: What colorway are you making your first tree in — classic forest green, a frosted neutral, or something unexpected? Drop a comment and let me know how many you’re planning to make.
You Might Also Like:
- Crochet Pinecone Garland
- Mini Crochet Wreath Ornament
- Stacked Crochet Gnome with Removable Hat
- Crochet Star Tree Topper
- Textured Crochet Snowball Ornament Trio
❓ R. FAQ
Can I use a different weight of yarn? Yes. This pattern is written for worsted weight, but it scales well — a bulky yarn with a larger hook makes a taller centerpiece tree, and a lighter sport or DK weight with a smaller hook produces a miniature ornament, as long as you adjust hook size to keep the fabric fairly dense.
What hook size should I use for a crochet Christmas tree ornament? For worsted-weight yarn, a 3.5 mm (E/4) or 3.75 mm (F/5) hook gives the firm, gap-free fabric this pattern needs so stuffing doesn’t peek through between stitches.
Do I need to use safety eyes or any special hardware? No — this design has no face or joints, so the only hardware is the optional wood bead on the hanging loop, which is easy to omit or swap for a fabric loop if you’d rather skip it.
Why is my tree flaring out too much or looking lopsided? Usually this comes from the increase round starting in a slightly different spot each time. Keep a stitch marker in the very first stitch of every round so each flare round begins in a consistent position relative to the one before it.
Can I make this without a stitch marker? You can, but it’s much easier to lose your place in a continuous-round pattern without one — a scrap of contrasting yarn looped through the first stitch works fine if you don’t have a locking marker on hand.
Is this pattern safe for a child’s room or a pet-friendly house? The wood bead and the firmly stuffed pieces make this better suited to display than to hands-on play. For a child’s space, omit the loose bead, use a sewn or crocheted closed loop instead of tied cord, and check the trunk seam periodically for wear.
How long does one ornament take to make? Most crocheters finish a single tree, including the trunk and finishing, in about 45–60 minutes once they’re comfortable with continuous rounds — batching several trunks or bodies at once speeds up a full set.
Can I felt or block this pattern? Light steam-blocking (held above the surface, not pressed directly on it) helps the tiers sit flat and crisp; full wet-felting isn’t necessary or recommended, since it can distort the terraced shape.