Christmas Stocking Crochet Table Runner Pattern (Free)
Crochet Pattern · Christmas Home Décor · Intermediate · Lace & Appliqué
📖 Introduction
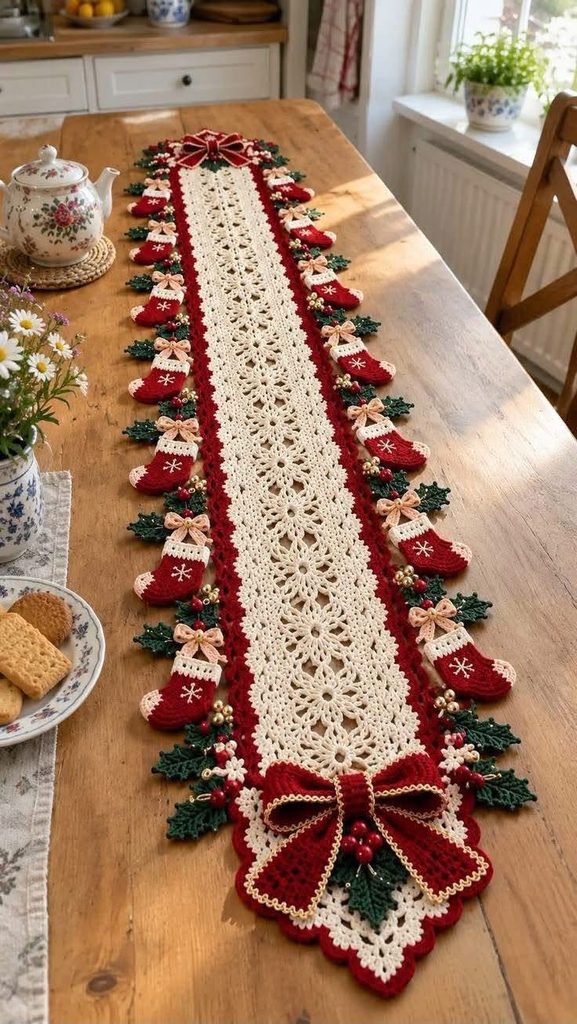
This Christmas stocking crochet table runner is a cream fan-lace panel framed in cherry red and lined on both sides with 22 tiny red stockings. Each stocking wears a cream cuff, a stitched snowflake, and a blush-pink bow. Between the stockings sit sprigs of holly leaves, red berries, and gold beads, and a big red bow trimmed in metallic gold anchors the end.
The lace panel is quick and rhythmic. It repeats just two rows, so you can work it while watching a movie. The detail work is where the runner earns its place on the table. The stockings, holly, and bows are small pieces you can make in batches over several evenings. That makes this a good project to start in October for a holiday dinner or Christmas morning brunch.
It suits a dining table, sideboard, mantel, or entryway console. It also makes a lasting gift for a host, a grandmother, or a new home. It works well as a craft-fair item too, since you can sell it as a set with matching coasters or a mini runner (see the variations in the Overview).
Personalizing it is easy. Swap the cherry red for forest green or navy. Use ivory stockings with silver beads for a winter-white look. Add or remove stockings to fit a shorter table. Replace the blush bows with plaid ribbon.
🔍 Main Pattern Overview
The runner is built in five stages:
- Lace panel. A cream fan-shell strip, worked flat from one end to the other.
- Red border. Three rounds of red: two of single crochet and one of reverse single crochet.
- Appliqués. 22 stockings, 22 mini bows, 44 holly leaves, 44 berries, and 4 blossoms, all made separately.
- Big bows. One large bow for the bottom end and one small bow for the top, both trimmed in gold.
- Assembly. Everything is sewn on after the panel is blocked.
Design choices (not copied from any source):
- The lace is an original two-row fan-shell repeat.
- The ends are straight rather than flared.
- Stockings are worked flat, which keeps them crisp and light.
- The reference’s floral lace is approximated with scallop shells.
Variation ideas:
- Work 4 repeat pairs (8 rows) fewer for each inch you want to remove.
- For a mini runner or placemat, work about 25 rows and use 4 stockings per side.
🎯 Skill Level
Intermediate. The stitches are basic, but there are many small parts and some precise placement.
Techniques involved:
- 🧵 Foundation chain and turning rows of sc and dc
- 🧵 Fan-shell lace with consistent stitch counts
- 🧵 Evenly spaced edging with corner increases
- 🧵 Color change at the end of a row
- 🧵 Mattress and whip stitching, plus surface embroidery
- 🧵 Sewing on beads
📏 Finished Size
| Metric | Imperial | |
|---|---|---|
| Lace panel (before border) | 18.5 × 100 cm | 7¼ × 39½ in |
| Runner with border | 21.5 × 104 cm | 8½ × 41 in |
| Width including stockings | about 34 cm | about 13½ in |
| Length including end bows | about 112 cm | about 44 in |
| Each stocking | about 7 × 6 cm | about 2¾ × 2½ in |
| Large bow | about 18 cm wide | about 7 in wide |
Size changes with yarn weight, hook size, blocking tension, and the number of repeats. Check your length after about 40 rows and add or remove repeat pairs to fit your table.
🧮 Gauge
Exact gauge is not critical for the appliqués, but the lace panel’s width depends on it.
- Single crochet swatch: about 20 sts × 22 rows = 4 in (10 cm) with a 3.5 mm hook.
- Lace panel: 37 sts measure about 7¼ in (18.5 cm) when blocked.
- Lace length: each two-row repeat (one dc-shell row plus one sc-shell row) should be about ¾ in (2 cm) tall once blocked, roughly 0.6 in (1.5 cm) unblocked. Work a 20-row test strip before committing.
💡 Keep your tension even on the shell rows. Tight shells pull the panel in and make it narrower than 7¼ in.
🧶 Required Yarn Amounts
Approximate yardage, all in DK-weight 100% mercerized cotton unless noted.
| Color | Used for | Approx. yardage | Approx. grams |
|---|---|---|---|
| 🧵 Cream (ecru) | Lace panel, stocking cuffs, snowflakes, blossoms | 650 yd / 595 m | 260 g |
| 🧵 Cherry Red | Border, stockings, berries, bows | 480 yd / 440 m | 190 g |
| 🧵 Holly Green | 44 holly leaves | 150 yd / 137 m | 60 g |
| 🧵 Blush Peach | 22 mini bows | 100 yd / 91 m | 40 g |
| 🧵 Fine gold metallic yarn | Bow trim | 50 yd / 46 m | 10 g |
Total: about 1,430 yd (1,308 m), including gold. Plan on 6 skeins cream, 4 red, 2 green, and 1 blush, using 50 g / ~125 yd skeins. Buy an extra skein of cream and red as insurance.
🧰 Materials
- 3.5 mm (E/4) crochet hook
- Optional 3.0 mm (D/3) hook for the gold trim
- DK cotton in the colors listed above
- Fine gold metallic yarn
- 48 gold seed beads (about 4 mm, size 6/0), plus a beading needle and matching thread
- A small handful of polyester fiberfill for the berries
- Yarn needle, scissors, stitch markers
- Blocking mat, rust-proof T-pins, spray bottle
- Measuring tape
🔤 Abbreviations — US Terms
| Abbr. | Meaning |
|---|---|
| ch | chain |
| sl st | slip stitch |
| sc | single crochet |
| hdc | half double crochet |
| dc | double crochet |
| inc | 2 sc in the same stitch |
| dec | single crochet 2 together |
| rsc | reverse single crochet (crab stitch), worked left to right |
| pic | picot: ch 2, sl st in the stitch just worked |
| MR | magic ring |
| R | round |
| st(s) | stitch(es) |
| FO | fasten off |
| RS | right side |
| x | times |
📝 Notes Before You Begin
- Panel and appliqués are worked flat, turning at the end of each row. Berries are worked in the round without joining, so use a stitch marker.
- Turning chains: In the sc rows, ch 1 does not count as a stitch. In the dc rows, ch 3 counts as the first dc.
- Color change: Switch to the new color at the last yarn-over of the final stitch of the old color.
- Tails: Leave a 6-inch tail on every piece. You will sew with it.
- Stuffing: Berries only. Stuff lightly so they stay round but soft.
- Blocking: Wet-block the finished panel and border flat, pinning to the finished size. Do this before sewing on appliqués.
🪡 Complete Pattern
🧶 Lace Panel (Make 1, cream)
What it is: The center strip. It uses a two-row fan-shell repeat over 37 stitches.
Foundation: ch 38.
Row 1: sc in 2nd ch from hook, skip 2 ch, 5 dc in next ch, skip 2 ch, sc in next ch, repeat to end. (7 sc, 6 shells = 37)
Row 2: ch 3 (counts as dc), turn, 2 dc in first sc. Skip 2 dc, sc in next dc (the center of the shell), skip 2 dc, 5 dc in next sc, repeat 5 times. Skip 2 dc, sc in center dc, skip 2 dc, 3 dc in last sc. (3 dc, 6 sc, 5 shells, 3 dc = 37)
Row 3: ch 1, turn, sc in first dc. Skip 2 dc, 5 dc in next sc, skip 2 dc, sc in next dc, repeat to end. (7 sc, 6 shells = 37)
Repeat Rows 2–3 a total of 66 times, ending with Row 3. That gives 133 rows and about 39½ in (100 cm) of panel. FO and weave in ends.
💡 Count every dc row. Rows 2 and 3 should always total 37 stitches.
🎀 Red Border (Make 1, Cherry Red)
Join red at any corner with a standing sc.
R1: ch 1, sc evenly around. Work 199 sc along each long side (3 sc per two-row repeat, plus 1 at the Row 1 end). Work 37 sc across each short end (one in each stitch of the end row, and one in each chain of the foundation). Work 3 sc in each corner. (199 + 199 + 37 + 37 + 12 = 484)
R2: ch 1, sc in each st around, working 3 sc in the center st of each corner group. (484 + 8 = 492)
R3: ch 1, do not turn. rsc in each st around, join with sl st. FO. (492)
If the border ripples, reduce the long-side count by 2–4 sc per side. If it pulls, add them. Keep the total consistent when sewing on stockings later.
👞 Stockings (Make 22, Cherry Red with Cream cuff)
Cuff (cream).
- Foundation: ch 9.
- Row 1: sc in 2nd ch from hook and across. (8)
- Rows 2–3: ch 1, turn, sc in each st. (8) Change to red at the end of Row 3.
Leg (red).
- Rows 4–9: ch 1, turn, sc in each st. (8)
Foot.
- Row 10: ch 1, turn, sc in each st, ch 5. Turn. (8 sc + 5 ch)
- Row 11: sc in 2nd ch from hook, sc in next 3 ch, sc in each of the 8 sc. (12)
- Rows 12–13: ch 1, turn, sc in each st. (12)
Sole shaping.
- Row 14: ch 1, turn, dec, sc in next 8, dec. (10)
- Row 15: ch 1, turn, dec, sc in next 6, dec. (8)
- Row 16: ch 1, turn, dec, sc in next 4, dec. (6)
FO leaving a tail.
Snowflake: With cream, embroider three straight-stitch spokes crossing at one point, centered on the leg just below the cuff. Six arms, each about ¼ in (6 mm) long.
Left and right sides: The toe points in one direction. Make 11 as written (toes point right when the cuff is at the top). For the other side, flip the stocking over and embroider the snowflake on the face that will show. Sc fabric is nearly reversible.
🎀 Mini Bows (Make 22, Blush Peach)
- Foundation: ch 11.
- Row 1: sc in 2nd ch from hook and across. (10)
- Rows 2–6: ch 1, turn, sc in each st. (10)
FO leaving a long tail. Pinch the center, wrap the tail around 3 times to form a bow, and secure with a few stitches at the back.
🌿 Holly Leaves (Make 44, Holly Green)
- ch 11.
- Side A: sl st in 2nd ch from hook, sc, hdc, dc, (dc, pic), dc, (dc, pic), hdc, sc. (9 sts)
- Tip: 3 sc in last ch. (3)
- Side B (in the unused loops of the chain): sc, hdc, (dc, pic), dc, (dc, pic), dc, hdc, sc. (8 sts) sl st in the base to finish. (1)
Total 21 sts plus 4 pics. FO leaving a tail at the base.
🍒 Berries (Make 44, Cherry Red)
R1: MR 6. (6)
R2: (1 sc, inc) x3. (9)
R3: sc around. (9)
R4: (1 sc, dec) x3. (6)
Stuff lightly. FO, thread the tail through the last 6 stitches, and pull closed.
🌸 Blossoms (Make 4, Cream)
Work in a magic ring: (sc, hdc, dc, hdc, sc) x5 for 5 petals. Pull tight. FO. Sew a gold bead to the center.
🎀 Large Bow (Make 1, Cherry Red)
Loops (make 2):
- ch 31. Row 1: sc in 2nd ch from hook and across. (30)
- Rows 2–8: ch 1, turn, sc across. (30)
- Seam the short ends together into a ring. Flatten with the seam at the center back.
Tails (make 2):
- ch 9. Row 1: sc in 2nd ch from hook and across. (8)
- Rows 2–24: ch 1, turn, sc across. (8)
Knot (make 1):
- ch 9. Row 1: sc in 2nd ch from hook and across. (8)
- Rows 2–6: ch 1, turn, sc across. (8)
Trim: With gold, sc evenly around the outer edge of each loop, tail, and knot, using about 1 sc per stitch or row. Seam short ends of the knot into a ring.
🎀 Top Bow (Make 1, Cherry Red)
Same construction as the Large Bow, with these changes:
- Loops (make 2): ch 21, Row 1: sc in 2nd ch and across (20), Rows 2–6: sc across (20). Seam into a ring.
- Tails (make 2): ch 7, Row 1: sc across (6), Rows 2–16: sc across (6).
- Knot (make 1): ch 7, Row 1: sc across (6), Rows 2–4: sc across (6).
- Trim in gold as above.
🎨 Styling / Assembly / Stability / Final Shaping
Recommended Assembly Order
- Weave in all ends on the lace panel and border.
- Block the runner flat and let it dry fully.
- Mark stocking positions with pins: 11 per side, about 3½ in (9 cm) apart, starting about 2½ in (6 cm) from each end.
- Sew each stocking by the back of the leg to the red border, toes pointing outward and slightly toward the bottom end.
- Sew a mini bow at the top of each stocking, over the cuff.
- Between each pair of stockings, sew 2 holly leaves in a V, 2 berries at the base, and 2 gold beads beside the berries.
- Assemble the large bow: layer the tails under the loops, wrap the knot around the center, and sew through all layers. Sew to the bottom end of the runner.
- Assemble the top bow and sew it to the top end.
- Sew blossoms near the large bow, then add their beads.
Stability
The runner lies flat, so no structural inserts are needed. Make sure appliqués are sewn down in at least two places, especially the stockings and bows, so they don’t flip when you move the runner.
Final Shaping Checklist
- ✅ Lace panel blocked straight and the same width at both ends
- ✅ Stockings evenly spaced and facing the same direction on each side
- ✅ Snowflakes centered and all arms the same length
- ✅ Mini bows level and secure
- ✅ Holly clusters not overlapping the stockings
- ✅ Beads sewn firmly with doubled thread
- ✅ Large bow symmetrical, tails lying flat
- ✅ All ends woven in
💡 Helpful Crochet Tips
- 💡 Mark Row 1 of the lace with a stitch marker so you can tell the sc-shell and dc-shell rows apart at a glance.
- 💡 Count the 37 stitches every five repeat pairs. A dropped shell is easiest to fix early.
- 💡 Make stockings in batches of five or six so your tension stays consistent.
- 💡 Wind off small balls of red, cream, and green before starting the appliqués, so you aren’t stopping to rewind.
- 💡 Pin every appliqué before sewing. Lay the whole runner out and photograph it, so you can check symmetry.
- 💡 Sew beads with doubled thread and knot twice. They are the first thing to come loose.
- 💡 If the gold trim is too thin to stitch neatly, hold it double or use a smaller hook.
- 💡 A light spritz of fabric stiffener on the bows will help them keep their shape.
- 💡 Block the border corners carefully. They show the most when the runner is on a table.
🧼 Care Instructions
- Hand wash in cool water with a mild soap, gently squeezing rather than wringing.
- Wash the red separately the first time. Red cotton can bleed onto cream.
- Reshape and dry flat, away from direct sunlight, which can fade the red and dull the gold.
- Remove beads before washing if possible, or spot-clean around them.
- Store flat or loosely rolled in acid-free tissue.
- Keep away from candle flames. Cotton is flammable.
🎄 Closing
There’s a particular pleasure in setting a table with something you made stitch by stitch. This runner turns an ordinary dinner into something that feels like the holidays, and it will come out every December for years. Make it in the traditional red and cream, or try green and gold, ivory and silver, or navy and white. Whatever palette you choose, the pattern holds.
If you make one, I’d love to see it. Share it with your friends and family, or send it to someone who would treasure it.
📌 Post-Article Engagement & Distribution
Share the Love: If you enjoyed this pattern, save it to Pinterest, share it with a crafty friend, and tag us when you post your finished runner.
Suggested categories: Christmas Crochet · Home Décor · Crochet Patterns · Free Patterns
Suggested tags: crochet table runner, Christmas crochet, Christmas stocking crochet, holly crochet, lace table runner, crochet Christmas décor, holiday crochet pattern, crochet appliqué, red and cream crochet, free crochet pattern, crochet gift idea, mini stocking crochet
Comment invitation: Which color palette would you choose for your runner, and would you keep the stockings or swap them for another ornament shape?
You Might Also Like:
- Crochet Christmas Tree Coaster Set
- Lace Snowflake Table Mat Pattern
- Crochet Holly Wreath Napkin Rings
- Mini Stocking Garland Crochet Pattern
- Crochet Poinsettia Placemats
❓ FAQ
How long does this Christmas table runner take to crochet?
Plan on about 25–35 hours. The lace panel takes roughly 10–12 hours and the border about 2 hours. The 22 stockings, bows, holly, and berries are the bulk of the remaining time.
Can I use a different yarn weight?
Yes, but the size and yardage change. Worsted weight with a 4.0 mm hook will make a wider, heavier runner. Fingering weight with a 2.5 mm hook will make a finer, smaller one.
What hook size should I use?
A 3.5 mm (E/4) hook for DK cotton. Go down a size if your shells look loose, or up if they pucker.
How do I make the runner longer or shorter?
Add or remove repeat pairs of Rows 2–3. Each pair adds about ¾ in (2 cm) once blocked. Adjust the number of stockings to match.
Is it safe around children?
It is a décor piece, not a toy. Beads and berries are choking hazards, so keep it out of reach of small children.
Do I have to use beads?
No. You can embroider small French knots in gold thread instead, which makes the runner safer and washable.