Crochet Spiral Christmas Tree Ornaments — Free Amigurumi-Style Pattern
Amigurumi Pattern · Holiday Décor · Beginner-Friendly
📖 Introduction
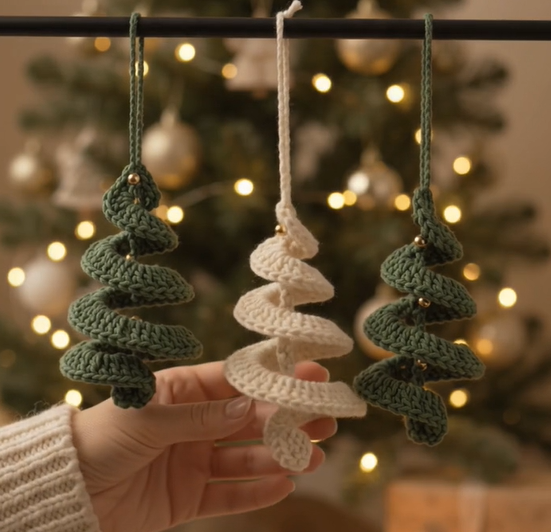
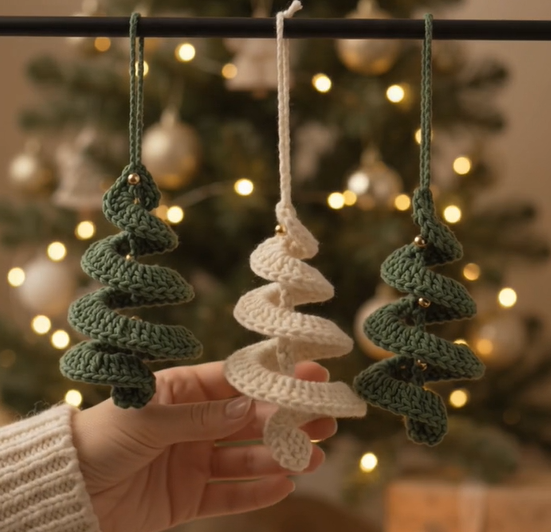
These crochet spiral Christmas tree ornaments coil upward like a miniature evergreen straight off the hook, no stuffing, no sewing dozens of pieces together, no wire armature required. A single strip of ruffled half double crochet twists itself into a cone the moment you pin the fasten-off tail through the center, and a single gold bead at the tip finishes the silhouette in seconds.
They earn a permanent spot on the tree (or the gift tag, or the napkin ring) because they solve the two things that make most holiday amigurumi a chore: they’re fast — a single tree spirals up in under twenty minutes once you’ve made your first one — and they’re forgiving, since the finished shape hides minor tension inconsistencies inside its natural ruffle. That combination makes them genuinely good for batch-making: a dozen trees for a garland, a set of six for a hostess gift, or a full box for a craft-fair table, all from the scraps left in your stash after bigger projects.
Made up in forest green cotton against a cream tree skirt, they read as a modern farmhouse Christmas; swap in white cotton with a single strand held together with metallic thread and they become bottle-brush-style trees for a Scandinavian palette instead. The spiral itself is the design’s signature: worked as a continuous rambling strip rather than a shaped cone, each ring naturally ruffles rather than lying flat, so the edge waves in and out the way real fir branches do — a detail a straight, un-ruffled crochet cone can’t replicate. A single gold seed bead anchors the very top like a star, and a few more tacked at random points along the spiral catch the light the way fairy lights do in a real tree.
Personalize freely: work the whole tree in a single color for a minimalist look, alternate two colors every few rounds for a candy-cane spiral, size up to a bulkier yarn and a 5mm hook for a tabletop tree instead of an ornament, or skip the beads entirely for a rustic, all-natural finish. The pattern below covers the standard 8cm/3in ornament size along with the size math you’ll need to scale it up or down.
Affiliate disclosure: This post may contain affiliate links. If you make a purchase through one of these links, we may earn a small commission at no extra cost to you.
<!– AD SLOT: post-introduction –>
🔍 C. Main Pattern Overview
This pattern builds one spiral tree from a single continuous strip of half double crochet, worked in joined rounds around a magic ring. Instead of the usual amigurumi increase sequence (which keeps a circle flat), this pattern increases faster than a flat circle requires, which forces the strip to ruffle. Once the strip is complete, you coil it by hand from the center outward into a cone, tack the layers together as you go with the working tail, and finish with a hanging loop and a bead “star” at the top.
📌 Save this pattern: Pin it now or subscribe below to get the printable PDF sent to your inbox.
🎯 D. Skill Level
Beginner-friendly.
The stitch vocabulary is limited to single crochet, half double crochet, and the increase — there’s no shaping decrease anywhere in the pattern, which removes the step most new amigurumi crocheters find fiddly. The only techniques a first-timer needs to practice are:
- Working in a continuous joined round (rather than a spiral round, since a visible ruffle needs a defined round edge to look intentional)
- A standard increase (2 sc/2 hdc in the same stitch)
- Coiling and tacking a flat piece into a 3-D shape with a yarn needle
- Attaching a bead with a sewing needle and thread (optional embellishment only)
📏 E. Finished Size
Standard ornament: approximately 8cm tall x 4cm wide at the base (3in x 1.5in), using DK-weight cotton and a 3.0mm (US D/3) hook.
What changes the finished size:
- Yarn weight is the biggest lever — a bulky yarn with a 5.0–5.5mm hook produces a tabletop tree closer to 15–18cm tall from the same round count.
- Hook size relative to yarn weight — sizing down (tighter stitches) produces a denser, smaller ruffle; sizing up produces a looser, floppier spiral that needs more tacking to hold its shape.
- Number of rounds worked — every 2 additional rounds add roughly 1.5cm of height.
- Coil tightness — a tightly wound coil looks shorter and denser; a loosely wound coil (more visible ruffle per layer) looks taller and airier for the same strip length.
🧮 F. Gauge
Gauge is not critical for this project. What matters is tight, even tension — a snug fabric holds its shape as a self-supporting cone without stuffing or wire, while loose stitches leave the tree floppy and prone to unraveling its coil. As a reference point only: 10 hdc x 8 rows = approximately 6cm x 6cm in DK cotton on a 3.0mm hook, worked tightly.
🧶 G. Required Yarn Amounts
Per ornament (approximate — cotton yarn, DK weight):
| Color | Amount |
|---|---|
| 🧵 Main color (forest green or cream) | ~4g / approx. 9m |
| 🧵 Hanging loop (same or contrasting color) | negligible, under 0.5m |
| Gold seed beads (optional) | 5–8 beads per ornament |
Total project estimate for a set of 6 mixed ornaments: approximately 25g of DK cotton, split across your chosen colors, plus 30–50 gold seed beads if embellishing.
🧰 H. Materials
- 3.0mm (US D/3) crochet hook — sized down slightly from the yarn’s ball-band recommendation, for a dense, self-supporting fabric
- DK-weight cotton yarn in forest green and/or cream (light worsted also works; adjust hook accordingly)
- Gold seed beads or small metallic beads, optional embellishment
- Sewing needle and matching or invisible thread, for bead attachment
- Yarn needle, for weaving in ends and tacking the coil
- Scissors
- Stitch marker, to track the start of each round
- A short length of cotton twine, embroidery floss, or crochet chain for the hanging loop
⚠️ Safety note: the gold seed beads and small hanging loop are choking hazards for young children and pets. Omit the beads, or secure them with jewelry glue in addition to stitching, for any ornament that will be within reach of small hands or curious mouths.
🛍️ Supplies we recommend: a size D/3 (3.0mm) crochet hook, a mid-weight 100% cotton yarn, a package of small gold glass seed beads, and a yarn needle set — see the linked supplies for our go-to picks. <!– AD SLOT: post-materials –>
🔤 I. Abbreviations — US Terms
| Abbreviation | Meaning |
|---|---|
| MR | Magic ring |
| ch | Chain |
| sc | Single crochet |
| hdc | Half double crochet |
| inc | Increase (2 stitches in the same stitch) |
| sl st | Slip stitch |
| rnd(s) | Round(s) |
| st(s) | Stitch(es) |
| ( ) | Stitch count at end of round |
📝 J. Notes Before You Begin
- 📌 Save this for later: pin this page or bookmark it before you start — you’ll want to reference the round-by-round counts as you go.
- Work in joined rounds, not continuous spiral rounds: sl st to close each round and ch 1 (does not count as a stitch) before starting the next. The visible “seam” this creates is intentional — it’s what gives the finished ruffle a defined edge instead of a smeared one.
- Use a stitch marker in the first stitch of each round if you find the join hard to spot in a ruffled fabric; the join will start to hide itself as the piece grows.
- This pattern deliberately increases every stitch, every round — this is not a typo, and it’s what forces the ruffle. A standard flat-circle increase rate (adding 6 sts per round) will not produce this effect.
- Leave a long tail (at least 40cm/16in) when you fasten off — you’ll use it entirely for coiling and tacking the spiral into its cone shape, not just for weaving in.
- No stuffing is used in this pattern. The coiled layers of fabric give the ornament its structure.
🪡 K. Complete Pattern
🔔 The Spiral Strip (make 1 per ornament)
What it’s for: the entire visible tree — this single ruffled strip becomes the whole cone once coiled. Yarn/color: main color throughout, or alternate every 2 rounds for a striped spiral. Quantity: 1 per ornament. Starting point: magic ring.
Rnd 1: MR 6, ch 1, sl st to close. (6)
Rnd 2: inc in each st around, ch 1, sl st to close. (12)
Rnd 3: inc in each st around, ch 1, sl st to close. (24)
Rnd 4: inc in each st around, ch 1, sl st to close. (48)
Rnd 5: (sc, inc) around, ch 1, sl st to close. (72)
Rnd 6: switch to hdc. (hdc, inc) around, ch 1, sl st to close. (108)
Rnd 7: (hdc, hdc, inc) around, ch 1, sl st to close. (144)
🧵 Color-change note: if striping, change color on the sl st join of the round before the new color is needed, carrying the unused color loosely up the inside of the coil rather than cutting it each time.
Fasten off, leaving a 40cm/16in tail.
✅ Stitch-count check: by round 7 your circle should be visibly refusing to lie flat — the edge should ripple and cup rather than sit as a disc. If it’s still lying flat, your increases fell behind the count above; a flat piece will not coil into a cone in the next step.
🌲 Coiling the Tree (per ornament)
What it’s for: turning the flat ruffled strip into the 3-D tree shape. Yarn/color: uses the working tail only — no new yarn. Starting point: the center of the spiral strip (Rnd 1).
- Thread the long tail onto your yarn needle.
- Holding the center (Rnd 1) upright between your fingers like the tip of a cone, gently roll the ruffled edge of Rnd 2 around it, letting the natural cupping shape pull it into a slight spiral rather than forcing it flat.
- Continue rolling each successive round loosely around the growing cone, letting the ruffle at the outer edge of each round sit slightly proud of the round beneath it — this is what creates the “branch” layers.
- As you roll, take 2–3 small tacking stitches with the threaded tail through the layer beneath, working from the tip downward, to hold the coil’s angle in place. Don’t pull tight enough to flatten the ruffle.
- At the base (the outer edge of Rnd 7), take a final few tacking stitches to secure the last layer flush against the layer above it, then weave the tail through the base a few times and trim.
💡 Pro tip: coil loosely on your first attempt and only tighten the tacking stitches once you’re happy with the silhouette — an over-tightened coil looks like a cone instead of a tree, while a loose one shows the individual ruffled “branches.”
🔔 Hanging Loop (make 1 per ornament)
What it’s for: attaching the ornament to a tree branch, garland, or gift. Yarn/color: main color, or contrasting thread for a visible loop. Starting point: worked directly into the tip of the coiled cone.
With the tip of the cone facing up, join yarn at the very center point.
Ch 8, sl st into the same starting point to form a loop.
Fasten off, weave in end.
💐 Bead Embellishment (optional, per ornament)
What it’s for: the gold-light detail scattered across the tree and the “star” bead at the top. Quantity: 1 bead at the tip, 4–7 beads scattered along the spiral.
- Using a sewing needle and thread (not the working yarn — sewing thread sits more invisibly), tack a single gold seed bead directly at the very tip of the cone, through the base of the hanging loop, so it reads as a star.
- Scatter 4–7 more beads at irregular intervals down the spiral, stitching through a single strand of the crocheted fabric at each point so the bead sits on the surface rather than sinking between stitches.
- Knot off invisibly on the inside of the coil after each bead or after the full set, whichever keeps your thread from tangling.
⚠️ Safety note: skip this component entirely for ornaments made for young children — see the safety note in Materials.
🎨 L. Styling / Assembly / Stability / Final Shaping
Styling notes: the finished tree should stand with a slight outward flare at the base and a visibly tapering ruffle toward the tip — resist the urge to tack every layer flush against the one below it, since that flattens the silhouette into a smooth cone rather than a textured tree.
Assembly order (per ornament):
- Crochet the full spiral strip (Rounds 1–7).
- Coil and tack the strip into a cone, tip to base.
- Attach the hanging loop at the tip.
- Add the tip “star” bead and scatter the remaining beads.
- Weave in all remaining ends.
Stability/structure: because there’s no stuffing or wire, stability comes entirely from tension and the tacking stitches. If your finished tree feels floppy at the base, add 2–3 extra tacking stitches around the inside of the last round, anchoring it to the round above, without pulling the ruffle flat.
Symmetry check: stand the finished tree tip-down against a flat surface — the base should sit level, and the ruffled edges should radiate outward at roughly even intervals. Adjust individual tacking stitches if one side leans.
✅ Final Shaping / Finishing Checklist
- ✅ Spiral strip lies unforced into a cupped, ruffled shape (not flat) before coiling
- ✅ Coil tacked from tip to base with no large gaps between layers
- ✅ Base sits flush and the tree stands upright unsupported
- ✅ Hanging loop attached securely at the tip and tested with a gentle tug
- ✅ Tip “star” bead (if used) sits centered at the very point of the cone
- ✅ Scattered beads (if used) distributed unevenly, not in a visible grid pattern
- ✅ All yarn tails woven in and trimmed close
- ✅ Overall silhouette tapers from wide base to narrow tip
💡 Helpful Crochet Tips
- 💡 Work this pattern in cotton rather than acrylic if you can — cotton holds a shaped coil better and doesn’t relax back toward flat overnight the way some acrylics do.
- 💡 Size your hook down from the yarn label’s recommendation, not up — a looser gauge here means a floppier tree, the opposite of most amigurumi advice.
- 💡 If your strip won’t ruffle by Round 5, check that you increased every stitch in Rounds 2–4 — a single missed increase early on is enough to flatten the whole later effect.
- 💡 Coil while the fabric is still slightly warm from your hands — cotton holds a curl better fresh off the hook than after it’s been left to sit flat.
- 💡 Keep your tacking stitches on the inside of the coil only; a visible tacking stitch on the outer ruffle reads as a mistake rather than a design detail.
- 💡 Make your first tree in a light, high-contrast color so you can clearly see whether each round is ruffling correctly before committing to a full set in your final color.
- 💡 If gifting a set, vary the coil tightness slightly between trees — a uniform forest of identical cones reads as mass-produced, while slight natural variation reads as handmade.
- 💡 Steam-block (hover a steam iron just above the surface, never touching) a stubborn floppy tree for a few seconds and let it cool in position — this helps cotton hold its coiled shape permanently.
🧼 Care Instructions
Spot-clean only — because the shape relies on tacking stitches rather than stuffing, submerging the ornament risks loosening the coil as the fabric relaxes when wet. Wipe gently with a barely damp cloth and reshape by hand immediately, then let it air-dry fully before hanging. Store trees upright in a shallow box (not stacked or squashed) to protect the coil’s shape between seasons, and keep dark green and cream ornaments separated with tissue if storing long-term, since damp storage conditions can occasionally transfer color between dark and light cotton yarns. Keep away from direct sunlight for extended periods to prevent the forest green from fading unevenly compared to pieces stored in shade.
Closing
However many of these you make, the pile on your table will look nothing like a factory batch — every coil takes on its own lean and ruffle, which is exactly what makes a handful of them look right piled in a bowl or strung along a mantel garland. Swap the palette for your own tree’s colors, size the yarn up for a tabletop centerpiece, or leave the beads off entirely for a quieter, all-cotton finish. However you make them, they’re sturdy enough to survive a few Christmases in the ornament box and small enough to tuck into a card as a handmade gift topper. Make a set, and don’t be surprised if they’re the first ones your family reaches for when the tree comes down.
Share the Love
Made a set of these? Snap a photo of your finished trees and tag us — we’d love to see your color combinations and add them to our reader gallery.
Suggested categories: Amigurumi Patterns, Holiday Crochet, Home Décor Crochet, Beginner Patterns
Suggested tags: crochet christmas ornament, amigurumi christmas tree, spiral crochet pattern, free crochet ornament pattern, crochet holiday decor, no-stuffing amigurumi, cotton yarn crochet, mini crochet tree, crochet gift topper, beginner amigurumi pattern, crochet garland, farmhouse christmas crochet
Join the conversation: Which color combination are you making first — classic forest green, all-cream for a Scandinavian tree, or a two-tone stripe?
You might also like:
- Crochet Mini Pinecone Garland
- Crochet Star Tree Topper Ornament
- Crochet Candy Cane Stripe Ornaments
- Crochet Holly Berry Wreath Ornament
- Crochet Snowflake Coasters
Printable version: a print-friendly, ad-free PDF of this pattern can be made available through your site’s print plugin. <!– AD SLOT: pre-faq –>
❓ FAQ
Can I make these without a hook smaller than the yarn label suggests? Yes, but the finished tree will be looser and floppier and may need more tacking stitches to hold its coiled shape. A smaller hook produces a denser fabric that holds a self-supporting cone with less reinforcement.
What yarn weight works best for this pattern? DK-weight cotton with a 3.0mm hook gives the 8cm ornament shown here. Worsted-weight cotton with a 3.5–4.0mm hook produces a slightly larger tree; bulky yarn with a 5.0–5.5mm hook scales it up to a tabletop-sized tree.
Do I need to stuff the tree? No. The coiled, tacked layers of the ruffled strip give the ornament its shape and structure — no fiberfill is used anywhere in this pattern.
Why isn’t my strip ruffling like the photos? The most common cause is a missed increase in Rounds 2–4. This pattern increases every stitch every round, which is a much faster rate than a standard flat amigurumi circle — if even one increase is skipped early on, the piece will lie closer to flat instead of cupping.
Are the gold beads safe for a tree a toddler or pet can reach? No — treat the seed beads and the hanging loop as choking hazards. Skip the beads and use a secure, shortened loop for any ornament within reach of young children or pets.
Can I use acrylic yarn instead of cotton? Yes, though the coil may relax slightly over time since acrylic doesn’t hold a shaped curl quite as firmly as cotton. Steam-blocking after coiling helps it hold its shape longer.
How long does one ornament take to make? Once you’ve made your first one and understand the ruffle, expect about 15–20 minutes for the strip and another 5–10 minutes to coil, tack, and embellish it.
Can I make a matching garland instead of individual ornaments? Yes — work several spiral strips, coil each into its tree shape, then join them along a length of twine or crochet chain through their hanging loops instead of hanging each one individually.